Blog
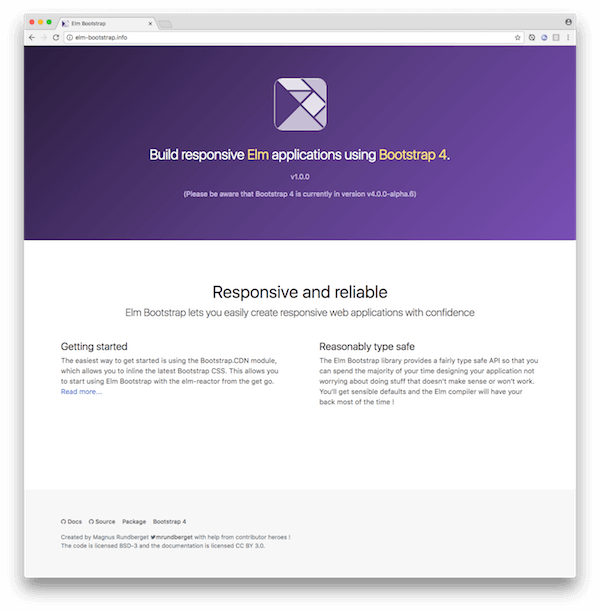
Introducing Elm Bootstrap
01 March 2017
TweetToday I’m happy that I can finally announce version 1.0.0 of Elm Bootstrap. When I set out to develop Elm Bootstrap, my goal was to make an Elm package that makes it easy to build responsive and reliable web applications in Elm using Twitter Bootstrap. This version is the first step towards that goal.
What is it then ?
Elm Bootstrap is a fairly comprehensive library package that wraps the upcoming Twitter Bootstrap 4 CSS framework. It provides a range of modules and functions to make it pleasant and reasonably typesafe to create a Bootstrap styled web application in Elm without giving up too much on flexibility. Most of Twitter Bootstrap is opt-in and the same applies to Elm Bootstrap. That means that you can pick and choose which parts you wish to use for your application.
| You will find modules in Elm Bootstrap that corresponds to most of what Twitter Bootstrap refers to as components. There are no such thing as components in Elm, there are only functions, and functions can be grouped into modules When I speak about modules you know I’m talking about Elm and when you see components mentioned you know it’s about Twitter Bootstrap. |
These are the main modules that ship with version 1.0.0
-
Layout related
-
Grid - Provides functions to easily create flexbox based responsive grid (rows, columns) layouts.
-
Text - Helper functions for working with text alignment
-
-
Forms
-
Form, Input, Select, Checkbox, Radio, Textarea and Fieldset - These modules provides functions to create nice Bootstrap styled forms with a lot of flexibility
-
-
Interactive elements
-
Tab, Accordion, Modal, Dropdown and Navbar are modules that provide functions to work with interative elements. In Twitter Bootstrap, the corresponding components are backed by JavaScript in Elm Bootstrap it’s all Elm of course.
-
-
Misc
-
Alert, Badge, Button, Card, Listgroup and Progress provide you functions to create elements that correspond to their Twitter Bootstrap counterpart.
-
Example of using the Elm Bootstrap Tab module to create an interactive tab control.
Documentation/help
The most comprehensive (and only) application using Elm Bootstrap at the time of writing this is the user documention site http://elm-bootstrap.info. You can find the source for the site application on github too. In time this will improve a lot. With the introduction of Ellie we now also have a great way to share interactive/editable examples of how to use Elm Bootstrap.
If you need help, there is a #elm-bootstrap channel on the Elm slack where you can ask for help. I’ll try to help when I can and hopefully others can help out there going forward too.
Built on top of Twitter Bootstrap version 4
Twitter Bootstrap is one of the most popular CSS (with some JS) frameworks for building responsive, mobile first web sites. At the time of writing version 4 is in alpha-6 and apparantly the plan is to move into beta fairly soon. Version 4 is fully embracing flexbox, which will provide much better control and flexibility.
Creating a wrapper for Twitter Bootstrap probably doesn’t score very high on the hipster scale. However it’s no denying it’s still very popular and probably will be for some time to come. More importantly I’m using it in projects and have done so several times in the past, so I know it would be useful to me when I get a chance to work on an Elm project. Hopefully others will find Elm Bootstrap useful too.
Reasonably type safe you say ?
What’s reasonable is obviously a matter of opinion. But since it’s an Elm package we’re talking about, the context is that it’s for use in a statically typed language that promotes reliability as a core characteristic. There is also no denying that Elm doesn’t have the most advanced type system out there. But in my humble opinion it’s one of the most approachble ones I’ve come across in terms of statically typed functional languages.
There’s no stopping you from just including the CSS from Bootstrap and start using it with the standard Elm Html functions today. Let’s face it, Twitter Bootstrap is mostly just a whole bunch of classes you apply to relevant elements you compose and voila. But applying a bunch of class strings is quite error prone, and it’s easy to nest elements incorrectly or apply incorrect classes to incorrect elements. Trying to alleviate that to some extent is what I’ve been trying to balance with necessary flexibility when defining the API for Elm Bootstrap.
I’m under no illusions that I’ve found the sweetspot that perfectly balances type safety, flexibility and usability. But given the constraints (the type system in Elm and my relatively short experience with statically typed functional languages), I’m reasonably happy with the API as a starting point. Real life use and feedback will surely help it develop in a direction where more and more people can agree that it really is reasonably type safe !
The development story - aka refactoring galore
For quite some time my main endevaours in Elm has been developing editor support for Elm in Light Table through my elm-light plugin. I’ve also been working blogging a bit on my journey learning Elm (and a little Haskell). But in November last year I decided I wanted to dive deeper into Elm, trying to make something substantial. Ideally something useful, but first and foremost something that would gain me experience in designing an API for use by others in Elm.
The Bootstrap wrapper idea has crossed my mind several times in the past, but never materialized. I did some research, but couldn’t find anything out there for Elm that was quite as ambitious as I had in mind.
Where to start ?
I first started looking at the very impressive elm-mdl which brings awesome Google Material Design support to Elm. I got a ton of inspiration from this library. Next up I had a look through elm-sortable-table, trying to pick up on good advice and experience for tackling the interactive components in Twitter Bootstrap.
Hmm okay, let’s just start and see where it leads me.
Think, code, refactor ad infinitum
So I started with a couple of modules using a record based api for everthing. That gave me an API that was pretty type safe and certainly explicit. But it looked horribly verbose where in many cases it didn’t provide enough value and even in some cases put way to many restrictions on what you could do. DOH. Back to the drawing board.
I know ! Let’s have 3 list arguments for everything; Options (exposed union types), attributes and children. So I refactored almost everything (silly I know), but it didn’t really feel right with all those lists and I also started to get concerned that users would find it confusing with the std Elm Html functions taking 2 lists. Time to think and refactor again. After that I started to run into cases where I wanted to compose stuff from several modules, well because stuff is related.
I’ll spare you all the details, but I can’t remember ever having refactored so much code so frequently that I have been during this process. Doing this in Elm has been an absolute pleasure. Truly fearless refactoring. The kind that is really hard to explain to other peope who haven’t experienced it. The Elm compiler and I have become the best of buddies during evenings and nights the past few months.
I can’t remember ever having refactored so much code so frequently that I have been during this process.
— Magnus Rundberget
Two list arguments
For most elements functions take two list arguments. The first argument is a list of options, the second is a list of child elements. You create options by calling functions defined in the relevant module.
Pipeline friendly composition
Composition of more complex elements is done by calling pipeline friendly functions. This design gives a nice balance between type safety and flexibility.
Reaching out to the Elm Community
In the middle/end of January I reached a point where I on one hand was ready to just ship something. At the same time I was really unsure about what I had created so I reached out for comments on the elm-slack. Turns out that both Mike Onslow and Richard Feldman both have had overlapping ideas about creating a Bootstrap package for Elm. We quickly decided to see if we could cooperate in some fashion and decided to hook up on Google Hangout. Awesome ! We’ve had many really interesting discussions on slack especially related to API design. It’s been really great to have someone to talk to about these things (other than my analysis paralysis brain).
Going forward
I could have been iterating forever trying to nail the best possible API and/or try to support every bit of Twitter Bootstrap, but I’ve decided it’s better to just get it out there and get feedback.
The API will certainly get breaking changes going forward, but I don’t see that as such a big negative given the semantic versioning guarantees and version diffing support provided by the Elm package manager.
I’m hoping folks find this interesting and useful enough to give it a try and give feedback on their experiences. In the mean time I’m going to work on improving the documentation, test support, API consistency and support for missing Twitter Bootstrap features.
Typed up CRUD SPA with Haskell and Elm - Part 6: Elm 0.18 Upgrade
21 November 2016
Tags: haskell elm haskellelmspa
TweetAnother Elm release and it’s time for yet another upgrade post. The changes outlined in the migration guide didn’t look to intimidating, so I jumped into it with pretty high confidence. It took me about 2 hours to get through and it was almost an instant success. The compiler had my back all along, helped by my editor showing errors inline and docs/signatures whenever I was in doubt. I didn’t even have to resort to google once to figure out what to do. I said it almost worked the first time. Well I had managed to add a http header twice which Servant wasn’t to impressed by, but once that was fixed everything was working hunky dory !
Introduction
The Albums app is about 1400 lines of Elm code, so it’s small, but still it might give you some pointers to the effort involved when upgrading. With this upgrade I tried to be semi-structured in my commits so I’ll be referring to them as we go along.
Upgrade steps
Preconditions
-
Install Elm 0.18
-
Install elm-format
Running elm-upgrade
For this release @avh4 and @eeue56 created the very handy elm-upgrade util to ease the upgrade process.
To summarize what elm-upgrade does; It upgrades your project definition (elm-package.json) and it runs elm-format on your code in "upgrade mode" so that most of the syntax changes in core is fixed.
|
It worked great ! Only snag I had was that it failed to upgrade elm-community/json-extra, but hey that was simple enough for me to do afterwords. Here you can see the resulting diff. |
Service API - Http and Json changes
Changing a simple get request
| 0.18 | 0.17 | ||||||
|---|---|---|---|---|---|---|---|
|
|
| If you wish to keep the old behavior, you can convert a request to a task using toTask |
Changing a post request
| 0.18 | 0.17 | ||
|---|---|---|---|
|
|
Changing a put request
| 0.18 | 0.17 | ||||||
|---|---|---|---|---|---|---|---|
|
|
Changing Json Decoding
| 0.18 | 0.17 | ||||
|---|---|---|---|---|---|
|
|
| You can view the complete diff for the Service Api here. (Please note that the headers for the put request should not be there, fixed in another commit) |
Handling the Service API changes
We’ll use the artist listing page as an example for handling the api changes. The big change is really that the messages have changed signature and we can remove a few.
Msg type changes
| 0.18 | 0.17 | ||
|---|---|---|---|
|
|
Changes to the update function
| 0.18 | 0.17 | ||||
|---|---|---|---|---|---|
|
|
|
The diffs for the various pages can be found here: |
Handling changes to url-parser
The url-parser package has had a few changes. Let’s have a closer look
| 0.18 | 0.17 | ||||||
|---|---|---|---|---|---|---|---|
|
|
Handling changes to Navigation in Main
Changing the main function
| 0.18 | 0.17 | ||||||
|---|---|---|---|---|---|---|---|
|
|
Changing the init function
| 0.18 | 0.17 |
|---|---|
We get the initial url passed as a Location to the init function. We just delegate to the update function to handle the url to load the appropriate page. |
|
Changing the main update function
| 0.18 | 0.17 | ||||||||||
|---|---|---|---|---|---|---|---|---|---|---|---|
|
|
| You can see the complete diff here |
Summary
Obviosuly there were quite a few changes, but none of the were really that big and to my mind all of the changed things for the better. Using elm-upgrade and the upgrade feature in elm-format really helped kick-start the conversion, I have great hopes for this getting even better in the future.
I haven’t covered the re-introduction of the debugger in elm-reactor, which was the big new feature in Elm 0.18.
In addition to Elm 0.18 being a nice incremental improvement, it has been great to see that the community has really worked hard to upgrade packages and helping out making the upgrade as smooth as possible. Great stuff !
| A little mind-you that even though this simple app was easy to upgrade that might not be the case for you. But stories I’ve heard so far has a similar ring to them. I guess the biggest hurdle for upgrading is dependending on lot’s of third-party packages that might take some time before being upgraded to 0.18. Some patience might be needed. |
Elm Light 0.4.0 - AST driven Elm features in Light Table using PEG.js
15 September 2016
Tags: elm clojurescript javascript pegjs lighttable
TweetVersion 0.4.0 marks the first version of Elm Light that uses ASTs to enable more advanced IDE like features. This version includes features like; find usages, jump to definition, context aware auto-completer and some simple refactorings. It’s early days, but I’m in no doubt it will enable some pretty cool features going forward.
Evan Czaplicki the author of Elm has told the community on several occations not to block on something not being available from Elm. I’ll have to admit that I’ve been hoping for more tooling hooks from Elm for quite some time, an offical AST coupled with the Elm compiler would be super sweet. It’s definitely on the roadmap, but not a high priority for Elm (right now). My best bet would be to wait for the AST work put into elm-format to be made available. That might actually not be to far off. But several weeks ago I decided I wanted to give it a shot to do something simplified on my own. Mainly as a learning experience, but also to gather data for use cases that an AST can support and to learn a bit about parsing.
You’ll find a demo of the new features added in version 0.4.0 below. The rest of this post gives a brief description of my journey to create a parser and how I integrated that into the plugin.
| You can find the elm-light plugin here |
Demo of 0.4.0 Features
Other relevant demos:
Creating a parser
Researching
It actually started a while back when I bought a book about parsers. It was almost 1000 pages. It turned out to be very uninspiring bed time reading. I guess I wasn’t motivated enough.
My only other experience with parsing since my University days was the stuff I did when porting rewrite-clj to ClojureScript. That ended up becoming rewrite-cljs, which I’ve used for some othere Light Table plugins I’ve created. But the syntax of Clojure is comparatively simple and also I did a port, so I can’t really claim any credits for the actual parsing anyways.
In the Clojure world I’ve used InstaParse which is a really neat library to build parsers. It also has a ClojureScript port, which I though would be good fit for Light Table. I found an old BNF for Elm called elm-spoofax, so I thought. Let’s give it a go. I spent a good week or so to get something that seemed to parse most Elm files I threw at it and provided a tree of nodes which looked fairly decent to work with. However I hadn’t read the README for the CLJs port that will and hadn’t really reflected on what an order of magnitude slower that it’s Clojure big brother actually meant. With a couple of hundred lines I started seeing parse-times nearing a second. I’m sure it could be optimized and tuned somewhat, but it was way off the mark of what I was going to need for continuos as you type parsing.
Back to the drawing board. I started looking at a ton of alternatives. Parser generators and parser combinators etc etc.
Enter PEG.js
After trying out a few parser generators I came across PEG.js. It looked approachable enough to me and they even had a nice online tool. So I set out on my way and decided to keep it simple. Just parse top level definitions. Spent a few days to get an initial version up and running. It was time to give it a performance test. YAY, for most files I got < 10ms parse times for some quite big ones (thousands of lines) I started seeing 100ms parse times. It still seemed worth pursuing. So I did !
| PEG.js is a simple parser generator. It supports a syntax that is BNF like, but you can smatter it with some JavaScript when appropriate. It also has nice error reporting and a few other nifty features. |
module                                           (1)
  = declaration:moduledeclaration EOS
    LAYOUT
    imports:imports?
    LAYOUT
    toplevel:topLevelDeclarations?
    LAYOUT
    {
      return {
      	moduledeclaration: declaration,
        imports: imports,
        declarations: toplevel
      }
    }

moduledeclaration                               (2)
  = type:(type:("effect" / "port") __ { return type; })? "module" __ name:upperIds __ exposing:exposing
    {
      return {
        type: (type||"" + " module").trim(),
        name: name,
        exposing: exposing
      };
    }

// .. etc| 1 | The top level rule. It sort of looks like BNF, but you’ll also notice some JavaScript |
| 2 | The rule for parsing the module declaration, which again uses other rules, which again … |
I basically used a process of looking at this old Elm BNF as inspiration and then adjusting along the way. The PEG.js online tool was really helpful during this work.
|
Why a JavaScript parser generator ?
Well Light Table is based on Electron. So it’s basically a node server with a browser client build in. Having a parser that plays seemlessly with the basic building blocks of the browser is both convenient and practical in terms of distribution. I can just require the parser as a node module and off we go. The second reason is that for example my Haskell foo is not up to scratch. I would love to do it in Elm but current Elm combinator libraries just doesn’t provide enough building blocks for me to see this as a competive or realistic alternative quite yet. |
Designing for As You Type Parsing (AYTP ?)
The general idea I had was to design with the following in mind - Parsing everything (including 3.rd party packages) when connecting, is a bearable price to pay to ensure everything is hunky dory and good to go once you are connected - The design should support file changes not only from actions in the editor, but also from any outside process - Things generally have to be asynchronous to ensure the Editor stays responsive at all times - Only introduce (persistent) caching if there is no way around it
Listening for changes
To support parsing whenever a file changes or whenever you install or remove a package in your Elm projects I opted for using Chokidar. Elmjutsu - an excellent Elm plugin for Atom provided me with the inspiration here.
Each Elm project in Light Table will get it’s own node process running Chokidar. Whenever the appropriate events are fired, it will parse the file(s) needed and notify the Elm plugin editor process with the results.
The code for initiating the watcher
  var watcher = chokidar.watch(['elm-package.json',                    (1)
                                'elm-stuff/exact-dependencies.json',
                                '**/*.elm'], {
    cwd: process.cwd(),
    persistent: true,
    ignoreInitial: false,
    followSymlinks: false,
    atomic: false
  });

  watcher.on("raw", function(event, file, details) {                   (2)
    var relFile = path.relative(process.cwd(), file);
    var sourceDirs = getSourceDirs(process.cwd());


    if(relFile === "elm-stuff/exact-dependencies.json") {
      if ( event === "modified") {
        parseAllPackageSources();                                      (3)
      }
      if (event === "deleted") {
        sendAstMsg({
          type: "packagesDeleted"
        });
      }
    }


    if (isSourceFile(sourceDirs, file) && event === "modified") {
      parseAndSend(file);                                              (4)
    }

    if (isSourceFile(sourceDirs, file) && event === "deleted") {
      sendAstMsg({
        file: file,
        type: "deleted"
      });
    }

    if (isSourceFile(sourceDirs, file) && event === "moved") {
      if (fileExists(file)) {
        parseAndSend(file);
      } else {
        sendAstMsg({
          file: file,
          type: "deleted"
        });
      }
    }
  });


  elmGlobals.watcher = watcher;
}| 1 | Start the watcher |
| 2 | To be able to handle renames and a few othere edge cases I ended listening for raw avents from Chokidar |
| 3 | Whenever this elm file changes is very likely that’s due to a package install, update or delete of some kind The time spent for parsing all package sources is proportionally small compared to the time spent on a package install so this "brute-force" approach actually works fine. |
| 4 | Parsing a single file on change and notifying the editor process with the results is the common case |
Caching the ASTs
In the Elm Light plugin Editor part, a Clojure(Script) atom is used to store all projects and their ASTs. Not only does it store AST’s for you project files, but it also stores ASTs for any 3.rd party packages your project depends on. That means that it does use quite a bit of memory, but profiling sugggest it’s not too bad actually. The great thing now is, that I have a Clojure datastructure I can work with. Slice and dice, transform and do all kinds of stuff with using the full power of the clojure.core API. Super powerful and so much fun too :-)
But what about this parsing as you type then ?
Well for every open Elm editor, there is a handler for parsing the editors content and update the AST atom. Again the actually parsing is performed in a node client process, otherwise the editor would obviously have ground to a halt.
It looks something like this:
(behavior ::elm-parse-editor-on-change                               (1)
          :desc "Parse a connected elm editor on content change"
          :triggers #{:change}
          :debounce 200                                              (2)
          :reaction (fn [ed]
                      (object/raise ed :elm.parse.editor)))          (3)


(behavior ::elm-parse-editor                                         (4)
          :desc "Initiate parsing of the content/elm code of the given editor"
          :triggers #{:elm.parse.editor :focus :project-connected }
          :reaction (fn [ed]
                      (when (not (str-contains (-> @ed :info :path) "elm-stuff"))
                        (let [client (get-eval-client-if-connected ed :editor.elm.ast.parsetext)
                             path (-> @ed :info :path)]

                         (when (and client
                                  (= (pool/last-active) ed))

                           (clients/send client                     (5)
                                         :editor.elm.ast.parsetext
                                         {:code (editor/->val ed)}
                                         :only ed))))))

(behavior ::elm-parse-editor-result                                 (6)
          :desc "Handle parse results for a parsed editors content"
          :triggers #{:editor.elm.ast.parsetext.result}
          :reaction (fn [ed res]
                      (if-let [error (:error res)]
                        (do
                          (object/update! ed [:ast-status] assoc :status :error :error error)
                          (object/raise ed :elm.gutter.refresh))
                        (let [path (-> @ed :info :path)]
                          (object/update! ed [:ast-status] assoc :status :ok :error nil)

                          (elm-ast/upsert-ast! (-> (get-editor-client ed) deref :dir)  (7)
                                               {:file path
                                                :ast (:ast res)})
                          (object/raise ed :elm.gutter.exposeds.mark)))


(elm-ast/update-status-for-editor ed)))| 1 | This the behaviour (think runtime configurable event handler) that triggers parsing whenever the editor contents change. |
| 2 | Parsing all the time is not really necessary for most things, so a debounce has been defined to not spam the node client |
| 3 | We delegate to the behaviour below which is a more generic trigger parsing behavior |
| 4 | This behavior is responsible for sending off a parse request to the node client |
| 5 | We send the parse request to the node client |
| 6 | Once the node client process has finished parsing this behviour will be triggered with the result |
| 7 | We update the AST atom with the AST for this particular combination of project and file represented by the editor |
| We only update the AST on succesful parses. A lot of the time when typing the editor contents will naturally not be in a correct state for parsing. We always keep track of the last valid state, so that allows the plugin to still provide features that doesn’t necessarily need an completely current AST. |
There is always an exception
Things was working quite well initially, managed to get several features up and running. But when I started to rewrite the auto completer from using elm-oracle I hit a few killer problems; - The contiuous parsing started to tax the editor to the point that things became unusable - With debouncing I didn’t have accurate enough results to provide a proper context for context aware completions - I discovered general performance problems in how I’ve written my ClojureScript code - For large files synchrounous parsing was out of the question
Auto completers are tricky and doing it synchronous was proving useless for Elm files larger than a few hundred lines. Back to the drawing board.
Tuning
So providing hints for the autocompleter definitely has to happen asynchronously. But even that was to taxing for larger files and AST. So I spent quite some time optimizing the ClojureScript code. Turning to JavaScript native when that was called for. Heck I even threw in memoization a couple of places to get response times down. Even turning JSON into EDN (clojure data format) had to be tweaked to become performant enough. The whole process was quite challenging and fun. There are still things to be tuned, but I’ll wait and see what real usage experience provides in terms of cases worth optimizing for.
Partial synchronous partial parsing
The autocompleter is async, but for some cases it turned out to be feasible to do a partial parse of the editors contents. PEG.js has a feature to support multiple start rules, so I ended up defining a start rule that only parses the module declaration and any imports. That allowed the context sensitive hints for module declartions and imports to have a completely up to date AST (well as long as it’s valid) and at the same time keep the autocompleter responsive enough.
Really large files
Depending on who you ask, you might get a different definition, but to me Elm files that are several thousand lines are large. So hopefully they are more the exception than the rule. But for files of that size the autocompleter will be a little slugish. Not too bad (on my machine!), but you will notice it.
| If you experience this, do let me know. And also be aware that turning off the auto-completer is deffo and option and easy for you to do. The guide contains instructions for how to do that. |
Refactoring
It would be really neat if I could refactor in the AST itself and just "print" the update result back to the editor. However with the complexities of the AST already, the fact that I’m not even parsing everything yet and all interesing challenges with an indentation sensitive language with lot’s of flexibility in terms of comments and whitespace… Well that’ll have to be a future enterprise.
That’s not entirly true though. For a couple of the features I sort of do that, but only for a select few nodes of the AST, and the change is not persited to the AST atom (think global database of ASTs). So it’s like a one-way dataflow:
-
get necessary nodes from AST atom
-
update the node(s)
-
print to editor
-
editor change triggers AST parsing for editor
-
node client notifies editor behaviour responsible for updating the AST atom
-
AST Atom gets updated
-
The AST atom is up to date, but slightly after the editor
(behavior ::elm-expose-top-level
          :desc "Behavior to expose top level Elm declaration"
          :triggers #{:elm.expose.top.level}
          :reaction (fn [ed]
                      (let [path (-> @ed :info :path)
                            prj-path (project-path path)
                            module (elm-ast/get-module-ast prj-path path)             (1)
                            exposing (-> module :ast :moduleDeclaration :exposing)]   (2)

                        (when-let [decl (elm-ast/find-top-level-declaration-by-pos    (3)
                                            (editor/->cursor ed)
                                            module)]
                          (when-not (elm-ast/exposed-by-module? module (:value decl))
                            (let [{:keys [start end]} (elm-ast/->range (:location exposing))
                                  upd-exp (elm-ast/expose-decl decl exposing)         (4)
                                  pos (editor/->cursor ed)
                                  bm (editor/bookmark ed pos)]
                              (editor/replace ed                                      (5)
                                              start
                                              end
                                              (elm-ast/print-exposing upd-exp))
(safe-move-cursor ed bm pos)))))))| 1 | Get the AST root node for the module the current editor represents |
| 2 | From that retrieve the exposing node (this is the one we want to update) |
| 3 | Find the declaration to expose based on where the cursor is placed in the editor |
| 4 | Update the exposing AST node to also expose the given declaration in <3> |
| 5 | Overwrite the exposing node in the editor, that works because we have the current location of it already :-) |
Once the editor is changed, the normal process for updating the global AST atom is triggered.
Summary and going forward
Writing a parser (with the help of a parser generator) has been a really valuable learning experience. After my failed attempt with InstaParse, it’s hard to describe the feeling I had when I saw the numbers from my PEG.js based implementation. I tried to talk to my wife about it, but she couldn’t really see what the fuzz was all about !
I’ll continue to make the parser better, but the plan isn’t to spend massive amounts of time on making that perfect. I’d rather turn my attention on trying to help the Elm community and it’s tooling people access to an AST on stereoids. My bet is that the AST from elm-format is going to be the way forward, so I’ll try to help out here. Hopefully my own experience will be useful in this process.
I’m pretty sure I can carry on to make some pretty cool features with the AST i already have, so there will defininetely be some cool stuff coming in Elm Light in the near future regardless of what happens in the AST space and tooling hooks for Elm in general.
Oh no! Learning Elm has gotten me confused about static vs dynamic typing.
13 June 2016
Tags: elm haskell groovy clojure
TweetThe last few years I’ve worked on projects using Groovy and Clojure/ClojureScript. In 2016 I’ve spent quite a bit of pastime trying to get to grips with statically typed functional languages. In particular I’ve deep dived into Elm. I’ve also dipped my toes into Haskell. It’s been a great learning experience and has changed my view of static typing. Does this mean I’m a static typing zealot now ? Nah, but there is no doubt I’m much more open to the benefits of static typing. I guess would characterize myself more like undecided or confused than convinced either way.
Background
A couple of years ago I started working with Groovy (and Grails). I fell in love and felt I became way more productive than I had ever been when working with Java. I rarely missed the added type safety of Java. Groovy also gave me a gentle introduction to functional programming related concepts in a way Java never encouraged me to.
In 2014 I started dabbling with Clojure(Script), but it took until 2015 before I got a chance to use it for real in a project. It was a blast and I finally started to understand why more and more people are turning towards functional programming. Clojure/ClojureScript became a big part of my life both at work and evenings and nights. I was hooked.
At the end of last year I was back on a Groovy/Grails project. I was perfectly ok with that, but it wasn’t a shiny new thing any longer, so I guess that’s partially why I was looking for something new to learn on the side. Elm really caught my attention. When I watched Let’s be mainstream! User focused design in Elm I finally found a statically typed functional language that looked approachable to me.
First signs of functional immutable damage
My time with Clojure (and gradually Elm) had changed me. I started to change how I coded Groovy. I tried to be more functional and whenever I declared a variable that I later mutated I was left feeling dirty somehow. It’s hard to try to enforce immutability in Groovy when the language, libraries and idioms don’t make immutability a first class citizen. I had to bite the bullet quite a few times, and yeah I could still get things done. The thing is, I started to pay more attention to what kind of errors and bugs I introduced as a result of careless mutation.
One particular example springs to mind. I was doing validation of a master/detail form. To validate the detail rows of the form I needed to make sure they were sorted.
Easy peasy ?
master.detailRows.sort {it.date}However this had the nasty side-effect
of reordering the detail rows in my UI which was rendered from this object.
I was puzzled at first, but then I remembered that immutability is not something you
can take for granted in the Groovy collection API (some things are, others are just bolted on top of Java).
The fix was easy enough. collection.sort has an overloaded version that takes a boolean parameter mutate.
So I was left with
master.details.sort(false) {it.date}My eyes hurt: sort false, but but I do want to sort.
2 years ago I wouldn’t think much of this, it’s just a thing I was used to deal with and spend cycles on.
Now I get annoyed both with myself for forgetting and the language for making me feel dumb for not remembering.
Adding types
After having spent some time with Elm (and Haskell) I noticed I started to add more type information in my Groovy code. I felt it improved the readability of my functions and methods. It also made IntelliJ more happy and helpful in many cases. The frontend of the application is written in JavaScript with a fair chunk of jQuery. Introducing something like Flow might be helpful, but I’m convinced there are other more fundemental issues that needs to be addressed before considering that.
I’m pretty sure I’ll be using something like Schema more actively when writing Clojure/ClojureScript going forward. When I have the chance Clojure Spec will probably be the preferred option. I know it’s not static typing, but my hunch is that it will have a huge positive impact on documentation, error messages, runtime checks, testing and probably many other things too.
Functionally dynamic, but statically aware
This week I was back to a Clojure/ClojureScript project again. I’m quite excited and I’m convinced I’m going to have a blast. However I’ve decided to use this opportunity to reflect more on where I feel Clojure/ClojureScript with it’s dynamic typing shines and where I think static typing might have been helpful. After spending so much time with Elm and very much enjoying it, I might be susceptible to confirmation bias that static typing only carries benefits. I’m going to try real hard to stay as objective or rather true to myself as I can when reflecting on positives of static vs dynamic. Of course there’s a lot more to languages than static vs dynamic typing. I do find it interesting to reflect about it though, especially since so many people seem to have such strong opinions about type safety. I myself am mostly confused or largely undecided at the moment.
First week reflections
| Undoubtably with some Elm tinted glasses |
The good
-
Figwheel how I’ve missed you ! With the latest release, error messages has gotten way better too. Maybe Elm with it’s suberb error messages has been an inspiration ?
-
I haven’t gotten my tooling set up right yet, but know that once I’ve got the REPL stuff set up right I’m going to be a happier puppy
-
The app is really cool, and there are lots of exciting techs to dig into
-
Paredit rocks for editing
Unsure/unknowns
-
re-frame - When I first read about it several months ago I was initially convinced that this small but very powerful framework was a fantastic thing. Maybe it really is to. But having experienced Elms departure from FRP, I’m wondering whether it might have some drawbacks at scale that I am not aware of yet. I’ve barely gotten a chance to work with it, but I’ve so far found it hard to internalize all the reactive dataflows going on in the client app. I obviously need to spend more time before making any judgment. Maybe I’ll write a blog post comparing The Elm Architecture to re-frame in the future.
Have I become dumber ?
-
I genuinly found it harder than before to understand what various functions did by looking at their signature. That could very well be down to naming and lack of documentation and or something like schema, but it was initially frustrating to see functions with map parameters and having to read through the whole of the implementation to get an understanding of what they might contain.
printlnto the rescue… sort of. -
I made silly mistakes, some of these resulted in things just not happening and others resulted in stacktraces that wasn’t helpful in anyway at all. I can’t help but think about the fact that static types and a helpful compiler would have prevented me from making many of those mistakes. Sure I should have tested more, both through the use of the REPL and probably more proper tests too.
-
I was faced with a few refactorings, that didn’t really go as well as I feel it should have. Again more tests would have helped, but then again a lot of those tests I just wouldn’t have needed to write in Elm.
An attempt to summarize
I’m convinced that functional programming vs imperative programming is a much more important concern than static vs dynamic typing. I’m also in no doubt that I think functional programming is by far superior. A year ago I was solidly in the dynamic typing camp. My impression of statically typed functional languages was that they were way to hard to get started with. None of the languages I had heard about seemed particularily approachable and I had doubts about their practicality for the problems I typically encounter in my projects. I’ve tried Haskell a couple of times, but I guess I was never commited enough. Learning Elm has not only been great fun, but It has clearly opened my mind to the possibility that static type checking can be very beneficial. It’s hard to describe the experience of doing a major refactoring, having a really helpful and friendly compiler guide you along step by step and when finally everything compiles it just works. Having had that experience many times with Elm (and to a degree Haskell) certainly changed something fundementally in my thinking.
Until I have used Elm, Haskell or another statically typed functional language in a real project I’m in no position to pass any proper (personal) judgement. Maybe I’m just going to remain confused, or maybe I’m never going to have a particularily strong preference.
Typed up CRUD SPA with Haskell and Elm - Part 5: Elm 0.17 Upgrade
30 May 2016
Tags: haskell elm haskellelmspa
TweetElm version 0.17 was released a few weeks back. If haven’t already, you should read the annoucement post A Farewell to FRP. So what does that mean for the Albums app ? Sounds like we’re in for a massive rewrite. It turns out, since we were already using The Elm Architecture to structure our application, the impact isn’t that big after all. Most of it is mechanical, and actually the biggest change is that we can no longer use the 3.rd party routing library we depended on.
Introduction
I would have done the upgrade to 0.17 sooner, but the Album application depended on a 3rd party package called elm-transit-router. It served us well and we even got some nice transition animations when changing pages. However as all the routing libraries that we’re available for 0.16, it depended on a community package called elm-history. That package was never going to updated to support 0.17, in fact all support for the Web Platform APIs will eventually supported by the Elm language.
Last week Navigation was announced. This is library for managing navigation in a SPA. It provides nice abstractions over the History API. In tandem Evan released URL Parser which is a simple parser for turning URLs into structured data.
With that in place I felt confident we should be able to do the upgrade. Let’s walk through the highlights !
Upgrade steps
Upgrading packages
| 0.17 | 0.16 | ||||||||||
|---|---|---|---|---|---|---|---|---|---|---|---|
|
|
Mechanical changes
Module declarations
In 0.16 we had
module Main (..) whereIn 0.17 we have
module Main exposing (..)Luckily Elm Format handles this conversion automatically for us when we do format of an 0.16 .elm file !
So we can just run elm-format on the src directory.
Effects are now named Cmd
The new name for Effects are now Cmd shorthand for Command. Cmd is part of elm-lang/core
and lives in the Platform.Cmd module.
| 0.17 | 0.16 | ||||
|---|---|---|---|---|---|
|
|
Making these changes is also fairly trivial with a good old search/replace.
Mailbox and address are gone in 0.17
| 0.17 | 0.16 |
|---|---|
|
|
-
The address parameter is gone, you no longer need to concern yourself with the intricacies of mailboxes. But you’ll also notice that the return value type
Htmltakes a tag which in this case is ourMsgtype. So if we have any event handlers in our view code, we are telling it that those should result in a message of typeMsg. We’ll come back to this in a bit more detail when we go through a nesting example. -
We no longer need to deal with an address for our event handler, we just tell Elm that when the user clicks the button, it should trigger our update function with the given
MsgSomeMsg. The Elm runtime will take care of routing the message to our update function without any address mumbojumbo !
Again making this change is largely a matter of search/replace. There are a few exceptions though.
| 0.17 | 0.16 |
|---|---|
|
|
But let’s say you actually do need a custom decoder it would still be simpler than in 0.16
import Json.Decode as Json
-- ...
[ input
[ class "form-control"
, value model.name
, on "input" (Json.map SetArtistName targetValue) (1)
]
[]
]| 1 | Here we just map over the targetValue, and call SetArtistName with the value. targetValue is a Json decoder which picks out the value from our input field when the event is triggered |
Routes and Route parsing (ehh… URLs if you like)
| 0.17 | 0.16 | ||||
|---|---|---|---|---|---|
|
|
| 0.17 (url-parser) | 0.16 (elm-route-parser) |
|---|---|
|
|
The parsing syntax is slightly different, but the transition was fairly trivial in our case. The observant reader will notice that we’ve skipped over the case when there is not matching route. We’ll get back to that when we wire it all together. Also, we’ll see later where our decode function comes into play when we wire up the app.
| To learn more about the new url-parser and it’s functions check out the package docs. |
Encoding
encode : Route -> String
encode route =
case route of
Home ->
"/"
ArtistListingPage ->
"/artists"
NewArtistPage ->
"/artists/new"
ArtistDetailPage i ->
"/artists/" ++ toString i
AlbumDetailPage i ->
"/albums/" ++ toString i
NewArtistAlbumPage i ->
"/artists/" ++ (toString i) ++ "/albums/new"Encoding routes is pretty much exactly the same as before.
| 0.17 (url-parser) | 0.16 (elm-route-parser) | ||||||||||
|---|---|---|---|---|---|---|---|---|---|---|---|
|
|
I borrowed most of this code from The tacks application from @etaque. Kudos to @etaque for coming up with this !
You might be wondering why we need catchNavigationClicks at all ? Well if you click on a href, the browser will (to my knowledge) change the window location
and trigger a server request which causes the page to reload. In an SPA we typically don’t want that to happen.
|
Please be advised that these helpers do make a compromise in terms of type safety. Note in particular the use of msg (basically anything) rather than a component specific Msg type.
I’m sure in due time, more type safe patterns will emerge. An obvious alternative to this approach is to
have a custom message in each update function that handles navigation. I’m going to try that out in the near future and see how it plays out.
|
Sample usage
Let’s have a quick look at a few examples on how we are using the navigate and linkTo helper functions
in the Albums app. How it all fits together will hopefully be apparent when we describe how we wire everything together in our Main module a little later on
| 0.17 | 0.16 | ||||
|---|---|---|---|---|---|
|
|
| 0.17 | 0.16 | ||
|---|---|---|---|
|
|
Dealing with Http
So in our Album app we separated all HTTP requests to a separate module we called ServerApi.
The changes from 0.16 to 0.17 isn’t massive, but since we’re at it we might as well make some small improvements
to be better prepared for error handling in future episodes.
| 0.17 | 0.16 |
|---|---|
|
|
The http methods haven’t really changed, but the manner in which we request the runtime to perform them have changed.
We no longer have the Effects package, so we need to use Task.perform to do it now. Our 0.16 implementation used
Maybe to signal success or failure, in 0.17 we have opted to give a different message for success or failure.
So if getArtist fails the error result of or http action will be passed to our update function wrapped in the provided Msg given by our errorMsg param,
if it succeeds the response will be json decoded and passed to our update function wrapped in the provided Msg given by our msg param.
| Separating out all our http requests in one module gives flexibility in usage from multiple modules, but comes with a price of reduced type safety though. You might (depending on context of course) want to localize http stuff with your components to make them more self-contained. |
Usage Comparison
frontend/src/AlbumDetail.elm 0.16
update : Action -> Model -> ( Model, Effects Action )
update action model =
case action of
NoOp ->
( model, Effects.none )
GetAlbum id ->
( model
, Effects.batch
[ getAlbum id ShowAlbum
, getArtists HandleArtistsRetrieved
]
)
ShowAlbum maybeAlbum ->
case maybeAlbum of
Just album ->
( createAlbumModel model album, Effects.none )
Nothing -> -- TODO: This could be an error if returned from api !
( maybeAddPristine model, getArtists HandleArtistsRetrieved )
HandleArtistsRetrieved xs ->
( { model | artists = (Maybe.withDefault [] xs) }
, Effects.none
)Our use of Maybe to signal failure in our 0.16 implementation clearly muddles what’s going on in terms of potential failures.
frontend/src/AlbumDetail.elm 0.17
mountAlbumCmd : Int -> Cmd Msg (1)
mountAlbumCmd id =
Cmd.batch
[ getAlbum id FetchAlbumFailed ShowAlbum
, getArtists FetchArtistsFailed HandleArtistsRetrieved
]
mountNewAlbumCmd : Cmd Msg (2)
mountNewAlbumCmd =
getArtists FetchArtistsFailed HandleArtistsRetrieved
update : Msg -> Model -> ( Model, Cmd Msg )
update msg model =
case msg of
-- TODO: show error
FetchAlbumFailed err -> (3)
( model, Cmd.none )
ShowAlbum album -> (4)
( createAlbumModel model album, Cmd.none )
HandleArtistsRetrieved artists' ->
( { model | artists = artists' }
, Cmd.none
)
-- TODO: show error
FetchArtistsFailed err ->
( model, Cmd.none )
-- rest left out for brevity| 1 | This command has been separated out as an exposed function for the module. The reason is that we need to perform this when we navigate to a `/albums/<id>. I.e when that particular url is mounted. You’ll see how when we cover the Main module. We are actually running two http requests here.. hopefully/presumably in the order they are listed :-) |
| 2 | Similar to the above, but this is for handling when the user navigates to the url for creating a new album |
| 3 | if getAlbum should fail this is where we should handle that (And we will eventually in a future episode) |
| 4 | If getAlbum succeeds we set the model up for displaying the retrieved artist |
Nesting Components
The way you handle nesting of components in 0.17 has changed (for the better) with the removal of Mailboxes. If you didn’t do to much fancy stuff with addresses the transition to 0.17 should be quite straight forward. We’ll illustrate by showing a simple/common transition and then we will show how you might handle a more complex nesting scenario (based on actual examples from the Albums App)
The common scenario
| 0.17 | 0.16 | ||
|---|---|---|---|
|
|
I think you’ll agree this change is pretty simple to deal with. Let’s see how nesting of view functions for components have changed
| 0.17 | 0.16 | ||||||
|---|---|---|---|---|---|---|---|
|
|
This change isn’t quite search/replace (well with regex perhaps), but it’s quite trivial too. Ok let’s move onto something a bit more complex.
A more complex scenario - Album and tracks
If you wish to see the Album and Tracks solution in action, you can check it out here:
| 0.17 | 0.16 | ||||||||||
|---|---|---|---|---|---|---|---|---|---|---|---|
|
|
There is no magic involved here, we are just returning an additional piece of info in the return value of our update function.
| 0.17 | 0.16 | ||||||
|---|---|---|---|---|---|---|---|
|
|
0.16 implementation of update function in frontend/src/AlbumDetail.elm
update : Action -> Model -> ( Model, Effects Action )
update action model =
case action of
-- ...
RemoveTrack id ->
( { model \| tracks = List.filter (\( rowId, _ ) -> rowId /= id) model.tracks }
, Effects.none
)
MoveTrackUp id ->
-- ...
MoveTrackDown id ->
-- ...
ModifyTrack id trackRowAction ->
let
updateTrack ( trackId, trackModel ) =
if trackId == id then
( trackId, TrackRow.update trackRowAction trackModel )
else
( trackId, trackModel )
in
( maybeAddPristine { model | tracks = List.map updateTrack model.tracks }
, Effects.none
)0.17 implementation of update function in frontend/src/AlbumDetail.elm
update : Msg -> Model -> ( Model, Cmd Msg )
update msg model =
case msg of
-- ...
RemoveTrack id -> (1)
( { model \| tracks = List.filter (\( rowId, _ ) -> rowId /= id) model.tracks
}
, Cmd.none
)
MoveTrackUp id ->
-- ...
MoveTrackDown id ->
-- ...
ModifyTrack id trackRowMsg ->
case (modifyTrack id trackRowMsg model) of (2)
Just ( updModel, Nothing ) -> (3)
( model, Cmd.none )
Just ( updModel, Just dispatchMsg ) -> (4)
handleDispatch id dispatchMsg updModel
_ ->
( model, Cmd.none ) (5)
modifyTrack : TrackRowId -> TrackRow.Msg -> Model -> Maybe ( Model, Maybe TrackRow.DispatchMsg )
modifyTrack id msg model = (6)
ListX.find (\( trackId, _ ) -> id == trackId) model.tracks
\|> Maybe.map (\( _, trackModel ) -> TrackRow.update msg trackModel)
\|> Maybe.map
(\( updTrack, dispatchMsg ) ->
( maybeAddPristine
{ model
\| tracks =
ListX.replaceIf (\( i, _ ) -> i == id)
( id, updTrack )
model.tracks
}
, dispatchMsg
)
)
handleDispatch : TrackRowId -> TrackRow.DispatchMsg -> Model -> ( Model, Cmd Msg )
handleDispatch id msg model = (7)
case msg of
TrackRow.MoveDown ->
update (MoveTrackDown id) model
TrackRow.MoveUp ->
update (MoveTrackUp id) model
TrackRow.Remove ->
update (RemoveTrack id) model| 1 | The parent, ie AlbumDetail, logic for deleting on of it’s track rows. |
| 2 | We delegate updating the track row and consequently the AlbumDetail model to a helper function. We pattern match on the result from that function. |
| 3 | If it was a "normal" update with no dispatch message returned we simply return the updated model and a no op Cmd. |
| 4 | If the update of the track row got a dispatch message in return from TrackRow.update we delegate the handling of the dispatch message to another helper function. |
| 5 | Since we are dealing with Maybe values we have to handle this case, but it really shouldn’t ever happen ! (Famous last words). |
| 6 | This might look a bit scary, but in summary it; locates the correct track row, performs the update of that row by delegating to TrackRow update, updates the track row in the model with the updated track row and finally returns a tuple of the updated model and the dispatch message (which is Maybe you remember). |
| 7 | Here we simply pattern match on the dispatch message and invokes the update function with the appropriate corresponding Msg. |
The pattern we used here is just one of many possible ways of solving this problem. Maybe someday a common preferred pattern will emerge,
but the bottom line is that it will most likely be some variation of return values from update functions and/or input params to the view function in the parent/child communucation.
The days of "magic" juggling with mailboxes are gone. Simple input/output FTW !
Oh, and finally, for this particular case I think there might be a good case for arguing that perhaps remove/moveup/movedown doesn’t really belong in TrackRow at all, it might
actually make more sence to use a decorator-kind of approach instead.
|
| Some flavors of using "global" or dummy effects (using say dummy tasks) for communicating between components have briefly surfaced. Pls think really carefully before adopting such an approach. Have a chat with the nice and very knowledgable people in the community to discuss if there isn’t a better solution for your problem ! |
Wiring it all together in frontend/src/Main.elm
| 0.17 | 0.16 | ||||||||||||
|---|---|---|---|---|---|---|---|---|---|---|---|---|---|
|
|
| 0.17 | 0.16 | ||
|---|---|---|---|
|
|
I don’t think it’s much point in describing the other slight differences, since they mostly pertain to details about elm-transit-router.
Url updates / Mounting routes
mounting routes in 0.16
mountRoute : Route -> Route -> Model -> ( Model, Effects Action )
mountRoute prevRoute route model =
case route of
Home ->
( model, Effects.none )
ArtistListingPage ->
( model, Effects.map ArtistListingAction (ServerApi.getArtists ArtistListing.HandleArtistsRetrieved) )
ArtistDetailPage artistId ->
( model
, Effects.map ArtistDetailAction (ServerApi.getArtist artistId ArtistDetail.ShowArtist) )
NewArtistPage ->
( { model | artistDetailModel = ArtistDetail.init }, Effects.none )
-- etc ..
EmptyRoute -> (1)
( model, Effects.none )| 1 | This is how we handled route parse failures in our 0.16 implementation btw. |
urlUpdate in 0.17
urlUpdate : Result String Route -> Model -> ( Model, Cmd Msg )
urlUpdate result model =
case result of
Err _ -> (1)
model ! [ Navigation.modifyUrl (Routes.encode model.route) ]
Ok (ArtistListingPage as route) -> (2)
{ model | route = route }
! [ Cmd.map ArtistListingMsg ArtistListing.mountCmd ]
-- rest left out for brevity
Ok ((NewArtistAlbumPage artistId) as route) -> (3)
{ model
| route = route
, albumDetailModel = AlbumDetail.initForArtist artistId
}
! [ Cmd.map AlbumDetailMsg AlbumDetail.mountNewAlbumCmd ]
Ok route -> (4)
{ model | route = route } ! []| 1 | If url parsing for a new url fails we just change the url back to url for the current route(/page) It might be appropriate to show an error of some sort error. |
| 2 | When the we change url to the artist listing page we wish to initiate the http request for retrieving artists from our backend. That’s where ArtistListing.mountCmd comes into the picture. |
| 3 | In addition to providing an effect, we need to ensure that the albumDetailModel starts with a clean slate when the page for adding a new album is displayed. It might have been a good idea to separate this out to it’s own component to avoid quite a bit of coniditional logic. |
| 4 | For any other url changes we just update the route field in our model. |
|
What’s up with the
|
Just a little more on the main update function, related to navigation
| 0.17 | 0.16 |
|---|---|
The navigate message triggers a call to the Navigation.newUrl function. That will step to a new url and update the browser history. You’ll see in the next chapter were we trigger this message. |
This is a elm-transit-router specific handler that takes care of starting and stopping animation transitions + updating the route field of our model. |
View
| 0.17 | 0.16 | ||||||
|---|---|---|---|---|---|---|---|
|
|
Summary
Most of the changes went really smoothly and quickly. I did have to spend a little bit of time to get familiar with the new navigation and url-parser package, but they are pretty intuitive. I wouldn’t be lying if I said I spent much more time on writing this blog post than doing the upgrade. I also did quite a few changes to the implementation of details I haven’t shown you, just because I’ve become more confident with Elm than I was when writing the previous episodes.
It was quite a bit of changes in terms of LOC’s and I have to be honest and tell you it’t didn’t work once everything compiled. But you can hardly blame Elm for that, it was all my bad. I hadn’t tested the route parsing properly and ended up implementing a loop. Kind of like a redirect loop, but all in js and out of reach for the browser. Firing up the inline repl in Light Table and interactively testing the parser quickly showed me the errors of my ways.
All in all I have to say the upgrade was a really fun and enjoyable ride. I can definately say that 0.17 made the App turn out much nicer.
What’s next ?
Hard to say for sure, but my current thinking is to start looking at auth using JWT web tokens. Time will tell if that’s what it’ll be.
Appendix
Unfortunately the 0.17 release left elm-reactor a bit behind in terms of what it supports. From my past experience with ClojureScript, I have gotten used to the feeback loop you get by using the wonderful figwheel. elm-reactor unfortunately doesn’t come close to that currently, so I had to turn to JS land for alternatives. After some evalutation and trials I ended up using elm-hot-loader. It has worked out really nicely even though I ended up pulling down a fair chunk of the npm package repo.
I’m sure elm-reactor will be back with a vengeance in the not so distant future, packing some really cool and unique features.
Elm Maybe - Dealing with null/Nothing
07 April 2016
Tags: elm javascript
TweetIf you have worked with JavaScript (or quite a few other languages that embrace null) I bet you have had one or two errors that can be traced back to an unexpected null reference. Some of them are obvious, but others are really tricky to track down. I’m sure most of you are well aware that quite a few other languages banishes null and introduces a Maybe or Option type to handle nothingness. Elm is one of those languages. Before I started looking at Elm I hadn’t really worked with Maybe types. In this blogpost I thought I’d share a little more insight on how to work with them in Elm. I’ll also briefly cover how they might be (or not) used in JavaScript for reference.
Elm Maybe
| Elm is a statically typed language which compiles down to JavaScript. Types is a core ingredient of Elm, that’s not the case with JavaScript obviously. |
type Maybe a = Just a | NothingThe Maybe type in Elm looks deceivingly simple. And actually it is.
The type is parameterized and the a is a placeholder for a concrete type in your program.
So a here means any type (Int, String, Float etc). A Maybe can have one of two values; either Just some value of type a or it is Nothing.
Where does Just and Nothing come from ? Are they defined somewhere else ? They are part of the type definition, think of them as tags. The name of these "tags"
must start with an upper case letter in Elm.
x = Just 0.0 -- Just 0.0 : Maybe.Maybe Float (1)
y = Nothing -- Nothing : Maybe.Maybe a (2)| 1 | The variable x Maybe with the tag Just and the Float value 0.0 (Maybe lives in a namespace or rather module in Elm called Maybe, that’s why the actual type definitions states Maybe.Maybe) |
| 2 | The variable y becomes a Maybe with the tag Nothing. Nothing has no value, and hence no value type associated. Nothing is Nothing, but it’s still a Maybe though :-) |
Quick detour - Type annotations
Elm is a statically typed language, everything is represented through types. So before we carry on I’d like to briefly cover the concept of type annotations.
Since JavaScript doesn’t have types, I’ll use Java as a comparable example
Sample Java functions
public int increment(int value) {
return value++;
}
public int add (int x, int y) {
return x + y;
}Type annotated equivalents in Elm
increment : Int -> Int (1)
increment value =
value + 1
add : Int -> Int -> Int (2)
add x y =
x + y| 1 | The type annotation for increment tells us it is a function which takes an argument of type Int and returns an Int |
| 2 | add takes two arguments of type Int and returns a an Int. So think of the last one as return type. |
Type annotations in Elm are optional, because the compiler is able to infer the types statically. Most people tend to use type annotations because they provide very useful documentation. When working with Elm it’s really something you quickly have to learn, because most documentation will use them and the Elm compiler will most certainly expose you to them.
Getting the actual values from a Maybe
Ok so I have this maybe thing which can be a Just some value or Nothing. But how do I get hold of the value so I can work with it ?
Pattern matching
myList : List String (1)
myList = ["First", "Second"] (2)
-- List.head : List a -> Maybe.Maybe a (3)
case List.head myList of (4)
Nothing -> (5)
"So you gave me an empty list!"
Just val -> (6)
val
-- returns "First"| 1 | Type annotation for myList. It is a List of String. It’s just a value, so that’s why there is no arrows in the type annotation |
| 2 | We are using a list literal to define our list. Each list item must be separated by a comma. It’s also worth noting, that every item in the list must be of the same type. You can’t mix Strings with Ints etc. The Elm compiler will yell at you if you try |
| 3 | I’ve added the type annotation for the List.head function. Given a List of values with type a it will return a Maybe of type a. List.head returns the first item of a List. The reason it returns a Maybe is because the List might be empty. |
| 4 | You can think of case as a switch statement on stereoids. Since List.head return a Maybe we have to possible case’s we need to handle |
| 5 | In this instance we can see from the code this case will never happen, we know myList contains items. The Elm compiler is really smart, but not that smart so it doesn’t know the list is empty. |
| 6 | This case unwraps the value in our Just so that we can use it. We just return the value, which would be "First". The value is unwrapped using something called pattern matching. In JavaScript terms you might think of it as destructuring |
The Maybe module
The Maybe type is defined in a module called Maybe. In addition to the Maybe type it also includes a collection
of handy functions that makes it handy to work with Maybe types in various scenarios.
Some sample data setup
myList = ["First", "Second", "Third"]
first = List.head myList
second = List.head (List.drop 1 myList)
tail = List.tail myList -- Just ["Second","Third"] : Maybe (List String)Handling defaults
-- Maybe.withDefault : a -> Maybe a -> a (1)
Maybe.withDefault "No val" first -- -> "First" (2)
Maybe.withDefault "No val" (List.head []) -- -> "No val"| 1 | Maybe.withDefault takes a default value of type a a Maybe of type a. It returns the value of the maybe if it has a value (tagged Just) otherwise it returns the provided default value |
| 2 | In the first example first is Just "First" so it unwraps the value and returns that. In the second example there is no value so it returns the provided default |
Mapping
-- Maybe.map : (a -> b) -> Maybe a -> Maybe b (1)
Maybe.map String.toUpper first -- -> Just "FIRST" (2)
Maybe.map String.toUpper Nothing -- -> Nothing
-- Maybe.map2 (a -> b -> c) -> Maybe a -> Maybe b -> Maybe c (3)
Maybe.map2 (\a b -> a ++ ", " b) first second -- -> Just "First, Second" (4)
Maybe.map2 (\a b -> a ++ ", " b) first Nothing -- -> Nothing
Maybe.map2 (++) first second -- -> Just "First, Second" (5)| 1 | Maybe.map takes a function which has the signature (a → b), that means a function that takes any value of type a and return a value of type b (which can be the same type or a completely different type). The second argument is a Maybe (of type a). The return value is a Maybe of type b. So Maybe.map unwraps the second argument, applies the provided function and wraps the result of that in a Maybe which in turn is returned. |
| 2 | String.toUpper takes a String (a if you like) and returns a String (b if you like). String.toUpper doesn’t understand Maybe values, so to use it on a Maybe value we can use Maybe.map |
| 3 | Maybe.map2 is similar to Maybe.map but the function in the first argument takes two in parameters. In addition to the function param we provide two Maybe values. These two doesn’t need to be of the same type, but happens to be so in our example. There is also map3, map4 etc up to map8 |
| 4 | If any or both of the two Maybe params are Nothing the result will be Nothing. |
| 5 | In the example above we used an anonymous function (lambda). However ++ is actually a function that takes two arguments so we can use that as the function argument |
Piping
-- Maybe.andThen Maybe.Maybe a -> (a -> Maybe b) -> Maybe b (1)
Maybe.andThen tail List.head -- -> Just "Second" (2)
tail `Maybe.andThen` List.head -- -> Just "Second" (3)
tail
`Maybe.andThen` List.head
`Maybe.andThen` (\s -> Just (String.toUpper s)) -- -> Just "SECOND" (4)
Just []
`Maybe.andThen` List.head
`Maybe.andThen` (\s -> Just (String.toUpper s)) -- -> Nothing (5)| 1 | Maybe.andThen resembles Maybe.map but there are two vital differences. The function argument comes as the second param (we’ll come back to why), secondly the function in the function argument must return a Maybe rather than a plain value. |
| 2 | The first argument tail is a Maybe, the second argument is List.head which is a function that takes a list as an argument and returns a Maybe, so that conforms to the function params signature required by Maybe.andThen |
| 3 | In this version we use the infix version of andThen (marked by backticks before and after). This is the reason the function argument comes second, so you typically use Maybe.andThen when you you need to work with maybes in a pipeline sort of fashion. |
| 4 | This is an example of piping values when dealing with Maybe values. We start with the tail of our list and then we pick out the head of that list and then we convert the value of that to uppercase |
| 5 | You can almost think of andThen as a callback. If any step of the chain returns Nothing, the chain is terminated and Nothing is returned |
Don’t like the way Maybe sound, how about rolling your own ?
type Perhaps a = Absolutely a | NotSoMuchOf course interop with others will be an issue and Maybe has some advantages being part of the core library. But still
if you really really want to…
JavaScript null/undefined
function headOfList(lst) {
if (lst && lst.length > 0) {
return lst[0];
} else {
// hm... not sure. let's try null
return null;
}
}
function tailOfList(lst) {
if (lst && lst.length > 1) then
return lst.slice(0);
} else {
// hm... not sure. let's try null
return null;
}
}
var myList = ["First", "Second", "Third"];
var first = headOfList(myList); // "First"
var second = headOfList(tailOfLIst(myList)) // "Second"
var tail = tailOfList(lst); // ["First", "Second"]
first // "First"
headOfList([]) // null (1)
first.toUpperCase() // "FIRST"
headOfList([]).toUpperCase() // Type Error: Cannot read property 'toUpperCase' of null (2)
first + ", " + second // "First, Second"
first + ", " + null // "First, null" (3)
headOfList(tail).toUpperCase() // "SECOND"
headOfList([]).toUpperCase() // Type Error: Cannot read property 'toUpperCase' of null (4)| 1 | An empty list obviously doesn’t have a first item. |
| 2 | If this was in a function you might guard against this. But what would you return ? Would you throw a exception ? |
| 3 | Doesn’t look to cool, so you would have to make sure you guarded against this case. Let’s hope you tested that code path, otherwise it’s lurking there waiting to happen ! |
| 4 | Same as 2 |
Okay so most of this cases are pretty silly, we would have to come up with something more real life with functions calling functions calling functions etc. The bottom line is that you have to deal with it, but it’s up to you all the time to make sure nulls or undefined doesn’t sneak in. In most cases there are simple non verbose solutions to deal with them, but it’s also quite easy to miss handling them. If you do it can sometimes be quite a challenge tracking down the root cause.
It’s undoubtably a little more ceremony in Elm, but in return you will not ever get nullpointer exceptions.
Introducing Maybe in JavaScript
If you are from a JavaScript background the blogpost Monads in JavaScript gives you a little hint on how you could implement Maybe in JavaScript.
Let’s borrow some code from there and see how some of the examples above might end up looking
Defining Just and Nothing
function Just(value) {
this.value = value;
}
Just.prototype.bind = function(transform) {
return transform(this.value);
};
Just.prototype.map = function(transform) {
return new Just(transform(this.value));
};
Just.prototype.toString = function() {
return 'Just(' + this.value + ')';
};
var Nothing = {
bind: function() {
return this;
},
map: function() {
return this;
},
toString: function() {
return 'Nothing';
}
};A few helper functions for dealing with JavaScript arrays
function listHead(lst) {
return lst && list.length > 0 ? new Just(lst[0]) : Nothing;
}
function listTail() {
return lst && list.length > 1 ? new Just(lst.slice[1]) : Nothing;
}Elm examples in JavaScript with Maybe’ish support
var myList = ["First", "Second", "Third"];
var first = listHead(myList);
var second = listTail(myList).bind(t => listHead(t));
var tail = listTail(myList);
// Similar to Maybe.map in Elm
first.map(a => a.toUpperCase()) // Just {value: "FIRST"} (1)
Nothing.map(a => a.toUpperCase()) // Nothing (object) (2)
// Similar to Maybe.map2 in Elm
first.bind(a => second.map( b => a + ", " + b)) // Just { value: 'First, Second' } (3)
first.bind(a => Nothing.map( b => a + ", " + b)) // Nothing (object)
// Similar to Maybe.andThen in Elm
tail.bind(a => listHead(a)).bind(b => new Just(b.toUpperCase())) // Just { value: 'SECOND' } (4)
new Just([]).bind(a => listHead(a)).bind(b => new Just(b.toUpperCase())) // Nothing (object) (5)| 1 | first is a Just object. Since it has a value the arrow function is run as expected |
| 2 | When the value is Nothing (a Nothing object) toUpperCase is never run and the Nothing object is returned |
| 3 | In the arrow function of bind for first we ignore the unwrapped value and call map on second with a new arrow function which now has both the unwrapped value of both a and b. We concatenate the values and the map function ensures the result is wrapped up in a Just object If you remember the elm case for map2, that was a separate function. Here map is just a convenience to wrap up the innermost value in a Just. |
| 4 | tail is a Just object with the value ["First", "Second"] in the first level arrow function we pick out the head which returns a Just object with the value "Second". In the innermost arrow level function we do upperCase on the value and wrap in it a Just which is the end result. |
| 5 | We are starting with Just with a value of an empty array. In the first level arrow function we try to pick out the head of the list. Since that will return a Nothing object, Nothing passes straight through the second level arrow function, never executing the toUpperCase call. |
So as you can see it is possible to introduce the notion of Maybe in JavaScript. There are several libraries out there to choose from I haven’t really tried any of them. Regardless the issue you’ll be facing is that the other libraries you are using probably won’t be using your representation of Maybe if at all. But hey, maybe it’s better with something than nothing. Or whatever.
Wrapping up
There is clearly a slight cost with explicitly handling nothingness everywhere. In Elm you basically don’t even have a choice. The type system and the compiler will force you into being explcit about cases when you don’t have a value. You can achieve the same as with null but you always have to handle them. In your entire program. The most obvious benefit you get, is that you simply will not get null reference related errors in Elm. When calling any function that accepts Maybe values as input params or return Maybe values you will be made well aware of that. The compiler will let you know, but typically you would also see type annotations stating this fact too. This explicitness is actually quite liberating once you get used to it.
In JavaScript you can try to be more explicit with nulls. You can even reduce the chances of null pointers ever happening by introducing a Maybe/Option like concept. Of course you wouldn’t introduce the possibility of null pointers in your code. However there’s a pretty big chance some bozo,responsible for one of the 59 libs you somehow ended up with from npm, have though.
There are plenty of bigger challenges than null pointer exceptions out there, but if you could avoid them altogether, surely that must a be of some benefit. I’ll round off with the obligatory quote from Tony Hoare as you do when one pays tribute to our belowed null.
I call it my billion-dollar mistake. It was the invention of the null reference in 1965. At that time, I was designing the first comprehensive type system for references in an object oriented language (ALGOL W). My goal was to ensure that all use of references should be absolutely safe, with checking performed automatically by the compiler. But I couldn’t resist the temptation to put in a null reference, simply because it was so easy to implement. This has led to innumerable errors, vulnerabilities, and system crashes, which have probably caused a billion dollars of pain and damage in the last forty years.
— Tony Hoare
Elm package docs preview in Light Table
28 March 2016
Tags: elm clojurescript lighttable
TweetMaybe you are a package author for Elm packages you wish to publish to http://package.elm-lang.org/ . Or maybe you are thinking about authoring a package. Before you publish something to the package repo you have to write documentation for your package. Wouldn’t it be sweet if you could preview the generated documentation from the comfort of your editor ?
The good news is that with the latest (0.3.6) edition of the elm-light plugin you can !
Demo
Feature highlights
-
Preview how the docs will look for each individual module
-
The preview is updated whenever you save your (exposed) Elm module file
-
Layout pretty close to how it will look on http://package.elm-lang.org/ once published
-
Fast (at least on my machine !)
-
Minor detail, but the entire preview UI is also implemented in Elm (ultimate dogfooding). It’s basically a modified and simplified implementation of the package preview code for http://package.elm-lang.org/
Resources
-
https://github.com/elm-lang/package.elm-lang.org for most of the Elm ui code used
-
Check out the plugin: elm-light
Elm and ClojureScript joining forces in the elm-light plugin
14 March 2016
Tags: elm clojurescript lighttable
TweetThe elm-light plugin provides a pretty useful featureset for developing elm applications. Until now all features have been implemented using a combination of ClojureScript and JavaScript. But wouldn’t it be cool if the plugin implemented Elm features using Elm where that’s feasible ? Elm compiles to JavaScript and JavaScript interop in ClojureScript is quite easy so it shouldn’t be that hard really.
If nothing else I thought it would be a fun challenge, so I set forth and decided to implemented a simple module browser for Elm projects.
Elm for the UI
In Elm it’s recommended that you follow The Elm Architecture (AKA: TEA). You model your Elm application and components into 3 separate parts; Model, View and Update. The easiest way to get started with implementing something following TEA is using the start-app package.
Model
Quite often you’ll find that you start by thinking about how to design your model. This was also the case for me when developing the module browser.
type alias Model = (1)
{ allModules : List Modul
, filteredModules : List Modul
, searchStr : String
, selected : Maybe Modul
}
type alias Modul = (2)
{ name : String
, file : String
, packageName : String
, version : String
}| 1 | The model is quite simple and contains; a list of all modules, the currently filtered modules, the search string entered by the user and the currently selected module |
| 2 | Since Module is a reserved word in Elm the type used for representing a project Module is doofily named Modul. |
| For more info about what Elm modules are check out the elm-guides |
UPDATE
Update is where we actually implement the logic of our Elm application. I won’t cover all the details, but let’s walk through the most important bits.
type Action (1)
= NoOp
| Filter String
| Prev
| Next
| Select
| ClickSelect String
| Close
| Refresh (List Modul)
update : Action -> Model -> ( Model, Effects Action ) (2)
update action model =
case action of
NoOp -> (3)
( model, Effects.none )
Filter str -> (4)
let
filtered =
filterModules str model.allModules
sel =
List.head filtered
in
( { model
| searchStr = str
, filteredModules = filtered
, selected = sel
}
, Effects.none
)
Prev -> (5)
( { model | selected = prevModule model }
, notifyChangeSelection
)
Next ->
( { model | selected = nextModule model }
, notifyChangeSelection
)
Select -> (6)
case model.selected of
Nothing ->
( model, Effects.none )
Just x ->
( model
, notifySelect x.file
)
ClickSelect file -> (7)
( model
, notifySelect file
)
Close -> (8)
( model, notifyClose )
Refresh modules -> (9)
( Model modules modules "" (List.head modules)
, Effects.none
)| 1 | The actions that causes changes to the model is represented by a Union Type called Action.
If you’re not sure what union type means, think of it as a Enum on stereoids. |
| 2 | The update function takes an action and the current model as parameters and returns a tuple of an (possibly) updated model and an Effect. Effects are basically things that have side-effects (http/ajax, interacting with the browser etc). We treat an effect like a value in the application, the Elm runtime takes care of actually executing it. |
| 3 | NoOp is just that. It’s handy when initializing the app and also for mapping effects to when there are
effects that we don’t care about in the context of this update function |
| 4 | Whenever the user changes the search string input the Filter action is called. It uses a filterModules helper function
to filter modules with names starting with the given search string. We default the selected
module to the first in the filtered results. The model is NOT mutated, rather we return a new updated model.
Elm keeps track of our global model state ! |
| 5 | Prev and Next selects/highlights the next/previous module given the currently selected one.
The notifyChangeSelection function call results in an effect that allows us to communicate with the ClojureScript part
of the module browser feature. We’ll get back to that further on. |
| 6 | The Select action is triggered when the users presses Enter. It selects the module and should
ultimately result in opening the Elm Module file. Again to make that happen we need to communicate
with our ClojureScript backend. This is achived through the notifySelect helper function. |
| 7 | ClickSelect is similar to Select but handles when the user uses the mouse to select a module. |
| 8 | Close - When the user presses the escape key, the module browser should close. Again we
need to notify the ClojureScript backend |
| 9 | To populate the Module browser ui with modules the Refresh action is called. This action
is actually triggered by our ClojureScript backend. |
Before we dive into more details about the interop with ClojureScript, let’s quickly go through the view rendering logic.
VIEW
The view part in Elm is also entirely functional and you as an application developer
never touches the DOM directly. Given the current Model you tell Elm what the view should look
like, and Elm (through the use of Virtual DOM) takes care of efficiently
updating the DOM for you.
The view for the module browser is really quite simple and consist of a search input field and an ul for listing the modules.
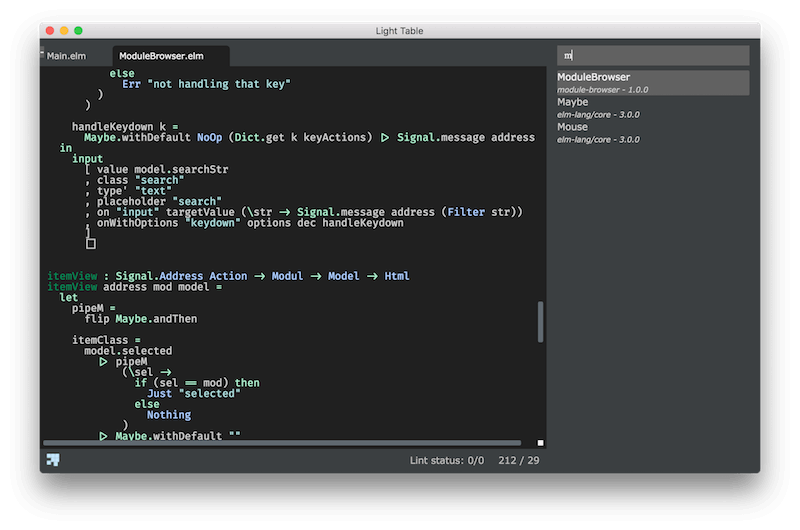
view : Signal.Address Action -> Model -> Html (1)
view address model =
div
[ class "filter-list" ] (2)
[ searchInputView address model
, ul
[]
(List.map (\m -> itemView address m model) model.filteredModules) (3)
]
searchInputView : Signal.Address Action -> Model -> Html (4)
searchInputView address model =
let
options =
{ preventDefault = True, stopPropagation = False }
keyActions =
Dict.fromList [ ( 38, Prev ), ( 40, Next ), ( 13, Select ), ( 27, Close ) ] (5)
dec =
(Json.customDecoder (6)
keyCode
(\k ->
if Dict.member k keyActions then
Ok k
else
Err "not handling that key"
)
)
handleKeydown k = (7)
Maybe.withDefault NoOp (Dict.get k keyActions) |> Signal.message address
in
input (8)
[ value model.searchStr
, class "search"
, type' "text"
, placeholder "search"
, on "input" targetValue (\str -> Signal.message address (Filter str))
, onWithOptions "keydown" options dec handleKeydown
]
[]
itemView : Signal.Address Action -> Modul -> Model -> Html
itemView address mod model = (9)
let
pipeM = (10)
flip Maybe.andThen
itemClass = (11)
model.selected
|> pipeM
(\sel ->
if (sel == mod) then
Just "selected"
else
Nothing
)
|> Maybe.withDefault ""
in
li
[ class itemClass
, onClick address (ClickSelect mod.file)
]
[ p [] [ text mod.name ]
, p [ class "binding" ] [ text (mod.packageName ++ " - " ++ mod.version) ]
]| 1 | The main view function takes an Address and the current Model as input and returns
a virtual HTML that represents the UI we want rendered. In Elm we use something called mailboxes
to respond to user interactions. Check out the note section below for more details if you’re interested.
In short the address param is the address to a given mailbox. Elm picks up any messages in the mailbox, handles them
and ultimately the results flow back to our application through the previously described update function. |
| 2 | All HTML tags have a corresponding function and all follow the same pattern. The first argument is a list of attributes, the second is a list of sub elements. |
| 3 | The beauty of everything being a function (as opposed to templating languages) is that you have the full power of the language to construct your view. Map, filter, reduce etc to your heart’s content. |
| 4 | The searchInputView function renders the search input field. This is where most of the user interaction stuff happens
so it’s naturally the most complex part of the UI. |
| 5 | We use the Dict type to represent key/values. Think map if you’re from a Clojure background! The keyActions
map lists the keycode and update action combo we are interested in handling. |
| 6 | We want to intercept just the given keyCodes everything else should flow through and update the searchStr in our model. To support that we need to implement a custom decoder for the keydown event. |
| 7 | You can read handleKeydown as follows, if the keyCode lookup for the given k returns an Action use that
otherwise use the default NoOp action. The result from that is used as the last param of the Signal.message function.
(In Clojure terms you can think of |> as thread-last). Signal.message sends the given action to the given address. |
| 8 | The search input handles changes to the input by triggering the Filter action with a payload
which is the current value of the input. To handle the special characters we handle the keydown event using
the local helper function we outlined in <7>. |
| 9 | itemView constructs the view for each individual item. Most of the logic here is related to giving the
currently selected item it’s own css class. |
| 10 | Maybe.andThen is a function to help you chain maybes.
(There is no such thing as null/nil in Elm !). flip flips the order of the two first arguments, and we do it to allow us to chain calls using the |> operator |
| 11 | If an item is selected and the selected item is the same as the current module being rendered then the class should be selected in all other cases
the class is an empty string. |
| To understand more about Mailboxes, Addresses and the term Signal in Elm. You might want to check out the relevant Elm docs or maybe this nice blog post |
Interop with ClojureScript using Ports
Interop with JavaScript in Elm goes through strict boundaries and use a mechanism called ports. The strict boundary is in place to ensure that you can’t get runtime exceptions in Elm (due to nulls, undefined is not a function, type mismatches etc etc). At first it feels a little bit cumbersome, but really the guarantees given from Elm makes up for it in the long run. Big time.
| The following blog post really helped me out when doing the ports stuff; "Ports in Elm" |
-- Inbound
modzSignal : Signal Action (1)
modzSignal =
Signal.map Refresh modzPort
port modzPort : Signal (List Modul) (2)
-- Outbound
selectMailbox : Signal.Mailbox String (3)
selectMailbox =
Signal.mailbox ""
port select : Signal String (4)
port select =
selectMailbox.signal
changeSelectionMailbox : Signal.Mailbox () (5)
changeSelectionMailbox =
Signal.mailbox ()
port changeSelection : Signal () (6)
port changeSelection =
changeSelectionMailbox.signal
closeMailbox : Signal.Mailbox ()
closeMailbox =
Signal.mailbox ()
port close : Signal ()
port close =
closeMailbox.signal| 1 | Signals are basically values that changes over time. A signal always has a value.
If you remember our update function, it takes an Action as the first argument. To allow
our incoming module list to trigger an update we need to convert the value we receive from the
modzPort to a Refresh action (with a payload which is a List of Modul records) |
| 2 | modzPort is a port which is a Signal that receives values from outside of Elm. Typically JavaScript
or in our instance ClojureScript. A Signal always has a value, so you will see that we need to provide an initial value
when we start the elm app from ClojureScript later on. |
| 3 | When using the Elm start app package we typically use mailboxes to
achieve (side-) effects. So to send messages to JavaScript (or ClojureScript!) we create an intermediary mailbox
to communicate through an outgoing port. When we select a module in the module browser we send the file name of the module
we wish to open and the type of the file name is String. Hence the Mailbox is a mailbox for string messages. |
| 4 | The select port is a Signal of Strings (file names) that we can subscribe to from JavaScript(/ClojureScript).
You can think of it as an Observable (in RxJs terms) or maybe simpler an event emitter if you like. |
| 5 | () in Elm means the same as void or no value. |
| 6 | When the user changes which module is selected/hightlighted we don’t care about the value, in this instance we just need to know that the user changed their selection |
Wiring up Elm with Start app
app : StartApp.App Model (1)
app =
StartApp.start
{ init = init
, update = update
, view = view
, inputs = [ modzSignal ] (2)
}
main : Signal Html (3)
main =
app.html
port tasks : Signal (Task.Task Never ()) (4)
port tasks =
app.tasks| 1 | StartApp.start takes care of wiring up our Elm application. init creates an initial empty Model, the other functions
we have already described. |
| 2 | StartApp also takes an inputs argument, here we need to remember to add our modzSignal so that it
is picked up and handled by StartApp. |
| 3 | main is the entry point for any Elm application. |
| 4 | Elm executes side effects through something called tasks I won’t go into details here, but just remember to add this incantation when using StartApp. |
Wrapping up the Elm part
Right so that wes pretty much all there is to the Elm part. Of course we also need to remember to compile
the Elm code to JavaScript before we can use it from Light Table.
To do that we use the elm-make executable that comes with the elm-platform installation
I can assure you that I didn’t get a single run time exception whilst developing the Elm part. It did get lots of helpful compiler errors along the way, but as soon as the compiler was happy the Elm application ran just as expected. It’s hard to describe the experience, but trust me, it’s certainly worth a try ! To be able to easily test and get visual feedback along the way I set up a dummy html page.
Ok let’s move on to the ClojureScript part were we hook the ui up to the Light Table plugin.
ClojureScript and Light Table
Generating the list of Elm Modules
Unfortunately there isn’t any API AFAIK that provides the information I wished to present
(ideally all modules and for each module, all it’s publicly exposed functions/types/values).
So I had to go down a route where I use a combination of the elm project file (elm-package.json) and
artifacts (files) generated when you run elm-make on your elm project.
(defn- resolve-module-file [project-path pck-json package module version] (1)
(->> pck-json
:source-directories
(map #(files/join project-path
"elm-stuff/packages"
package
version
%
(str (s/replace module "." files/separator) ".elm")))
(some #(if (files/exists? %) % nil))))
(defn- get-exposed-modules [project-path {:keys [package exact]}] (2)
(let [pck-json (u/parse-json-file (files/join project-path
"elm-stuff/packages"
package exact
"elm-package.json"))]
(->> pck-json
:exposed-modules
(map (fn [x]
{:name x
:packageName package
:version exact
:file (resolve-module-file project-path pck-json package x exact)})))))
(defn- get-package-modules [project-path] (3)
(->> (u/get-project-deps project-path)
(filter :exact)
(mapcat (partial get-exposed-modules project-path))
(sort-by :name)))
(defn- deduce-module-name [root-path elm-file-path] (4)
(-> elm-file-path
(s/replace root-path "")
(s/replace ".elm" "")
(s/replace #"^/" "")
(s/replace files/separator ".")))
(defn- get-project-modules [project-path] (5)
(let [pck-json (u/parse-json-file (files/join project-path "elm-package.json"))]
(->> (:source-directories pck-json)
(mapcat (fn [dir]
(if (= dir ".")
(->> (files/ls project-path) ;; fixme: no nesting allowed to avoid elm-stuff etc
(filter #(= (files/ext %) "elm"))
(map (fn [x]
{:name (deduce-module-name "" x)
:file (files/join project-path x)})))
(->> (files/filter-walk #(= (files/ext %) "elm") (files/join project-path dir))
(map (fn [x]
{:name (deduce-module-name (files/join project-path dir) x)
:file x}))))))
(map (fn [m]
(assoc m :packageName (files/basename project-path) :version (:version pck-json))))
(sort-by :name))))
(defn get-all-modules [project-path] (6)
(concat
(get-project-modules project-path)
(get-package-modules project-path)))| 1 | Helper function which tries to resolve the file for a Module from a 3rd party library |
| 2 | Every 3rd party library also comes with a elm-package.json that lists which module are publicly exposed. This helper function generates module info for all exposed modules from a 3rd party library |
| 3 | Given all defined project dependencies for a project at a given project-path this function generates
module informaation for all this packages. It will only try to resolve modules which has a resolved version :exact, so there is a precondition
that you have run either elm-package install or elm-make successfully on your project first. |
| 4 | deduce-module-name is a helper function which tries to deduce the module name for an Elm file in your project |
| 5 | Helper function that takes a simplistic approach to try to find all modules in you project and generate module information for them
It uses the "source-directories" key in your project’s elm-package.json as a starting point. |
| 6 | The complete list of modules is a concatination of 3rd party modules and your project modules. |
| There are a few simplifications in this implementation that might yield incomplete results (and sometimes erronous). However for the majority of cases it should work fine. |
Light Table sidebar
The module browser will live in the right sidebar in Light Table. The following code will construct the wrapper view and a Light Table object that will allow us to wire up the appropriate behaviors.
(defui wrapper [this] (1)
[:div {:id "elm-module-browser"} "Retrieving modules..."])
(object/object* ::modulebrowser (2)
:tags #{:elm.modulebrowser}
:label "Elm module browser"
:order 2
:init (fn [this]
(wrapper this)))
(def module-bar (object/create ::modulebrowser)) (3)
(sidebar/add-item sidebar/rightbar module-bar) (4)| 1 | Helper function to create a wrapper div which will host our module browser |
| 2 | A Light Table object (basically an ClojureScript atom) that allows us to tag behaviors. |
| 3 | The object above is instantiated at start up |
| 4 | We add the module bar to the right hand sidebar in Light Table |
Light Table behaviors
(behavior ::clear! (1)
:triggers #{:clear!}
:reaction (fn [this]
(cmd/exec! :close-sidebar)))
(behavior ::focus! (2)
:triggers #{:focus!}
:reaction (fn [this]
(let [input (dom/$ "#elm-module-browser input")]
(.focus input))))
(behavior ::ensure-visible (3)
:triggers #{:ensure-visible}
:reaction (fn [this]
(sidebar-cmd/ensure-visible this)))
(behavior ::show-project-modules (4)
:triggers #{:show-project-modules}
:reaction (fn [this prj-path]
(let [modules (get-all-modules prj-path)
el (dom/$ "#elm-module-browser")
mod-browser (.embed js/Elm js/Elm.ModuleBrowser el (clj->js {:modzPort []}))] (5)
(.send (.-modzPort (.-ports mod-browser)) (clj->js modules)) (6)
;; set up port subscriptions
(.subscribe (.-changeSelection (.-ports mod-browser)) (7)
(fn []
(object/raise this :ensure-visible)))
(.subscribe (.-select (.-ports mod-browser))
(fn [file]
(cmd/exec! :open-path file)
(object/raise this :clear!)))
(.subscribe (.-close (.-ports mod-browser))
(fn []
(object/raise this :clear!)))
(object/raise this :focus!))))
(behavior ::list-modules (8)
:triggers #{:editor.elm.list-modules}
:reaction (fn [ed]
(when-let [prj-path (u/project-path (-> @ed :info :path))]
(do
(object/raise sidebar/rightbar :toggle module-bar)
(object/raise module-bar :show-project-modules prj-path)))))
(cmd/command {:command :show-modulebrowser (9)
:desc "Elm: Show module-browser"
:exec (fn []
(when-let [ed (pool/last-active)]
(object/raise ed :editor.elm.list-modules)))})| 1 | This behavior basically closes the module browser sidebar when triggered |
| 2 | We need to be able to set focus to the search input field when we open the module browser |
| 3 | Helper behavior that ensures that the currently selected item in the module browser is visible on the screen. Ie it will scroll the div contents accordingly using a LT core helper function. |
| 4 | This is were we hook everything up. We gather the module information for the given project instantiate the Elm app, subscribe to outgoing messages(/signals!) and populate the module browser with the module list. |
| 5 | We start the elm app here and tells it to render in the wrapper div defined previously. We provide an initial value for the modzPort with an empty list. (Could have provided the gathered list modules here, but wanted to show how you send messages to a inbound Elm port explicitly. See next step) |
| 6 | To populate the module browser we send a message to the modzPort. Elm port thinks in JavaScript so we need to convert our list of ClojureScript maps to a list of JavaScript objects |
| 7 | To listen to events from the Elm app we call subscribe with a given callback function. In this example we trigger the ensure-visible behavior when the users moves the selection up or down, to ensure the selected item stays visible. |
| 8 | The behaviors above was tied(tagged) to the module-bar object, however this behavior is tagged to
a currently opened and active elm editor object. Light Table has no concept of projects, so to deduce which project we should
open the module browser for we need a starting point. Any elm file in your project will do. Based on that
we can deduce the root project path. If we find a project we display the module bar view and trigger the behavior
for populating the module browser. |
| 9 | Commands are the user interfacing functions that responds to user actions. They can be listed in the command bar in Light Table
and you can assign shortcuts to them. The show-modulebrowser command triggers the list-modules behavior.
Commands are available regardless of which editor you trigger them from, this is why we introduced the intermediary 'list-modules` behavior
because that allows us to declaritly filter when this behavior will be triggered. You’ll see how when we describe behaviors wiring in Light Table. |
Wiring up LT behaviors
In our plugin behaviors file we need to wire up our behaviors.
[:editor.elm :lt.plugins.elm-light.modulebrowser/list-modules] (1)
[:elm.modulebrowser :lt.plugins.elm-light.modulebrowser/clear!] (2)
[:elm.modulebrowser :lt.plugins.elm-light.modulebrowser/show-project-modules]
[:elm.modulebrowser :lt.plugins.elm-light.modulebrowser/focus!]
[:elm.modulebrowser :lt.plugins.elm-light.modulebrowser/ensure-visible]| 1 | Here we tell Light Table that only editor objects with the tag :editor.elm
will respond with the list-modules behavior we described earlier |
| 2 | Similaritly the other behaviors will only be triggerd by objects tagged with :elm-modulebrowser.
In our case that would be the module-bar object we defined. |
Why all this ceremony with behaviors ?
Flexibility! It allows us to easily turn on/off features while Light Table is running. If you wish you could quite easily create your own implementation for a behavior and replace the one supplied by the plugin. Or maybe you’d like to do something in addition for a given behavior trigger.
Conclusion
Okay let’s be honest. We haven’t set the world alight with a killer feature that couldn’t be accomplished quite easily without Elm. Neither have we created an advanced demo for Elm and ClojureScript integration. But we’ve certainly proven that it’s possible and it wasn’t particularily difficult. It somehow feels better with an Elm plugin that has Elm as part of it’s implementation.
You can do some pretty awesomly advanced UI’s with Elm and combing it with ClojureScript is definitely feasible. I’ll leave it to you to evaluate if that would ever make sense to do though !
Typed up CRUD SPA with Haskell and Elm - Part 4: Feature creep
01 March 2016
Tags: haskell elm haskellelmspa
TweetSo the hypothesis from episode 3 was that it should be relatively easy to add new features. In this episode we’ll put that hypothesis to the test and add CRUD features for Albums. There will be a little refactoring, no testing, premature optimizations and plenty of "let the friendly Elm and Haskell compilers guide us along the way".
Introduction
When I set out to implement the features for this episode I didn’t really reflect on how I would then later go about blogging about it. It turns out I probably did way to many changes to fit nicely into a blog episode. Let’s just say I got caught up in a coding frenzy, but let me assure you I had a blast coding for this episode ! This means I wont be going into detail about every change I’ve made since the last episode, but rather try to highlight the most important/interesting ones.
A highlevel summary of changes includes:
-
Haskell stack has been introduced to the backend
-
Implemented REST endpoints for Albums CRUD
-
Backend now composes endpoints for Artists and Albums
-
Data model changed to account for Album and Track entities
-
Bootstrapping of sample data extended and refactored to a separate module
-
-
Implemented UI for listing, deleting, creating, updating and displaying album details
-
In particular the the features for creating/updating Albums and associated tracks, gives a glimpse of the compasability powers of the Elm Architecture
-
Backend
Stack
Working with Cabal and Cabal sandboxes is a bit of a pain. Stack promises to alleviate some of those pains, so I figured
I’d give it a go. There are probably tutorials/blog posts out there going into how you should go about migrating
to use stack in your Haskell projects, so I won’t go into any details here.
Basically I installed stack and added a stack configuration file stack.yml. After that I was pretty much up and running.
The instructions for running the sample app with stack can be found in the Albums README.
Datamodel

The datamodel contains a little bit of flexibility so that a track can be potentially be included in many albums (hence the album_track entity). For this episode though, we’re not using that and of course that innocent bit of flexibility comes with a cost of added complexity. I considered removing the album_track entity, but decided against it. I figured that in a real project this is a typical example of things you have to deal with (say you have a DBA or even more relevant… and exisiting datamodel you have to live with). Let’s run with it, and try to deal with it along the way.
Bootstrapping
The code for schema creation and bootstrapping test data has been moved to a separate module.
backend/src/Bootstrap.hs
bootstrapDB :: Sql.Connection -> IO ()
bootstrapDB conn = do
createSchema conn
populateSampleData conn
createSchema :: Sql.Connection -> IO ()
createSchema conn = do
executeDB "PRAGMA foreign_keys = ON"
executeDB "create table artist (id integer primary key asc, name varchar2(255))"
executeDB "create table track (id integer primary key asc, name varchar2(255), duration integer)"
executeDB "create table album (id integer primary key asc, artist_id integer, name varchar2(255), FOREIGN KEY(artist_id) references artist(id))"
executeDB "create table album_track (track_no integer, album_id, track_id, primary key(track_no, album_id, track_id), foreign key(album_id) references album(id), foreign key(track_id) references track(id))"
where
executeDB = Sql.execute_ conn
-- definition of sample data omitted for brevity
populateSampleData :: Sql.Connection -> IO ()
populateSampleData conn = do
mapM_ insertArtist artists
mapM_ insertTrack tracks
mapM_ insertAlbum albums
mapM_ insertAlbumTrack albumTracks
where
insertArtist a = Sql.execute conn "insert into artist (id, name) values (?, ?)" a
insertTrack t = Sql.execute conn "insert into track (id, name, duration) values (?, ?, ?)" t
insertAlbum a = Sql.execute conn "insert into album (id, artist_id, name) values (?, ?, ?)" a
insertAlbumTrack at = Sql.execute conn "insert into album_track (track_no, album_id, track_id) values (?, ?, ?)" atSomewhat amusing that foreign key constraints are not turned on by default in SQLite, but hey. What’s less amusing is that foreign key exceptions are very unspecific about which contraints are violated (:
New endpoints for Albums
Model additions
backend/src/Model.hs
data Track = Track (1)
{ trackId :: Maybe Int
, trackName :: String
, trackDuration :: Int -- seconds
} deriving (Eq, Show, Generic)
data Album = Album (2)
{ albumId :: Maybe Int
, albumName :: String
, albumArtistId :: Int
, albumTracks :: [Track]
} deriving (Eq, Show, Generic)| 1 | Our Track type doesn’t care about the distiction between the album and album_track entities |
| 2 | It was tempting to add Artist as a property to the Album type, but opted for just the id of an Artist entity. I didn’t want to be forced to return a full artist instance for every Album returned. You gotta draw the line somewhere right ? |
Albums CRUD functions
In order to keep this blog post from becoming to extensive we’ve only included the functions to list and create new albums. You can view the update, findById and delete functions in the album sample repo
findAlbums :: Sql.Connection -> IO [M.Album] (1)
findAlbums conn = do
rows <- Sql.query_ conn (albumsQuery "") :: IO [(Int, String, Int, Int, String, Int)]
return $ Map.elems $ foldl groupAlbum Map.empty rows
findAlbumsByArtist :: Sql.Connection -> Int -> IO [M.Album] (2)
findAlbumsByArtist conn artistId = do
rows <- Sql.query conn (albumsQuery " where artist_id = ?") (Sql.Only artistId) :: IO [(Int, String, Int, Int, String, Int)]
return $ Map.elems $ foldl groupAlbum Map.empty rows
albumsQuery :: String -> SqlTypes.Query (3)
albumsQuery whereClause =
SqlTypes.Query $ Txt.pack $
"select a.id, a.name, a.artist_id, t.id, t.name, t.duration \
\ from album a inner join album_track at on a.id = at.album_id \
\ inner join track t on at.track_id = t.id"
++ whereClause
++ " order by a.id, at.track_no"
groupAlbum :: Map.Map Int M.Album -> (Int, String, Int, Int, String, Int) -> Map.Map Int M.Album (4)
groupAlbum acc (albumId, albumName, artistId, trackId, trackName, trackDuration) =
case (Map.lookup albumId acc) of
Nothing -> Map.insert albumId (M.Album (Just albumId) albumName artistId [M.Track (Just trackId) trackName trackDuration]) acc
Just _ -> Map.update (\a -> Just (addTrack a (trackId, trackName, trackDuration))) albumId acc
where
addTrack album (trackId, trackName, trackDuration) =
album {M.albumTracks = (M.albumTracks album) ++ [M.Track (Just trackId) trackName trackDuration]}
newAlbum :: Sql.Connection -> M.Album -> IO M.Album (5)
newAlbum conn album = do
Sql.executeNamed conn "insert into album (name, artist_id) values (:name, :artistId)" [":name" := (M.albumName album), ":artistId" := (M.albumArtistId album)]
albumId <- lastInsertRowId conn
tracks <- zipWithM (\t i -> newTrack conn (i, fromIntegral albumId, (M.albumArtistId album), t)) (M.albumTracks album) [0..]
return album { M.albumId = Just $ fromIntegral albumId
, M.albumTracks = tracks
}
newTrack :: Sql.Connection -> (Int, Int, Int, M.Track) -> IO M.Track (6)
newTrack conn (trackNo, albumId, artistId, track) = do
Sql.executeNamed conn "insert into track (name, duration) values (:name, :duration)" [":name" := (M.trackName track), ":duration" := (M.trackDuration track)]
trackId <- lastInsertRowId conn
Sql.execute conn "insert into album_track (track_no, album_id, track_id) values (?, ?, ?)" (trackNo, albumId, trackId)
return track {M.trackId = Just $ fromIntegral trackId}| 1 | Function to list all albums |
| 2 | Function to list albums filtered by artist |
| 3 | Helper function to construct an album query with an optional where clause. The query returns a product of albums and their tracks. Let’s just call this a performance optimization to avoid n+1 queries :-) |
| 4 | Since album information is repeated for each track, we need to group tracks per album. This part was a fun challenge for a Haskell noob. I’m sure it could be done eveny more succinct, but I’m reasonably happy with the way it turned out. |
| 5 | This is the function to create a new album with all it’s tracks. We assume the tracks are sorted in the order they should be persisted and uses zipWith to get a mapIndexed kind of function so that we can generate the appropriate track_no for each album_track in the db. |
| 6 | Working with tracks we have to consider both the track and album_track entities in the db. As it is, the album_track table is just overhead, but we knew that allready given the design decission taken earlier. Once we need to support the fact that a track can be included in more that one album, we need to rethink this implementation. |
Adding albums to the API
backend/src/Api.hs
type AlbumAPI = (1)
QueryParam "artistId" Int :> Get '[JSON] [M.Album] (2)
:<|> ReqBody '[JSON] M.Album :> Post '[JSON] M.Album
:<|> Capture "albumId" Int :> ReqBody '[JSON] M.Album :> Put '[JSON] M.Album
:<|> Capture "albumId" Int :> Get '[JSON] M.Album
:<|> Capture "albumId" Int :> Delete '[] ()
albumsServer :: Sql.Connection -> Server AlbumAPI
albumsServer conn =
getAlbums :<|> postAlbum :<|> updateAlbum :<|> getAlbum :<|> deleteAlbum
where
getAlbums artistId = liftIO $ case artistId of (3)
Nothing -> S.findAlbums conn
Just x -> S.findAlbumsByArtist conn x
postAlbum album = liftIO $ Sql.withTransaction conn $ S.newAlbum conn album
updateAlbum albumId album = liftIOMaybeToEither err404 $ Sql.withTransaction conn $ S.updateAlbum conn album albumId
getAlbum albumId = liftIOMaybeToEither err404 $ S.albumById conn albumId
deleteAlbum albumId = liftIO $ Sql.withTransaction conn $ S.deleteAlbum conn albumId
type API = "artists" :> ArtistAPI :<|> "albums" :> AlbumAPI (4)
combinedServer :: Sql.Connection -> Server API (5)
combinedServer conn = artistsServer conn :<|> albumsServer conn| 1 | We’ve added a new API type for Albums |
| 2 | For listing albums we support an optional query param to allow us to filter albums by artist |
| 3 | This implementation is quite simplistic, we probably want to provide a more generic way to handle multiple filter criteria in the future. |
| 4 | The API for our backend is now a composition of the api for artists and the api for albums |
| 5 | As Servant allows us to compose apis it also allows us to compose servers (ie the implementations of the apis). We create a combined server, which is what we ultimately expose from our backend server |
| The really observant reader might have noticed that the update function for albums is a little bit more restrictive/solid than the corresponding function for artist. Here we actually check if the given album id corresponds to a album in the DB. If it doesn’t we return a 404. |
backend/Main.hs
app :: Sql.Connection -> Application
app conn = serve A.api (A.combinedServer conn) (1)
main :: IO ()
main = do
withTestConnection $ \conn -> do
B.bootstrapDB conn (2)
run 8081 $ albumCors $ app conn| 1 | Rather than serve the just the albumServer, we now serve the combined server. |
| 2 | We’ve updated bootstrapping to use the the new bootstrap module |
Backend summary
That wasn’t to hard now was it ? Adding additional end points was quite straightforward, the hard part was overcoming analysis paralysis. Settling on data types and db design took some time, and in hindsight I might have opted for a more simplistic db design. I’m also curious about how the design would have been had I started top down (frontend first) and backend last. I have a strong suspicion it would have been different.
Haskell IO
The thing I probably spent most time struggling with was working with IO actions. Apparantly I shouldn’t
use the term IO Monad. Anyways I can’t wrap my head around
when I’m "inside" the IO thingie and when I’m not. It’s obvious that do, ←, let and return is something
I have to sit down and understand (in the context of IO things). My strategy of trial and error doesn’t scale
all that well, and whatsmore It feels ackward not having a clue on the reasoning on why something is working or not.
Note to self, read up on Haskell IO.
REST concerns
Even with this simple example I started to run into the same old beef I have with generic rest endpoints. They rarely fit nicely with a Single Page Application. They work ok when it comes to adding and updating data, but when it comes to querying it all becomes much more limiting. In a SPA you typically want much more flexibility in terms of what you query by and what you get in return.
-
In an album listing for a given artist I might just want to display the name, release date, number of songs and album length I’m not interested in the tracks.
-
In an album listing / album search outside of an artist context I probably want to display the artist name
-
For a mobile client I might just want to display the album name (size of payloads might actually be important for mobile…)
-
Likewise when listing artists I might want to display number of albums
-
Or when searching I might want to search album name, artist name and/or track name
Frontend
New routes
frontend/src/Routes.elm
type Route (1)
= Home
-- ...
| AlbumDetailPage Int
| NewArtistAlbumPage Int
| EmptyRoute
routeParsers = (2)
[ static Home "/"
-- ...
, dyn1 AlbumDetailPage "/albums/" int ""
, dyn1 NewArtistAlbumPage "/artists/" int "/albums/new"
]
encode route = (3)
case route of
Home -> "/"
-- ...
AlbumDetailPage i -> "/albums/" ++ toString i
NewArtistAlbumPage i -> "/artists/" ++ (toString i) ++ "/albums/new"
EmptyRoute -> ""| 1 | We have added 2 new routes, one for edit/create albums, one for creating a new album (for a given artist) (actually there is a 3 for creating an album without selecting an artist, but it’s not wired up yet) |
| 2 | We need to add route matchers for the new routes. |
| 3 | We also need to add encoders for our new routes. |
Service API
To call our new REST api for albums we need to implement a few new functions and json decoders. We’ll only show two of the api related functions.
type alias AlbumRequest a = (1)
{ a | name : String
, artistId : Int
, tracks : List Track
}
type alias Album = (2)
{ id : Int
, name : String
, artistId : Int
, tracks : List Track
}
type alias Track = (3)
{ name : String
, duration : Int
}
getAlbumsByArtist : Int -> (Maybe (List Album) -> a) -> Effects a (4)
getAlbumsByArtist artistId action =
Http.get albumsDecoder (baseUrl ++ "/albums?artistId=" ++ toString artistId)
|> Task.toMaybe
|> Task.map action
|> Effects.task
createAlbum : AlbumRequest a -> (Maybe Album -> b) -> Effects.Effects b (5)
createAlbum album action =
Http.send Http.defaultSettings
{ verb = "POST"
, url = baseUrl ++ "/albums"
, body = Http.string (encodeAlbum album)
, headers = [("Content-Type", "application/json")]
}
|> Http.fromJson albumDecoder
|> Task.toMaybe
|> Task.map action
|> Effects.task
-- other functions left out for brevity. Check out the sample code or have a look at episode 2 for inspiration
-- Decoders/encoders for albums/tracks (6)
albumsDecoder : JsonD.Decoder (List Album)
albumsDecoder =
JsonD.list albumDecoder
albumDecoder : JsonD.Decoder Album
albumDecoder =
JsonD.object4 Album
("albumId" := JsonD.int)
("albumName" := JsonD.string)
("albumArtistId" := JsonD.int)
("albumTracks" := JsonD.list trackDecoder)
trackDecoder : JsonD.Decoder Track
trackDecoder =
JsonD.object2 Track
("trackName" := JsonD.string)
("trackDuration" := JsonD.int)
encodeAlbum : AlbumRequest a -> String
encodeAlbum album =
JsonE.encode 0 <|
JsonE.object
[ ("albumName", JsonE.string album.name)
, ("albumArtistId", JsonE.int album.artistId)
, ("albumTracks", JsonE.list <| List.map encodeTrack album.tracks)
]
encodeTrack : Track -> JsonE.Value
encodeTrack track =
JsonE.object
[ ("trackName", JsonE.string track.name)
, ("trackDuration", JsonE.int track.duration)
]| 1 | We use the AlbumRequest type when dealing with new albums |
| 2 | The Album type represents a persisted album |
| 3 | We aren’t really interested in the id of tracks so we only need one Track type |
| 4 | For finding albums for an artist we can use the Http.get function with default settings |
| 5 | To implement createAlbum we need to use Http.Send so that we can provide custom settings |
| 6 | Decoding/Encoding Json to/from types isn’t particularily difficult, but it is a bit of boilerplate involved |
The album page
We’ve made some changes to the ArtistDetail page which we won’t show in this episode. These changes include:
-
List all albums for an artist
-
Add features to remove album and link from each album in listin to edit the album
-
A button to initation the Album detail page in "Create New" mode
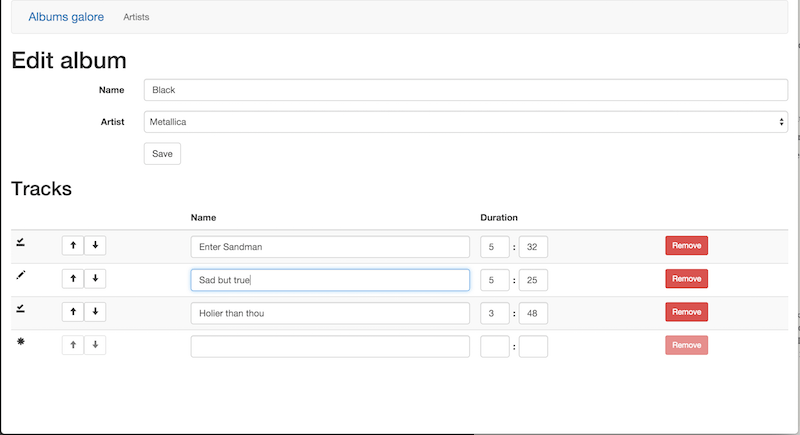
We consider an Album and it’s tracks to be an aggregate. This is also reflected in the implementation of the ArlbumDetail module in the frontend code. You’ll hopefully see that it’s not that hard to implement a semi advanced page by using the composability of the elm architecture.
Ok lets look at how we’ve implemented the Album detail page and it’s associated track listing.
Types
type alias Model = (1)
{ id : Maybe Int
, artistId : Maybe Int
, name : String
, tracks : List ( TrackRowId, TrackRow.Model )
, nextTrackRowId : TrackRowId
, artists : List Artist
}
type alias TrackRowId = (2)
Int
type Action (3)
= NoOp
| GetAlbum (Int)
| ShowAlbum (Maybe Album)
| HandleArtistsRetrieved (Maybe (List Artist))
| SetAlbumName (String)
| SaveAlbum
| HandleSaved (Maybe Album)
| ModifyTrack TrackRowId TrackRow.Action
| RemoveTrack TrackRowId
| MoveTrackUp TrackRowId
| MoveTrackDown TrackRowId| 1 | The model kind of reflects the Album type we saw in the previous chapter, but it’s bespoke for use in this view. Most notably we keep a list of Artists (for an artist dropdown) and tracks are represented as a list of trackrow models from the TrackRow.elm module. |
| 2 | To be able to forward updates to the appropriate TrackRow instance we are using a sequence type |
| 3 | There are quite a few actions, But the last 4 are related to the list of TrackRows. |
AlbumDetails can be seen as holding an AlbumListing, updates that concerns the list is handled by AlbumDetails whilst updates that concerns individual TrackRows are forwarded to the appropriate TrackRow instance.
The update function
update : Action -> Model -> ( Model, Effects Action )
update action model =
case action of
NoOp ->
( model, Effects.none )
GetAlbum id -> (1)
( model
, Effects.batch
[ getAlbum id ShowAlbum
, getArtists HandleArtistsRetrieved
]
)
ShowAlbum maybeAlbum -> (2)
case maybeAlbum of
Just album ->
( createAlbumModel model album, Effects.none )
-- TODO: This could be an error if returned from api !
Nothing ->
( maybeAddPristine model, getArtists HandleArtistsRetrieved )
HandleArtistsRetrieved xs -> (3)
( { model | artists = (Maybe.withDefault [] xs) }
, Effects.none
)
SetAlbumName txt -> (4)
( { model | name = txt }
, Effects.none
)
SaveAlbum -> (5)
case (model.id, model.artistId) of
(Just albumId, Just artistId) ->
( model
, updateAlbum (Album albumId model.name artistId (createTracks model.tracks)) HandleSaved
)
(Nothing, Just artistId) ->
( model
, createAlbum { name = model.name
, artistId = artistId
, tracks = (createTracks model.tracks)
} HandleSaved
)
(_, _) ->
Debug.crash "Missing artist.id, needs to be handled by validation"
HandleSaved maybeAlbum -> (6)
case maybeAlbum of
Just album ->
( createAlbumModel model album
, Effects.map (\_ -> NoOp) (Routes.redirect <| Routes.ArtistDetailPage album.artistId)
)
Nothing ->
Debug.crash "Save failed... we're not handling it..."
RemoveTrack id -> (7)
( { model | tracks = List.filter (\( rowId, _ ) -> rowId /= id) model.tracks }
, Effects.none
)
MoveTrackUp id -> (8)
let
track =
ListX.find (\( rowId, _ ) -> rowId == id) model.tracks
in
case track of
Nothing ->
( model, Effects.none )
Just t ->
( { model | tracks = moveUp model.tracks t }
, Effects.none
)
MoveTrackDown id -> (9)
let
track =
ListX.find (\( rowId, _ ) -> rowId == id) model.tracks
mayMoveDown t =
let
idx =
ListX.elemIndex t model.tracks
in
case idx of
Nothing ->
False
Just i ->
i < ((List.length model.tracks) - 2)
in
case track of
Nothing ->
( model, Effects.none )
Just t ->
( { model
| tracks =
if (mayMoveDown t) then
moveDown model.tracks t
else
model.tracks
}
, Effects.none
)
ModifyTrack id trackRowAction -> (10)
let
updateTrack ( trackId, trackModel ) =
if trackId == id then
( trackId, TrackRow.update trackRowAction trackModel )
else
( trackId, trackModel )
in
( maybeAddPristine { model | tracks = List.map updateTrack model.tracks }
, Effects.none
)| 1 | When we mount the route for an existing album, we need to retrieve both the album and
all artists (for the artist dropdown). To do both in one go we can use Effects.batch |
| 2 | We use the album param to differntiate between "update" and "new" mode for albums. If show album is called with an album we update our inital model with the information contained in the given album (this also involves initating TrackRow.models for each album track. If there is no album, we just add an empty track row and the initiate the retrieval of artists for the artists dropdown. |
| 3 | Once artists are retrieved we update our model to hold these |
| 4 | This action is executed when the user changes the value of the name field |
| 5 | The save action either calls update or create in the server api based on whether the model has an albumId or not. In both instances it needs to convert the model to an Album/AlbumRequest as this is what the signature of the ServerApi functions require |
| 6 | A successful save will give an Album type back, we update the model and in this instance we also redirect the user to the artist detail page. |
| 7 | This action is called when the user clicks on the remove button for a track row. We’ll get back to this when in just a little while |
| 8 | Action to move a track one step up in the track listing. If it’s already at the top
it’s a no op. The "heavy" lifting is done in the moveUp generic helper function |
| 9 | Similar to MoveTrackUp but it has addtional logic to ensure we don’t move a track below the
always present empty (Pristine) row in the track listing |
| 10 | The ModifyTrack action forwards to the update function for the TrackRow in question. Each track row is tagged with an Id (TrackRowId) |
The view
view : Signal.Address Action -> Model -> Html (1)
view address model =
div
[]
[ h1 [] [ text <| pageTitle model ]
, Html.form
[ class "form-horizontal" ]
[ div
[ class "form-group" ]
[ label [ class "col-sm-2 control-label" ] [ text "Name" ]
, div
[ class "col-sm-10" ]
[ input
  [ class "form-control"
  , value model.name
  , on "input"
        targetValue
        (\str -> Signal.message address (SetAlbumName str))
  ]
  []
]
]
, ( artistDropDown address model )
, div
[ class "form-group" ]
[ div
[ class "col-sm-offset-2 col-sm-10" ]
[ button
[ class "btn btn-default"
, type' "button"
, onClick address SaveAlbum
]
[ text "Save" ]
]
]
]
, h2 [] [ text "Tracks" ]
, trackListing address model
]
artistDropDown : Signal.Address Action -> Model -> Html (2)
artistDropDown address model =
let
val =
Maybe.withDefault (-1) model.artistId
opt a =
option [ value <| toString a.id, selected (a.id == val) ] [ text a.name ]
in
div
[ class "form-group" ]
[ label [ class "col-sm-2 control-label" ] [ text "Artist" ]
, div
[ class "col-sm-10" ]
[ select
[ class "form-control" ]
(List.map opt model.artists)
]
]
trackListing : Signal.Address Action -> Model -> Html (3)
trackListing address model =
table
[ class "table table-striped" ]
[ thead
[]
[ tr
[]
[ th [] []
, th [] []
, th [] [ text "Name" ]
, th [] [ text "Duration" ]
, th [] []
]
]
, tbody [] (List.map (trackRow address) model.tracks)
]
trackRow : Signal.Address Action -> ( TrackRowId, TrackRow.Model ) -> Html (4)
trackRow address ( id, rowModel ) =
let
context =
TrackRow.Context
(Signal.forwardTo address (ModifyTrack id))
(Signal.forwardTo address (always (RemoveTrack id)))
(Signal.forwardTo address (always (MoveTrackUp id)))
(Signal.forwardTo address (always (MoveTrackDown id)))
in
TrackRow.view context rowModel| 1 | The view function for the page. |
| 2 | The artist dropdown (a github star for the observant reader that can spot what’s missing :-) ) |
| 3 | Generates the track listing for the album |
| 4 | The rendering of each individual TrackRow is forwarded to the TrackRow module. We pass on a context so that a TrackRow is able to "signal back" to the AlbumDetails page for the actions that are owned by AlbumDetails (RemoveTrack, MoveTrackUp and MoveTrackDown). You’ll see how that plays out when we look at the TrackRow implementation in the next secion. |
|
Why the context thingie ? Well we can’t have the AlbumDetails depending on TrackRows and the TrackRow component having a dependency back to AlbumDetails. To solve that we pass on the tagged forwarding addresses so that TrackRows can signal AlbumDetails with the appropriate actions. I guess you can sort of think of them as callbacks, but it’s not quite that. Another slightly more elaborate explantion might be that when a user performs something on a track row that we capture (say a click on the remove button). The view from the track row returns a signal (wrapped as an effect) to album details which in turn returns a signal back to main. The signal is processed by the startapp "event-loop" and flows back through the update functions (main → AlbumDetails) and since it’s tagged to as an action to be handled by AlbumDetails is handled in AlbumDetails update function (and doesn’t flow further. Clear as mud or perhaps it makes sort of sense ? |
Track row
Types
type alias Model =                        (1)
  { name : String
  , durationMin : Maybe Int
  , durationSec : Maybe Int
  , status : Status
  }


type alias Context =                      (2)
  { actions : Signal.Address Action
  , remove : Signal.Address ()
  , moveUp : Signal.Address ()
  , moveDown : Signal.Address ()
  }


type Status                               (3)
  = Saved
  | Modified
  | Error
  | Pristine                              (4)


type Action                               (5)
  = SetTrackName String
  | SetMinutes String
| SetSeconds String| 1 | The model captures information about an album track. Duration is separated into minutes and seconds to be more presentable and easier for the user to input. In addition we have a status flag to be able to give the user feedback and handle some conditional logic. |
| 2 | Here you see the type definition for the Context we previously mentioned we used in the when forwarding view rendering for each individual track row in the Album Details page. (Btw it could be any component as long as they pass on a context with the given signature of Context). |
| 3 | The possible status types a row can be in. |
| 4 | Prisitine has a special meaning in the track listing in AlbumDetails. It should always be just one and it should be the last row. However that’s not the responsibility of TrackRow. TrackRow should just ensure the status is correct at all times. |
| 5 | The possible actions that TrackRow handles internally |
Update function
update : Action -> Model -> Model
update action model =
  case action of
    SetTrackName v ->        (1)
      { model | name = v, status = Modified }

    SetMinutes str ->        (2)
      let
        maybeMinutes = Result.toMaybe <| String.toInt str
      in
        case maybeMinutes of
          Just m ->
            { model | durationMin = maybeMinutes, status = Modified }

          Nothing ->
            if String.isEmpty str then
              { model | durationMin = Nothing, status = Modified}
            else
              model


    SetSeconds str ->        (3)
      let
        maybeSeconds = Result.toMaybe <| String.toInt str
      in
        case maybeSeconds of
          Just m ->
            if m < 60 then
              { model | durationSec = maybeSeconds, status = Modified }
            else
              model

          Nothing ->
            if String.isEmpty str then
              { model | durationSec = Nothing, status = Modified}
            else
model| 1 | Updates the trackname model property when user inputs into the trackname field |
| 2 | Updates the minutes property if a valid number is entered. Also blanks the field when the text input field becomes empty |
| 3 | Similar to minutes, but also ensures that you don’t enter more than 59 ! |
View
We’ll only show parts of the view to limit the amount of code you need to scan through.
view : Context -> Model -> Html
view context model =
  tr
    []
    [ td [] [ statusView model ]
    , td [] [ moveView context model ]
    , td [] [ nameView context model ]
    , td [] [ durationView context model ]
    , td [] [ removeView context model ]
    ]


nameView : Context -> Model -> Html
nameView context model =
  input
    [ class "form-control"
    , value model.name
    , on "input" targetValue (\str -> Signal.message context.actions (SetTrackName str))  (1)
    ]
    []


removeView : Context -> Model -> Html
removeView context model =
  button
    [ onClick context.remove ()                                                           (2)
    , class <| "btn btn-sm btn-danger " ++ if isPristine model then "disabled" else ""
    ]
[ text "Remove" ]| 1 | When a user causes an input event on the name input field we create a message using the address in context.actions with action SetTrackName So this message will cause an update eventually forwarded to the update function of TrackRow |
| 2 | When a user clicks on the remove button we use the address given by context.remove with a payload of () (ie void).
This message will always be forwarded to the address for AlbumDetails with the payload set to RemoveTrack with the given track row id.
All of which TrackRow is blissfully unaware of. |
Main.elm wiring it all up
type alias Model =
  WithRoute
    Routes.Route
    { --....
    , albumDetailModel : AlbumDetail.Model
    }


type Action
  = NoOp
  -- ...
  | AlbumDetailAction AlbumDetail.Action
  | RouterAction (TransitRouter.Action Routes.Route)


initialModel =
  { transitRouter = TransitRouter.empty Routes.EmptyRoute
  -- ...
  , albumDetailModel = AlbumDetail.init
  }


mountRoute prevRoute route model =
  case route of
    -- ...

    AlbumDetailPage albumId ->         (1)
      let
        (model', effects) =
          AlbumDetail.update (AlbumDetail.GetAlbum albumId) AlbumDetail.init
      in
        ( { model | albumDetailModel = model' }
        , Effects.map AlbumDetailAction effects)


    NewArtistAlbumPage artistId ->     (2)
      let
        (model', effects) =
          AlbumDetail.update (AlbumDetail.ShowAlbum Nothing) (AlbumDetail.initForArtist artistId)
      in
        ( { model | albumDetailModel = model' }
        , Effects.map AlbumDetailAction effects)

    -- ...


update action model =
  case action of
    -- ..

    AlbumDetailAction act ->           (3)
      let
        ( model', effects ) =
          AlbumDetail.update act model.albumDetailModel
      in
        ( { model | albumDetailModel = model' }
        , Effects.map AlbumDetailAction effects
        )

-- ..| 1 | When we mount the route for the AlbumDetailsPage ("/albums/:albumId") we call the
update function of AlbuDetail with a GetAlbum action. You might remember that this in turn calls the functions
for retrieving an Album and the function for retrieving artists as a batch. |
| 2 | When the user performs an action that results in the NewArtistAlbumPage being mounted ("/artists/:artistId/albums/new")
, we call the update on AlbumDetail with ShowAlbum action and a reinitialized model where artistId is set. |
| 3 | In the update function of Main we forward any actions particular to AlbumDetail |
Frontend summary
Working with the frontend code in Elm has been mostly plain sailing. I struggled a bit to get all my ducks(/effects) in a row and I’m not too happy with some of the interactions related to new vs update.
Unfortunately the elm-reactor isn’t working all that well with 0.16, certainly not on my machine. It also doesn’t work particularily well with single page apps that changes the url. I looked at and tried a couple of alternatives and settled on using elm-server. I had to make some modifications to make it work nicely with an SPA. I submitted a PR that seems to work nicely for my use case atleast. With that in place, the roundtrip from change to feedback became very schneizz indeed !
Undoubtably there is quite a bit that feels like boiler plate. The addition of routing also introduces yet another thing you have to keep in mind in several places. Boilerplate it might be, but it’s also quite explicit. I would imagine that in a large app you might grow a bit weary of some of the boilerplate and start looking for ways to reduce it.
I’d be lying if I said I’ve fully grasped; signals, tasks, ports, effects and mailboxes. But it’s gradually becoming clearer and it’s very nice that you can produce pretty cool things without investing to much up front.
Concluding remarks
I utterly failed to make a shorter blog post yet again. To my defence, the default formatting of Elm do favor newlines bigtime. Most of the Elm code has been formatted by elm-format btw.
I’m really starting to see the benefits of statically (strongly) typed functional languages. The journey so far has been a massive learing experience. Heck this stuff has been so much fun, I ended up taking a day off work so that I could work on this for a whole day with most of my good brain cells still at acceptable performance levels. Shame I can’t use this stuff at work, but I’m starting to accumulate quite a substantial collection of selling points.
Whats next ?
The sample app has started to accumulate quite a bit of technical dept, so I suppose the next episode(s) should start to address some of that.
Typed up CRUD SPA with Haskell and Elm - Part 3: Routing
19 January 2016
Tags: haskell elm haskellelmspa
TweetAny serious Single Page Application needs to have routing. Right ? So before we add any further pages it’s time to add routing support to the Elm frontend.
In episode 2, we implemented a Micky Mouse solution for page routing. Clearly that approach won’t scale. Now is a good time to implement something that can handle multiple pages, history navigation, direct linking etc. We could do it all from scratch, but lets opt for pulling in a library. In this episode we’ll introduce elm-transit-router to the Albums sample application.
Introduction
I decided pretty early on to try out the elm-transit-router library. It seemed to cover most of what I was looking for. It even has some pretty cool support for animations when doing page transitions.
Static typing is supposed to be really helpful when doing refactoring. Introducing routing should be a nice little excercise to see if that holds. Remember, there still isn’t a single test in our sample app, so it better hold. The elm-transit-router library github repo contains a great example app that proved very helpful in getting it up and running for the Albums app.
| Hop is an alternative routing library you might want to check out too. |
Implementation changes
frontend/elm-package.json
  // (...
  "source-directories": [
        ".",
        "src/"                                             (1)
    ],

  // ...
  "dependencies": {
    //... others ommitted
    "etaque/elm-route-parser": "2.1.0 <= v < 3.0.0",       (2)
    "etaque/elm-transit-style": "1.0.1 <= v < 2.0.0",      (3)
    "etaque/elm-transit-router": "1.0.1 <= v < 2.0.0"      (4)

  }
...| 1 | We’ve moved all elm files but Main.elm to the a src sub directory. So we need to add src to the list of source directories |
| 2 | A typed route parser with a nice DSL in Elm: We use it for defining our routes |
| 3 | Html animations for elm-transit |
| 4 | Drop-in router with animated route transitions for single page apps in Elm. Drop in, as in fitting very nicely with elm start-app. |
Album dependencies
The addition of the 3 new dependencies also adds quite a few transitive dependencies. The diagram above is automatically generated by the elm-light plugin for Light Table.
Defining routes (frontend/src/Routes.elm)
type Route                                                   (1)
  = Home
  | ArtistListingPage
  | ArtistDetailPage Int
  | NewArtistPage
  | EmptyRoute


routeParsers : List (Matcher Route)
routeParsers =
  [ static Home "/"                                         (2)
  , static ArtistListingPage "/artists"
  , static NewArtistPage "/artists/new"
  , dyn1 ArtistDetailPage "/artists/" int ""                (3)
  ]


decode : String -> Route
decode path =                                               (4)
  RouteParser.match routeParsers path
    |> Maybe.withDefault EmptyRoute


encode : Route -> String
encode route =                                              (5)
  case route of
    Home -> "/"
    ArtistListingPage   -> "/artists"
    NewArtistPage       -> "/artists/new"
    ArtistDetailPage  i -> "/artists/" ++ toString i
EmptyRoute -> ""| 1 | Union type that defines the different routes for the application |
| 2 | A static route matcher (static is a function from the RouteParser dsl) |
| 3 | Dynamic route matcher with one dynamic param |
| 4 | We try to match a given path with the route matchers defined above. Returns route of first successful match, or the EmptyRoute route
if no match is found. |
| 5 | Encode a given route as a path |
A few handy router utils (frontend/src/Routes.elm)
redirect : Route -> Effects ()
redirect route =                                       (1)
  encode route
    |> Signal.send TransitRouter.pushPathAddress
    |> Effects.task


clickAttr : Route -> Attribute
clickAttr route =                                     (2)
  on "click" Json.value (\_ ->  Signal.message TransitRouter.pushPathAddress <| encode route)


linkAttrs : Route -> List Attribute
linkAttrs route =                                     (3)
  let
    path = encode route
  in
    [ href path
    , onWithOptions
        "click"
        { stopPropagation = True, preventDefault = True }
        Json.value
        (\_ ->  Signal.message TransitRouter.pushPathAddress path)
]| 1 | This function allows us to perform routing through a redirect kind of effect. Comes in handy when we need to switch routes as a result of performing a task or doing an update action of some sort. |
| 2 | Helper function that creates a click handler attribute. When clicked the signal is forwarded to an address of the internal mailbox for the elm-transit-router library. By means of delegation the internal TransitRouter.Action type is wrapped into our app’s Action type. We’ll get back to this when we wire it all together ! |
| 3 | Another helper function, similar to clickAttr, but this is more specific for links that also has a href attribute |
Changes in Main.elm
Too hook in elm-transit-router we need to make a couple of changes to how we wire up our model, actions, view and update function. It’s also worth noting that from episode 2 have removed all direct update delegation from ArtistListing to ArtistDetail, this now all will happen through route transitions. An immediate benefit of that is that the ArtistDetail page becomes much more reusable.
Model, actions, transitions and initialization
type alias Model = WithRoute Routes.Route                                (1)
  { homeModel : Home.Model
  , artistListingModel : ArtistListing.Model
  , artistDetailModel : ArtistDetail.Model
  }


type Action =
    NoOp
  | HomeAction Home.Action
  | ArtistListingAction ArtistListing.Action
  | ArtistDetailAction ArtistDetail.Action
  | RouterAction (TransitRouter.Action Routes.Route)                    (2)


initialModel : Model
initialModel =
  { transitRouter = TransitRouter.empty Routes.EmptyRoute               (3)
  , homeModel = Home.init
  , artistListingModel = ArtistListing.init
  , artistDetailModel = ArtistDetail.init
  }


actions : Signal Action
actions =
  Signal.map RouterAction TransitRouter.actions                         (4)


mountRoute : Route -> Route -> Model -> (Model, Effects Action)
mountRoute prevRoute route model =                                      (5)
  case route of

    Home ->
      (model, Effects.none)

    ArtistListingPage ->                                                (6)
      (model, Effects.map ArtistListingAction (ServerApi.getArtists ArtistListing.HandleArtistsRetrieved))

    ArtistDetailPage artistId ->
      (model, Effects.map ArtistDetailAction (ServerApi.getArtist artistId ArtistDetail.ShowArtist))

    NewArtistPage ->
      ({ model | artistDetailModel = ArtistDetail.init } , Effects.none)

    EmptyRoute ->
      (model, Effects.none)


routerConfig : TransitRouter.Config Routes.Route Action Model
routerConfig =                                                          (7)
  { mountRoute = mountRoute
  , getDurations = \_ _ _ -> (50, 200)
  , actionWrapper = RouterAction
  , routeDecoder = Routes.decode
  }


init : String -> (Model, Effects Action)
init path =                                                             (8)
TransitRouter.init routerConfig path initialModel| 1 | We extend our model using WithRoute for our Route type in routes. This extends our type with a transitRouter property |
| 2 | We add a RouteAction to our Action type. We will handle that explicitly in the update function we’ll cover in the next section |
| 3 | We define an initial model, which has the initial models for the various pages. In addition we initialize the transitRouter property with an empty state and EmptyRoute route (that didn’t read to well). Basically a route that shouldn’t render anything, because it will transition to an actual route. It’s just an intermediary |
| 4 | Transformer for mapping TransitRouter actions to our own RouterAction. This allows start-app to map external input signals to inputs with an action type our application can recognize and process. |
| 5 | mountRoute is a function that provides what we want to happen in our update when a new route is mounted. Currently we
only pattern match on route to be mounted, but we could also match on the combination of previous route and new route to provide
custom behaviour depending on where you came from and where your are going to. Very powerful ! |
| 6 | When the ArtistListingPage route is mounted we return an effect to retrieve artists (when that effect returns the ArtistListing.HandleArtistRetrieved action is then eventually passed to the update function of ArtistListing) |
| 7 | routerConfig wires together the various bits that TransitRouter needs to do it’s thing |
| 8 | The init function now just initializes the TransitRouter with our config, and initial path (which we receive from a port) and our Initial model |
There’s quite a bit going on here, but once this is all in place, adding new routes is quite a breeze. I’d recommend reading through the Readme for elm-transit-router to understand more about the details of each step
The update function
update : Action -> Model -> (Model, Effects Action)
update action model =
  case action of

    NoOp ->
      (model, Effects.none)

    HomeAction homeAction ->
      let (model', effects) = Home.update homeAction model.homeModel
      in ( { model | homeModel = model' }
         , Effects.map HomeAction effects )

    ArtistListingAction act ->                                                       (1)
      let (model', effects) = ArtistListing.update act model.artistListingModel
      in ( { model | artistListingModel = model' }
         , Effects.map ArtistListingAction effects )

    ArtistDetailAction act ->                                                        (2)
      let (model', effects) = ArtistDetail.update act model.artistDetailModel
      in ( { model | artistDetailModel = model' }
         , Effects.map ArtistDetailAction effects )

    RouterAction routeAction ->                                                      (3)
TransitRouter.update routerConfig routeAction model| 1 | You should recognize this pattern from the previous episode. We delegate all actions tagged with ArtistListingAction to the update function for ArtistListing. The we update the model with the updated model from ArtistListing and map any effects returned. |
| 2 | If you remember from episode 2 this used to reside in ArtistListing, but has been moved here. |
| 3 | RouterAction action types are handled by the update function in TransitRouter. If you Debug.log this function you will see this
is called repeadly when there is a transition from one route to the next. (To handle the animation effects most notably) |
The main view/layout
menu : Signal.Address Action -> Model -> Html
menu address model =                                                       (1)
  header [class "navbar navbar-default"] [
    div [class "container"] [
        div [class "navbar-header"] [
          div [ class "navbar-brand" ] [
            a (linkAttrs Home) [ text "Albums galore" ]
          ]
        ]
      , ul [class "nav navbar-nav"] [
          li [] [a (linkAttrs ArtistListingPage) [ text "Artists" ]]       (2)
      ]
    ]
  ]


contentView : Signal.Address Action -> Model -> Html
contentView address model =                                                (3)
  case (TransitRouter.getRoute model) of
    Home ->
      Home.view (Signal.forwardTo address HomeAction) model.homeModel

    ArtistListingPage ->                                                   (4)
      ArtistListing.view (Signal.forwardTo address ArtistListingAction) model.artistListingModel

    ArtistDetailPage i ->
      ArtistDetail.view (Signal.forwardTo address ArtistDetailAction) model.artistDetailModel

    NewArtistPage  ->
      ArtistDetail.view (Signal.forwardTo address ArtistDetailAction) model.artistDetailModel

    EmptyRoute ->
      text "Empty WHAT ?"


view : Signal.Address Action -> Model -> Html
view address model =
  div [class "container-fluid"] [
      menu address model
    , div [ class "content"
          , style (TransitStyle.fadeSlideLeft 100 (getTransition model))]  (5)
          [contentView address model]
]| 1 | Menu view function for the app |
| 2 | Here we use the linkAttrs util function from Routes.elm to get a click handler. When the link is click
a route transition to the given page will occur (with addressbar update, history tracking and the whole shebang) |
| 3 | We render the appropriate main content view based which route is current in our model. |
| 4 | Getting the view for a page is used in the typical start-app way. Call the view function of the sub component and make sure to provide a forwarding addres that main can handle in its update function ! |
| 5 | We define the route transition animation using the style attribute (function) in elm-html. Here we use a transition style defined in elm-transit-style. |
How to navigate from one page to another ?
Move from artistlisting to artistdetail (frontend/src/ArtistListing.elm)
artistRow : Signal.Address Action -> Artist -> Html
artistRow address artist =
  tr [] [
     td [] [text artist.name]
    ,td [] [button [ Routes.clickAttr <| Routes.ArtistDetailPage artist.id ] [text "Edit"]]  (1)
    ,td [] [button [ onClick address (DeleteArtist (.id artist))] [ text "Delete!" ]]
  ]


view : Signal.Address Action -> Model -> Html
view address model =
  div [] [
      h1 [] [text "Artists" ]
    , button [
            class "pull-right btn btn-default"
          , Routes.clickAttr Routes.NewArtistPage                                            (2)
        ]
        [text "New Artist"]
    , table [class "table table-striped"] [
          thead [] [
            tr [] [
               th [] [text "Name"]
              ,th [] []
              ,th [] []
          ]
        ]
        , tbody [] (List.map (artistRow address) model.artists)
    ]
]| 1 | For navigation using links we just use the util function Routes.clickAttr function we defined earlier. This will trigger the necessary
route transition to the appropriate page (with params as necessary) |
| 2 | It’s worth noting that we since episode 2 have introduced a separate route for handling NewArtist (/artists/new). We are still
using the same behaviour otherwise, so it’s just a minor modification to have a separate transition for a new artist (since that doesn’t have a numeric id as part of its route path) |
Move to the artist listing after saving an artist (frontend/src/ArtistDetail.elm)
  -- ... inside update function

  HandleSaved maybeArtist ->
      case maybeArtist of
        Just artist ->
          ({ model | id = Just artist.id
                   , name = artist.name }
            , Effects.map (\_ -> NoOp) (Routes.redirect Routes.ArtistListingPage)   (1)
          )

        Nothing ->
Debug.crash "Save failed... we're not handling it..."| 1 | We use the Routes.redirect function we defined earlier. When the task fro saving is completed we trigger an effect
that will transtion route to the ArtistListing page. To allow the effect to work in our update function we need to map it to
an action that ArtistDetail knows about (we don’t have access to the RouterAction in main here!). That’s why we map the effect
to a NoOp action. |
The final wiring
frontend/main.elm
app : StartApp.App Model
app =
  StartApp.start
    { init = init initialPath                  (1)
    , update = update
    , view = view
    , inputs = [actions]                       (2)
    }


main : Signal Html
main =
  app.html


port tasks : Signal (Task.Task Never ())
port tasks =
  app.tasks


port initialPath : String (3)| 1 | We call the init function previously defined with a initialPath (which we get from a port, see 3 below) |
| 2 | The inputs fields of the start-app config is for external signals. We wire it to our actions defintion defined earlier |
| 3 | We get the initialPath through a port from JavaScript. See the next section for how |
| Initially I forgot to wire up the inputs. The net result of that was that none of the links actually did anything. Was lost for a while there, but the author of elm-transit-router etaque was able to spot it easily when I reached out in the elm-lang slack channel |
frontend/index.html
<!DOCTYPE html>
<html lang="en">
  <head>
    <meta charset="utf-8">
    <title>Albums</title>
    <link rel="stylesheet" href="assets/css/bootstrap.min.css">
  </head>
  <body>
    <script type="text/javascript" src="main.js"></script>                 (1)
    <script type="text/javascript" src="/_reactor/debug.js"></script>      (2)

    <script type="text/javascript">
      var main = Elm.fullscreen(Elm.Main, {initialPath: "/"});             (3)
    </script>

  </body>
</html>| 1 | This is the transpiled elm to js for our frontend app |
| 2 | We don’t really need this one, but if reactor in debug mode had worked with ports this would be necessary for debug tracing etc |
| 3 | We start our elm app with an input param for our initialPath. This is sent to the port defined above. It’s currently hardcoded to / (home), but
once we move to a proper web server we would probably use something like window.location.pathname to allow linking directly to
a specific route within our Single Page App. |
Summary and next steps
This was an all Elm episode. Hopefully I didn’t loose all Haskellites along the way because of that. We’ve added a crucial feature for any Single Page (Web) Application in this episode. The end result was pretty neat and tidy too.
So how was the refactoring experience this time ? Well the compiler was certainly my best buddy along the way. Obviously I also had to consult the documentation of elm-transit-router quite often. i had a few times where things appeared to be compiling fine in Light Table, but actually there was some error in a Module referred by Main. I’m not sure if it’s make’s fault or just that there is something missing in the elm-light plugin. I’ll certainly look into that. Always handy to have the command line available when you’re not sure about whether your IDE/Editor is tripping you up or not. I don’t think tests would have caught many of the issues I encountered. Forgetting to wire up inputs to startapp was probably my biggest blunder, and I’m sure no test would have covered that. I needed to know that this was something I had to wire up for it to work. RTFM etc.
Next up I think we will look at how much effort there is to add additional features. The hypothesis is that it should be fairly straighforward, but who knows !
Typed up CRUD SPA with Haskell and Elm - Part 2: Persistence up and running
14 January 2016
Tags: haskell elm haskellelmspa
TweetMy journey into Elm and Haskell continues. It’s time to add database support.
Since episode 1 I’ve managed to implement simple CRUD features for the Artist entity of the Albums sample application. It’s been anything but plain sailing, but it’s been a blast so far. Trying to wrap my head around two new languages and their libraries in parallell is somewhat daunting. The journey would probably have been smoother if I took more time to learn the language proper. Learning by doing is at times frustrating, at the same time very rewarding when stuff finally works.
There seems to be a pretty close correlation between it compiles and it works when programming in Elm and Haskell
— Magnus
(yeah I know; correlation does not imply causation)
(yeah I know; correlation does not imply causation)
Overview
So what have I done for this episode ?
-
Added persistence support to the haskell/servant backend server using SQLite
-
REST API now supports POST, PUT, DELETE and GET (multiple/single) Artists
-
The Elm frontend has features for listing, deleting, updating and creating new artists
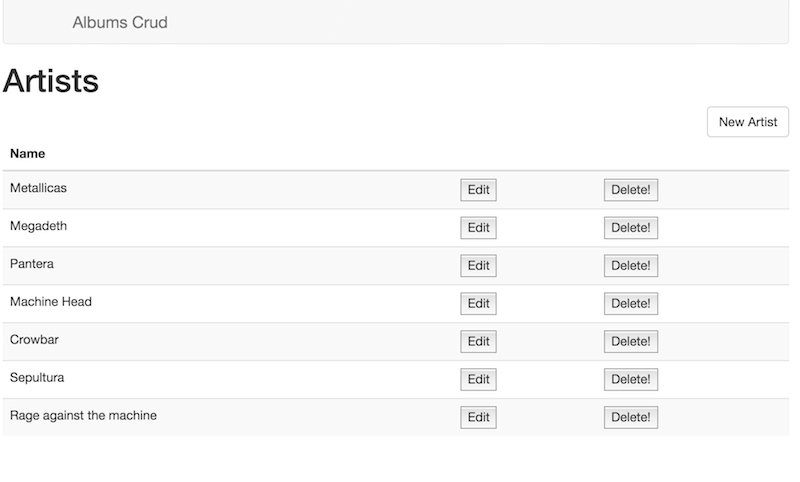
I’ve taken a bottom up approach to developing the features. For both the Frontend and the Backend I’ve implemented everything in one module. After that I’ve done pretty substantial refactorings into smaller modules while letting the respective compilers guide me along the way. So how did that work out ?
Backend
Pretty early on I managed to get halive to start working. Having live recompiling is really nice and seriously improved my workflow. I have very limited editor support because my editor (Light Table) currently doesn’t provide much in terms of haskell support. I was almost derailed with developing a Haskell plugin (or making the existing one work), but managed to keep on track.
Adding cors support
During development of the spike for the previous episode I used a chrome plugin to get around CORS restrictions from my browser. Surely this has to be solvable ? Indeed it was, wai-cors to the rescue.
backend/albums.cabal
  build-depends:
    -- ...
    ,  wai-cors
    -- ...
backend/src/Main.hs
;....

import Network.Wai.Middleware.Cors

;....

albumCors :: Middleware
albumCors = cors $ const (Just albumResourcePolicy)                             (1)


albumResourcePolicy :: CorsResourcePolicy                                       (2)
albumResourcePolicy =
    CorsResourcePolicy
        { corsOrigins = Nothing -- gives you /*
        , corsMethods = ["GET", "POST", "PUT", "DELETE", "HEAD", "OPTION"]
        , corsRequestHeaders = simpleHeaders -- adds "Content-Type" to defaults
        , corsExposedHeaders = Nothing
        , corsMaxAge = Nothing
        , corsVaryOrigin = False
        , corsRequireOrigin = False
        , corsIgnoreFailures = False
        }


main :: IO ()
main = do
run 8081 $ albumCors $ app (3)| 1 | Define wai cors middleware |
| 2 | Define a cors policy. This one is very lax. You wouldn’t want to use this for anything public facing as is |
| 3 | Apply the middleware to our app. Now cross origin headers are added and OPTION prefligh requests are supported. Nice |
| Cors inspiration harvested from https://github.com/nicklawls/lessons btw |
Enter SQLite
I looked at a few different options for database support. Most examples and tutorials related to servant and database usage seems to favor persistent. I’m surely going to have a closer look at that, but my initial impression was that perhaps there was just a little bit to much going on there. Just a little bit to much "magic" ? Having lost my taste for ORM’s in the JVM spehere (hibernate in particular) I wanted to start with something closer to the metal.
So to make it a little harder for myself I went for the sqlite-simple library. Pretty happy with the choice so far.
backend/albums.cabal
  build-depends:
    -- ...
    , sqlite-simple
    -- ...
backend/Main.hs
{-# LANGUAGE OverloadedStrings #-}
module Main where


import qualified Storage as S                              (1)
import qualified Api as A                                  (2)
import Network.Wai
import Network.Wai.Handler.Warp
import Servant
import Network.Wai.Middleware.Cors
import Control.Exception (bracket)
import Database.SQLite.Simple as Sql


app :: Sql.Connection -> Application
app conn = serve A.api (A.artistsServer conn)              (3)


testConnect :: IO Sql.Connection
testConnect = Sql.open ":memory:"                          (4)


withTestConnection :: (Sql.Connection -> IO a) -> IO a
withTestConnection cb =                                    (5)
  withConn $ \conn -> cb conn
  where
    withConn = bracket testConnect Sql.close               (6)

{-
  ...
  cors stuff omitted, already covered
-}


main :: IO ()
main = do
  withTestConnection $ \conn ->  do
    S.bootstrapDB conn                                     (7)
run 8081 $ albumCors $ app conn (8)| 1 | Module with functions for communication with the Albums database. Only used for bootstrapping with test data in main |
| 2 | Module that defines the webservice api |
| 3 | We make sure to pass a connection to our webservice server |
| 4 | For simplicity we are using an in memory database |
| 5 | Wrap a function (cb) giving it a connection and cleaning up when done |
| 6 | bracket ensures we also release the connection in case of any exceptions. |
| 7 | Creates schema and bootstraps with some sample data |
| 8 | Ensure we pass the connection to our app function |
| Read more about the bracket pattern |
backend/Api.hs
{-# LANGUAGE TypeOperators #-}
{-# LANGUAGE DataKinds     #-}

module Api where

import qualified Model as M                           (1)
import qualified Storage as S
import Data.Aeson
import Control.Monad.IO.Class     (MonadIO, liftIO)
import Control.Monad.Trans.Either
import Servant
import Database.SQLite.Simple as Sql


instance ToJSON M.Artist
instance FromJSON M.Artist


type ArtistAPI =                                       (2)
       Get '[JSON] [M.Artist]
  :<|> ReqBody '[JSON] M.Artist :> Post '[JSON] M.Artist
  :<|> Capture "artistId" Int :> Get '[JSON] M.Artist
  :<|> Capture "artistId" Int :> ReqBody '[JSON] M.Artist :> Put '[JSON] M.Artist
  :<|> Capture "artistId" Int :> Delete '[] ()

-- '

artistsServer :: Sql.Connection -> Server ArtistAPI    (3)
artistsServer conn =
  getArtists :<|> postArtist :<|> getArtist :<|>  updateArtist :<|> deleteArtist

  where
    getArtists                   = liftIO $ S.findArtists conn     (4)
    getArtist artistId           = liftIOMaybeToEither err404 $ S.artistById conn artistId
    postArtist artist            = liftIO $ S.newArtist conn artist
    updateArtist artistId artist = liftIO $ S.updateArtist conn artist artistId
    deleteArtist artistId        = liftIO $ S.deleteArtist conn artistId


liftIOMaybeToEither ::  (MonadIO m) => a -> IO (Maybe b) -> EitherT a m b
liftIOMaybeToEither err x = do                         (5)
    m <- liftIO x
    case m of
      Nothing -> left err
      Just x -> right x


type API = "artists" :> ArtistAPI


api :: Proxy API
api = Proxy| 1 | The record definitions for our API lives in this module |
| 2 | We’ve extended the api type defintions from episode 1 to define the shape of get multiple, get single, post, put and delete. |
| 3 | Connection has been added as a parameter to our artist server |
| 4 | liftIO is a monad transformer. I’d love to be able to explain
how it works, but well… Anyways net result is that I don’t have to define EitherT ServantErr IO .. all over the place |
| 5 | liftIOMaybeToEither - what it says. Handy function to return a servant error (which again maps to a http error) if a function like getArtist doesn’t return
a result. Tx to ToJans for inspiration |
| put aka update artist should also return a 404 when a non existing artist id is provided. Actually, error handling is pretty light throughout, but we’ll get back to that in a later episode ! |
/backend/Model.hs
{-# LANGUAGE DeriveGeneric #-}

module Model where

import GHC.Generics

data Artist = Artist                (1)
  { artistId :: Maybe Int           (2)
  , artistName :: String            (3)
} deriving (Eq, Show, Generic)| 1 | Moved record defintions to a separate module. Currently just Artist |
| 2 | Make id optional. This is a quick and dirty way to be able to use the same record definiton for new artists as for updates and gets. |
| 3 | Names in records are not scoped withing the record so one solution is to manually make sure names stay unique. |
| From what I gather record syntax is a bit clunky in Haskell (atleast when compared to Elm). This stackoverflow post didn’t bring any warm fuzzy feelings. If anyone has some better solutions which also plays well with the handy servant and SQLite simple functions feel free to leave a comment below ! |
backend/Storage.hs
{-# LANGUAGE OverloadedStrings #-}
module Storage where


import qualified Model as M
import qualified Data.Text as Txt


import Database.SQLite.Simple as Sql
import Database.SQLite.Simple.Types as SqlTypes


instance Sql.FromRow M.Artist where                         (1)
  fromRow = M.Artist <$> Sql.field <*> Sql.field


artistById :: Sql.Connection -> Int -> IO (Maybe M.Artist)  (2)
artistById conn idParam =
  findById conn "artist" idParam :: IO (Maybe M.Artist)


findArtists :: Sql.Connection -> IO [M.Artist]
findArtists conn =
  Sql.query_ conn "select * from artist" :: IO [M.Artist]


newArtist :: Sql.Connection -> M.Artist -> IO M.Artist
newArtist conn artist = do
  Sql.execute conn "insert into artist (name) values (?) " (Sql.Only $ M.artistName artist)
  rawId <- lastInsertRowId conn
  let updArtist = artist { M.artistId = Just (fromIntegral rawId) }  (3)
  return updArtist


-- Really we should check whether the artist exists here
updateArtist :: Sql.Connection -> M.Artist -> Int -> IO M.Artist
updateArtist conn artist idParam = do
  Sql.executeNamed conn "update artist set name = :name where id = :id" params
  return artist { M.artistId = Just idParam }                        (4)
  where
    params = [":id" := (idParam :: Int), ":name" := ((M.artistName artist) :: String)]


deleteArtist :: Sql.Connection -> Int -> IO ()
deleteArtist conn idParam =
  Sql.execute conn "delete from artist where id = ?" (Sql.Only idParam)


findById :: (FromRow a) => Sql.Connection -> String -> Int -> IO (Maybe a)
findById conn table idParam = do
  rows <- Sql.queryNamed conn (createFindByIdQuery table) [":id" := (idParam :: Int)]
  let result = case (length rows) of
                  0 -> Nothing
                  _ -> Just $ head rows      (5)

  return result


createFindByIdQuery :: String -> SqlTypes.Query
createFindByIdQuery table =
  SqlTypes.Query $ Txt.pack $ "SELECT * from " ++ table ++ " where id = :id"   (6)

-- ... boostrap function left out, check the source repo for details| 1 | Define SQLite row converter to create artist records for rows with id and name |
| 2 | Finding an artist by Id may return empty results. Prematurely factored out a generic findById function that is used here |
| 3 | Add the id of the newly inserted artist row to the resulting artist. (The Maybe artistId starts to smell) |
| 4 | Yuck, this smells even worse. The decision to support an optional id on the Artist record doesn’t ring true |
| 5 | Using let allows us to "work inside" the IO monad. Otherwise the compiler complains along the lines of Couldn’t match expected type ‘[r1]’ with actual type ‘IO [r0]’ |
| 6 | Whacking strings together is discouraged (helps avoid sql injection for one), but getting around it is possible with a little serimony |
Backend summary
Well now we got persistence up and running with a good ole' relational database. That’s not very exciting and I might return to change that in a future episode. The REST api is quite simple and lacking in validation and error handling, but it’s hopefully a decent start and foundation for future changes.
After working with Clojure and Leiningen not to long ago, the server startup time feels blistering fast in comparison. Getting halive to work made significant improvements to the development workflow. When working with Haskell I get a constant reminder that I would benefit from learning more about the language and fundemental concepts. The compiler messages still throws me off a lot of times, but the situation is gradually improving as I’m learning. I guess I’m already spoilt with the error messages from Elm which feels a lot clearer and better at highlighting the root cause(s) of my mistakes.
I’m still fumbling to design a sensible structure for the custom data types. I have a feeling several iterations will be needed as I add support for additional services.
Frontend
It’s a shame the hot reloading support in elm-reactor is broken at the time of writing, otherwise the development experience
would have been a lot better. Make → reload browser is just a keystroak away in Light Table, but still.
Having the informative compiler error and warning messages inline in my Editor is really nice though.
| Do better understand the elm-architecture I’ve tried to follow, you should really check out the tutorial. It does a much better job at explaining the core concepts than I do. |

frontend/Main.elm
module Main where


import ArtistListing
import Html exposing (..)
import Html.Attributes exposing (..)
import Html.Events exposing (onClick)
import Task exposing (..)
import Effects exposing (Effects, Never)
import StartApp


type alias Model =                                    (1)
  { artistListing : ArtistListing.Model}


type Action =                                         (2)
    ShowHomePage
  | ArtistListingAction ArtistListing.Action


init : (Model, Effects Action)                        (3)
init =
  let
    (artistListing, fx) = ArtistListing.init
  in
    ( Model artistListing
      , Effects.map ArtistListingAction fx            (4)
    )


update : Action -> Model -> (Model, Effects Action)
update action model =
  case action of

    ShowHomePage ->                                   (5)
      let
        (artistListing, fx) = ArtistListing.init
      in
        ( {model | artistListing = artistListing}
        , Effects.map ArtistListingAction fx
        )

    ArtistListingAction sub ->                        (6)
      let
        (artistListing, fx) = ArtistListing.update sub model.artistListing
      in
        ( {model | artistListing = artistListing}
        , Effects.map ArtistListingAction fx
        )


menu : Signal.Address Action -> Model -> Html
menu address model =
  header [class "navbar navbar-default"] [
    div [class "container"] [
      div [class "navbar-header"] [
        button [ class "btn-link navbar-brand", onClick address ShowHomePage ]
        [text "Albums Crud"]
      ]
    ]
  ]


view : Signal.Address Action -> Model -> Html
view address model =
  div [class "container-fluid"] [
      menu address model   (7)
    , ArtistListing.view (Signal.forwardTo address ArtistListingAction) model.artistListing
  ]

-- ... app, main and port for tasks left out, no changes since previous episode| 1 | The main model composes the artistlisting page model |
| 2 | Actions for main, currently just holds the actions for ArtistListing + a convenience action to reset/show home page |
| 3 | The init function from ArtistListing returns it’s model and an effect (get artist from server task). We initialize the main model with the artistlisting model |
| 4 | We map the effect from ArtistListing to an Main module effect which is then handled by the startapp "signal loop" |
| 5 | Quick and dirty way to trigger showing of the artist listing page (re-initialized) |
| 6 | All ArtistListing actions are tagged with ArtistListingAction, we delegate to the update function for ArtistListing , update the main model accordingly and the map the returne effect |
| 7 | To get/create the view for ArtistListing we call it’s view function, but we need to ensure signals sent from ArtistListing makes it back to the main view mailbox address. Signal.forwardTo helps us create a forwarding address. |
| Read more about Mailboxes, Messages and Addresses |
frontend/ArtistListing.elm
module ArtistListing (Model, Action (..), init, view, update) where


import ServerApi exposing (..)                                                 (1)
import ArtistDetail
-- ... other imports ommited

type Page = ArtistListingPage | ArtistDetailPage


type alias Model =
  { artists : List Artist
  , artistDetail : ArtistDetail.Model
  , page : Page}


type Action =
    HandleArtistsRetrieved (Maybe (List Artist))
  | SelectArtist (Int)
  | DeleteArtist (Int)
  | HandleArtistDeleted (Maybe Http.Response)
  | ArtistDetailAction ArtistDetail.Action
  | NewArtist


init : (Model, Effects Action)
init =
  let
    (artistDetail, fx) = ArtistDetail.init
  in
    ( Model [] artistDetail ArtistListingPage
      , getArtists HandleArtistsRetrieved                                      (2)
    )


update : Action -> Model -> (Model, Effects Action)
update action model =
  case action of

    HandleArtistsRetrieved xs ->                                               (3)
      ( {model | artists = (Maybe.withDefault [] xs) }
      , Effects.none
      )

    DeleteArtist id ->
      (model, deleteArtist id HandleArtistDeleted)

    HandleArtistDeleted res ->
      (model, getArtists HandleArtistsRetrieved)

    NewArtist ->                                                              (4)
      update (ArtistDetailAction <| ArtistDetail.ShowArtist Nothing) model

    SelectArtist id ->
      update (ArtistDetailAction <| ArtistDetail.GetArtist id) model

    ArtistDetailAction sub ->                                                 (5)
      let
        (detailModel, fx) = ArtistDetail.update sub model.artistDetail
      in
        ( { model | artistDetail = detailModel
                  , page = ArtistDetailPage }                                 (6)
        , Effects.map ArtistDetailAction fx
        )


-- ... artistView details ommitted for brevity

view : Signal.Address Action -> Model -> Html
view address model =
  div [class "content"] [
    case model.page of                                                       (7)

      ArtistListingPage ->
        artistsView address model

      ArtistDetailPage ->
        ArtistDetail.view (Signal.forwardTo address ArtistDetailAction) model.artistDetail

]| 1 | The ServerApi module exposes functions to interact with the backend server |
| 2 | getArtists HandleArtistsRetrieved calls the serverAPI with a action param, so that when the ajax/xhr callback finally makes in back into the elm signal loop, the update function is called with the action we want |
| 3 | Update the model with the list of artists retrieved (if any) |
| 4 | To show the artist detail page in "create" mode we create a ArtistDetailAction with the appropriate ArtistDetail.action |
| 5 | ArtistDetailAction sub actions are actions that are delegated to the actions of the ArtistDetail module. |
| 6 | Note that we change "page context" here so that the view function displays the appropriate page |
| 7 | Our naive page routing, just toggles display of pages by the page attribute of our model |
We’ve implemented a very simplistic page routing here. In a later episode we will refactor to something more managable for handling proper page routing.
frontend/ArtistDetail.elm
This page handles update/creation of a single Artist. I’ll leave it to you to check out the details of the sample code on github.
frontend/ServerApi.elm
module ServerApi where


import Json.Decode as JsonD exposing ((:=))
import Json.Encode as JsonE
import Effects exposing (Effects)
import Http
import Task


type alias ArtistRequest a =                                                 (1)
  { a | name : String }

type alias Artist =
  { id : Int
  , name : String
  }

baseUrl : String
baseUrl = "http://localhost:8081"


getArtist : Int -> (Maybe Artist -> a) -> Effects.Effects a
getArtist id action =                                                        (2)
  Http.get artistDecoder (baseUrl ++ "/artists/" ++ toString id)
    |> Task.toMaybe
    |> Task.map action                                                       (3)
    |> Effects.task


getArtists : (Maybe (List Artist) -> a) -> Effects a
getArtists action =
  Http.get artistsDecoder (baseUrl ++ "/artists")
    |> Task.toMaybe
    |> Task.map action
    |> Effects.task

createArtist : ArtistRequest a -> (Maybe Artist -> b) -> Effects.Effects b
createArtist artist action =                                                 (4)
  Http.send Http.defaultSettings
        { verb = "POST"
        , url = baseUrl ++ "/artists"
        , body = Http.string (encodeArtist artist)                           (5)
        , headers = [("Content-Type", "application/json")]
        }
    |> Http.fromJson artistDecoder
    |> Task.toMaybe
    |> Task.map action
    |> Effects.task

-- .. the remaining services and encoding|decoding left out for brevity| 1 | This type is an extensible record type. It allows our artist related services to be a little bit more generic and still keep a level of type checking |
| 2 | GET a single artist from our backend api. (Actually it returns and effect that will executa a task which upon callback will eventually call the update function in our app with the given action) |
| 3 | We’ve relented on type safety for actions by allowing it to be a generic param, but we gain some flexibility that allows our service to be usable in many different contexts |
| 4 | To take more control over http actions we use Http.send. It’s closer to the metal so it’s a little
bit more boilerplate. |
| 5 | Encode the artist (request) to a json string |
To see the remaining services and details of decoding and encoding please consolt the sample code on github.
Frontend summary
We are beginning to see the resmblance of a Single Page Application. We have started to compose views and pages using the Elm Architecture. The app supports basic CRUD oparations for an Artist entity. Error handling is light, there is no validation and our routing solution is overly simplistic, but we’ll get to that soonish !
Working with Elm has been an absolute pleasure. The compiler messages really do help. Doing refactoring (without tests I might add) doesn’t feel anywhere near as scary as I’m used to from other languages. I’m starting to understand more about the Elm Architecture, but I’m still getting a little confused about the details of Signals, Tasks, Mailboxes, Effects etc. It’s coming to me gradually. The important thing is I can still be quite productive even though I don’t understand all the details.
Conclusion and next steps
I’m aware this blog post got way to long even though I tried to shave of some of the code from the code listings. I’ll have to try to take on smaller/more targeted chunks in future episodes.
Anyways. I’m staring to feel I’m getting somewhere now. Both with Haskell and Elm. Learning Haskell is by far the most challenging but getting my head around Functional Reactive Programming in Elm isn’t without challenges either. My motivation is still strong and I’m learning a ton of stuff.
Candidate areas to address for the next episode are; routing, validation, error handling and obviously more useful features. I’m thinking perhaps routing comes first, but we’ll see.
Managing and diagramming elm packages with d3 in Light Table
01 January 2016
Tags: elm clojurescript d3 lighttable
TweetIn an effort to making management of project dependencies in Elm projects a little easier, the Elm plugin for Light Table the elm-light has a few neat features up it’s sleave. Check out the demo below for a brief overview.
| You can find the elm-light plugin here |
Demo
Other relevant demos:
Short implementation summary
I’m just going to give a very brief overview of a few key pieces for how the features are implemented here. I might add a more detailed blog post if there is any interest for that in the future.
Package management
The package manager is just a thin wrapper around the elm-package executable.
(defn parse-json-file [json-file]
  (when (files/exists? json-file)
    (-> (->> (files/open-sync json-file)
             :content
             (.parse js/JSON))
        (js->clj :keywordize-keys true))))


(defn remove-pkg [path pkg]
  (let [pkg-file (files/join path "elm-package.json")]
    (-> (u/parse-json-file pkg-file)
        (update-in [:dependencies] (fn [deps]
                                     (-> (into {}
                                               (map (fn [[k v]]
                                                      [(u/nskw->name k) v]) deps))
                                         (dissoc pkg))))
        u/pretty-json
        ((partial files/save pkg-file)))))
To list, update and remove dependencies it parses (and updates) the project file for elm projects; elm-package.json. In addition
it parses the exact-dependencies.json file for all resolved dependencies.
| Working with json in ClojureScript feels almost seamless to working with native ClojureScript datastructures |
View rendering
(q/defcomponent PackageTable [props]
  (d/table
   {:className "package-table"}
   (d/thead
    {}
    (d/tr
     {}
     (d/th {} "Package")
     (d/th {} "Range")
     (d/th {} "Exact")
     (d/th {} "")))
   (apply d/tbody {}
          (map #(PackageRow (assoc %
                              :on-remove (:on-remove props)
                              :on-browse (:on-browse props)))
               (:packages props)))))
You can find a detailed blog post about some of the benefits of using react for view rendering in Light Table in Implementing a Clojure ns-browser in Light Table with React
Dependency autocompletion
Whan adding dependencies there is a handy autocompleter. This uses a json resource from http://package.elm-lang.org/.
(defn fetch-all-packages
  "Fetch all packages from package.elm-lang.org"
  [callback]
  (fetch/xhr (str "http://package.elm-lang.org/all-packages?date=" (.getTime (new js/Date)))
             {}
             (fn [data]
               (let [pkgs (js->clj (.parse js/JSON data) :keywordize-keys true)]
                 (callback pkgs)))))
Dependency graph
To implement the dependency graph d3 and dagreD3 is used. Both of these ships node-modules. Using node-modules from Light Table plugins is definetely not rocket science !
(def dagreD3 (js/require (files/join u/elm-plugin-dir "node_modules/dagre-d3")))
(def d3 (js/require (files/join u/elm-plugin-dir "node_modules/d3")))


defn create-graph [data]                                                         (1)
  (let [g (.setGraph (new dagreD3.graphlib.Graph)  #js {})]
    (doseq [x (:nodes data)]
      (.setNode g (dep-id x) (node-label x)))
    (doseq [x (:edges data)]
      (.setEdge g (:a x) (:b x) #js {:label (:label x)
                                     :style (when (:transitive x)
                                              "stroke-dasharray: 5, 5;")}))
    g))


(behavior ::on-render                                                           (2)
          :desc "Elm render dependencies"
          :triggers #{:elm.graph.render}
          :reaction (fn [this]
                      (let [svg (.select d3 "svg")
                            g (.select svg "g")
                            renderer (.render dagreD3)]
                        (renderer g (create-graph (:data @this)))
                        (init-zoom svg g)
(resize-graph this svg))))| 1 | The function to create the dependency graph. Helper functions omitted, but not much to it really |
| 2 | Light Table behavior that is responsible for rendering the graph |
Credits
Typed up CRUD SPA with Haskell and Elm - Part 1: Spike time
28 December 2015
Tags: haskell elm haskellelmspa
TweetJoin me on my journey into statically typed functional languages. I’ve been living a pretty happily dynamic life so far. What’s the fuzz with all those types ? What do they give me in a real life scenario (aka is it worth using for work gigs) ? I need to make an effort and try to figure some of this out. This blog series is an attempt to document some of my experiences along the way through a practical example.
There will be:
-
A single page web application with crud features
-
Lots of types, refactoring and hopefully some testing
-
An evolving web-app github repo for your amusement or amazement
Just a little background on me
For quite some time I’ve been wanting to learn more about functional languages that are statically (and strongly) typed. What benefits do they really provide in practice and what are the downsides ? My background is a from quite a few years with Java, and the last 3-4 years I’ve been working mostly with Groovy, JavaScript and Clojure/ClojureScript. I’ve dabbled a little with Elm recently (minesweeper in Elm) , and I’ve tried to take on Haskell a couple of times (without much success I might add).
I mostly do web apps at work, so I figured I need to try and make something at least remotely similar to what I do in real life.
Let’s get started
This is the point where I’ve run into analysis paralysis so many a time before. So I set out to create a crud app, but what shall I build. After some deliberation I settled on making something related to Music. You know Albums, Artists, Tracks and such. I have no idea what the end result will be, but to start off I’ll make a simple spike.
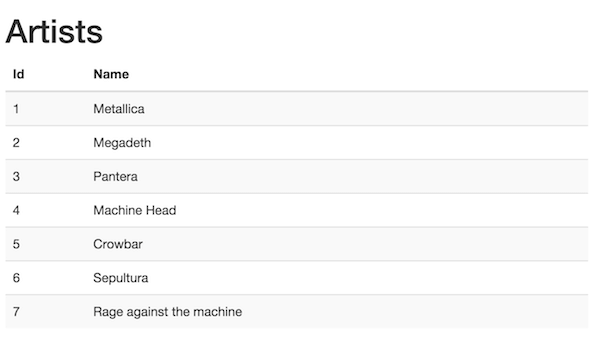
The spike should
-
establish a base architecture
-
implement a simple feature: List artists
|
You will find the sample application code on github. There will be a tag for each blog post in the series |
Backend
I wanted to implement server component that would provide REST-services. There are quite a few options available for Haskell that can help with that. After some research and trials I ended up using Servant.
I just had to choose one, and Servant seemed like a nice fit for REST stuff and I managed to get it working without to much hazzle.
Project set up
name:                albums
version:             0.1.0.0
synopsis:            Albums rest backend
license:             MIT
license-file:        LICENSE
author:              rundis
maintainer:          mrundberget@hotmail.com
category:            Web
build-type:          Simple
cabal-version:       >=1.10

executable albums
  main-is:             Main.hs              (1)
  build-depends:
      base >= 4.7 && < 5
    , either
    , aeson >= 0.8                          (2)
    , servant                               (3)
    , servant-server
    , wai
    , warp
  hs-source-dirs:      src                  (4)
default-language: Haskell2010| 1 | The entry point for the application |
| 2 | Provides JSON support |
| 3 | The servant library that helps us create type safe rest services |
| 4 | The directory(ies) where the source code for our app resides |
For the purposes of this spike all haskell code will reside in Main.hs. This will
surely not be the case as the app progresses.
| If you wan’t to try out automatic reloading support, you may want to check out halive. Unfortunately I couldn’t get it to work on my machine (OS/X Maverick), but it might work our for you though :-) |
Main.hs
data Artist = Artist
  { artistId :: Int
  , name :: String
  } deriving (Eq, Show, Generic)
A simple type describing the shape of an Artist in our app.
instance ToJSON Artist                                       (1)

type ArtistAPI =                                             (2)
       Get '[JSON] [Artist]                                  (3)
  :<|> Capture "artistId" Int :> Get '[JSON] Artist          (4)


artistsServer :: Server ArtistAPI
artistsServer = getArtists :<|> artistOperations             (5)

  where getArtists :: EitherT ServantErr IO [Artist]
        getArtists = return artists                          (6)

        artistOperations artistId =
          viewArtist

          where viewArtist :: EitherT ServantErr IO Artist
viewArtist = artistById artistId (7)| 1 | ToJSON is a type class. This line
basically is all we need to set up for json encoding an instance of our Artist type. |
| 2 | We describe our REST api using a type |
| 3 | Get on this api returns a list of Artists |
| 4 | Definition of how to get a single Artist by it’s id |
| 5 | The server type is the part where we descibe how we actually serve the api |
| 6 | The handler for listing artists. Currently it just returns a static list |
| 7 | The handler for retrieving a given artist by its id |
:<> is a combinator that ships with Servant. It allows us to combine the various parts
of our API into a single type.
|
artistById :: Int -> EitherT ServantErr IO Artist
artistById idParam =
  case a of
    Nothing -> left (err404 {errBody = "No artist with given id exists"})  (1)
    Just b -> return b                                                     (2)
  where
a = find ((== idParam) . artistId) artists (3)| 1 | If the find (by id) in 3 returns Nothing (see Maybe monad). We return a 404 error with a custom body |
| 2 | Upon success return the given artist instance |
| 3 | Find a given artist by id from our List of artists |
EitherT - An either monad. Check out the description from the servant tutorial on EitherT
|
Wrapping it all up
type API = "artists" :> ArtistAPI    (1)


api :: Proxy API
api = Proxy                          (2)


app :: Application
app = serve api artistsServer        (3)


main :: IO ()
main = run 8081 app (4)| 1 | A generic type for our api. It let’s us combine multiple types, but the
main reason it’s factored out for now is to avoid repetion of the root path for our
api artists |
| 2 | TBH I haven’t grokked why this is needed, but it’s probably to do with some type magic ? |
| 3 | An "abstract" web application. serve gives us a WAI web application. I guess WAI is like a common API for Haskell Web applicaitons. |
| 4 | The main entry point for our application. It starts our web application on port 8081 (and uses warp behind the scene to do so.) |
To get the backend up and running, check out the readme for the sample application
Backend experiences
Following the Servant tutorial it was quite easy to get a simple translated example to work. However I did start to struggle once I started to venture off from the tutorial. Some of it is obviously due to my nearly non-existing haskell knowledge. But I think what tripped me up most was the EitherT monad. Heck I still don’t really know what a monad is. The error messages I got along the way didn’t help me much, but I guess gradually they’ll make more and more sense, once my haskell foo improves.
Frontend
So Elm is pretty cool. The syntax isn’t too far off from Haskell. I’ve already started looking at Elm so it makes sense continuing with Elm to hopefully gain deeper knowledge of its strenghts and weaknesses.
| For a really pleasurable experience when developing elm I would suggest choosing an editor with linting support. As a shameless plug, one suggestion would be to use Light Table with my elm-light plugin. (Emacs, Vim, Sublime, Visual Code are other good options) |
Project setup
{
    "version": "1.0.0",
    "summary": "The frontend for the Albums CRUD sample app",
    "repository": "https://github.com/rundis/albums.git",
    "license": "MIT",
    "source-directories": [
        "."                                                      (1)
    ],
    "exposed-modules": [],
    "dependencies": {                                            (2)
        "elm-lang/core": "3.0.0 <= v < 4.0.0",
        "evancz/elm-effects": "2.0.1 <= v < 3.0.0",
        "evancz/elm-html": "4.0.2 <= v < 5.0.0",
        "evancz/elm-http": "3.0.0 <= v < 4.0.0",
        "evancz/start-app": "2.0.2 <= v < 3.0.0"
    },
    "elm-version": "0.16.0 <= v < 0.17.0"
}| 1 | For simplicity source files currently resides in the root folder of the project. This will change once the application grows |
| 2 | Initial set of dependencies used |
Album.elm
Before you start you may want to check out start-app. The frontend code is based on this.
type alias Artist =                                     (1)
  { id : Int
  , name : String
  }

type alias Model =                                      (2)
  { artists : List Artist}


type Action = ArtistRetrieved (Maybe (List Artist)) (3)| 1 | Front end representation of Artist. You’ll notice it’s strikingly similar to it’s Haskell counterpart on the server side |
| 2 | Type for keeping track of our model. Currently it will only contain a list of artists, but there is more to come later |
| 3 | "Tagged type" that describes the actions supported in the frontend app. |
init : (Model, Effects Action)
init =                                                  (1)
  ( Model []
    , getArtists
  )


update : Action -> Model -> (Model, Effects Action)
update action model =                                  (2)
  case action of
    ArtistRetrieved xs ->
      ( {model | artists = (Maybe.withDefault [] xs) }
      , Effects.none
      )


getArtists : Effects.Effects Action
getArtists =                                           (3)
  Http.get artists "http://localhost:8081/artists"
    |> Task.toMaybe
    |> Task.map ArtistRetrieved
    |> Effects.task


artist : Json.Decoder Artist
artist =                                               (4)
  Json.object2 Artist
    ("artistId" := Json.int)
    ("name" := Json.string)


artists : Json.Decoder (List Artist)
artists =                                              (5)
Json.list artist| 1 | Initializer function called by start-app when staring the application
it returns an empty model and an effect getArtists. Meaning getArtists will be
invoked once the page is loaded |
| 2 | The update function handles actions in our app. Currently it only supports one action, and that is the a callback once getArtists have returned. It updates the model with the retrieved artists and returns the updated model |
| 3 | Our ajax call ! We invoke the our rest endpoint using the elm http library. The first
argument to Http.get, artists, tells elm how to decode the result.
A lot is going on here, but the end result is that it does an xhr request decodes the result (if success)
using the given decoder and eventually invoke the update function with our list of artists (wrapped in a Maybe). |
| 4 | A decoder for decoding the json representation of an artist from the server to and Artist type instance |
| 5 | The response from our rest endpoint is a list of artists, so we use the JSON.list function telling it to use our artist decoder for each item in the list |
artistRow : Artist -> Html
artistRow artist =                                     (1)
  tr [] [
     td [] [text (toString artist.id)]
    ,td [] [text artist.name]
  ]

view : Signal.Address Action -> Model -> Html
view address model =                                  (2)
  div [class "container-fluid"] [
        h1 [] [text "Artists" ]
      , table [class "table table-striped"] [
          thead [] [
            tr [] [
               th [] [text "Id"]
              ,th [] [text "Name"]
          ]
        ]
      , tbody [] (List.map artistRow model.artists)
    ]
]| 1 | Function to generate the view for a single artist row |
| 2 | Our main view function for presenting a list of artists |
| We are not rendering dom nodes here, it’s just a representation of what we want to render. The actual rendering uses Virual DOM. |
Wrapping up the frontend
app : StartApp.App Model
app =                                          (1)
  StartApp.start
    { init = init
    , update = update
    , view = view
    , inputs = []
    }


main : Signal Html
main =                                         (2)
  app.html


port tasks : Signal (Task.Task Never ())
port tasks =                                   (3)
app.tasks| 1 | Using startapp to wire up our core functions (init, update and view) |
| 2 | The entry point function for our frontend app |
| 3 | When communicating with the outside world elm uses ports. This is used for by our rest invocation. It does so using tasks which is the elm way to describe asynchronous operations. |
Frontend experiences
Elm ports, tasks and effects are concepts that are yet to dawn completely on me. I protect my brain temporarily by giving them overy simplistic explanations. I wasn’t sure how to do the JSON decoding stuff, but fired up an elm-repl in Light Table and just experiemented a little until I had something workable. I used the linter feature of my Light Table plugin quite heavily, and the error messages from elm proved yet again to be very helpful.
Conclusion and next steps
I pretty sure I could have knocked this up with Clojure/ClojureScript, groovy/grails or plan old JavaScript in a fraction of the time I’ve used. But that’s not really a fair or relevant comparison. Learning completely new languages and new libraries takes time. I think I’ve learned quite a bit already and I’m very pleased to have made it this far !
Elm was easier to get into than Haskell and the Elm compiler felt a lot more helpful to me than ghc (haskell compiler). I had a head start on Elm, but I do remember getting started with Elm felt a lot smoother than jumping into Haskell. I’m still very much looking forward to improving my haskell skills and I’m sure that will proove very valuable eventually.
So what’s up next? Not sure, but i think adding persistence and the facility to add/update artists might be next up. I will keep you posted !
Minesweeper - a brief journey from JavaScript/React to Elm
10 November 2015
Tags: javascript react elm
TweetAfter taking a keen interest to Elm lately I figured I needed to solve a real problem. Something a bit fun and achievable in a couple of evenings/nights. Not being awfully creative, piggiebacking on other peoples' work is sometimes a good option. In this post I’ll take you through some of my steps in porting/re-implementing https://github.com/cjohansen/react-sweeper (JavaScript and React) to an Elm implementation.

| If you’d like to have a look at the complete implementation of the game, check out https://github.com/rundis/elm-sweeper. There you’ll find instructions on how to get it running too. |
A little background
Right! So I’ve taken an interest in Elm lately. If you’ve read any of my previous posts you might have noticed that I’m quite fond of Clojure and ClojureScript. I still very much am and I have tons to learn there still. But I wanted to dip my toes into a statically typed functional language. Elm seems quite approachable and I guess probably the talk "Let’s be mainstream" made my mind up to give it a go. After creating a language plugin for Light Table: elm-light and attending an Elm workshop at CodeMesh, I needed something concrete to try it out on.
I remembered that a colleague of mine at Kodemaker, Christian Johansen, made a minesweeper implementation using JavaScript and React. That seemed like a sufficiently interesting problem and I could shamelessly steal most of the game logic :)
First steps - The Game Logic
So the obvious place to start was the game logic. I had the option of trying to set up Elm-Test to use a test-driven inspired approach. But heck I figured I had to try to put those types to the test, so I went for an all out repl driven approach. That gave me a chance to experience the good and bad with the repl integration of my own Light Table Elm plugin too.
Starting with records and type aliases
Reading the game logic in react-sweeper I decided to define a couple of types
type alias Tile               (1)
  { id: Int
  , threatCount: Maybe Int    (2)
  , isRevealed: Bool
  , isMine: Bool}

type GameStatus = IN_PROGRESS | SAFE | DEAD

type alias Game =             (3)
  { status: GameStatus        (4)
  , rows: Int
  , cols: Int
, tiles: List Tile}| 1 | Type alias for records representing a tile in the game. |
| 2 | Threat count is a property on a tile that is not set until the game logic allows it. |
| 3 | Type alias for a record representing a game |
| 4 | Status of the game, the possible states are defined by GameStatus. SAFE means you’ve won, DEAD… well |
Describing these types proved to be valuable documentation as well as being very helpful when implementing the game logic later on.
What’s that Maybe thing ? If someone told me it’s a Monad I wouldn’t be any wiser. I think of it
as a handy way of describing that something may have a value. A nifty way to eliminate the use of null basically.
It also forces you to be explicit about handling the fact that it may not have a value.
You won’t get null pointer errors in an Elm program! (nor Undefined is not a function).
|
Finding neighbours of a tile
When revealing tiles in minesweeper you also reveal any adjacent tiles that aren’t next to a mine. In addition you display the threat count (how many mines are adjacent to a tile) for tiles next to those you just revealed. So we need a way to find the neighbouring tiles of a given tile.
JavaScript implementation
function onWEdge(game, tile) {                                                 (1)
  return tile % game.get('cols') === 0;
}

function onEEdge(game, tile) {                                                 (2)
  return tile % game.get('cols') === game.get('cols') - 1;
}


function nw(game, tile) {                                                      (3)
  return onWEdge(game, tile) ? null : idx(game, tile - game.get('cols') - 1);
}

function n(game, tile) {
  return idx(game, tile - game.get('cols'));
}

// etc , ommitted other directions for brevity


const directions = [nw, n, ne, e, se, s, sw, w];

function neighbours(game, tile) {
  return keep(directions, function (dir) {                                     (4)
    return game.getIn(['tiles', dir(game, tile)]);
  });
}| 1 | Helper function to determine if a given tile is on the west edge of the board |
| 2 | Helper function to determine if a given tile is on the east edge of the board |
| 3 | Returns the the tile north-west of a given tile. Null if none exists to the north-west |
| 4 | Keep is a helper function that maps over the collection and filters out any resulting `null`s. So the function iterates all directions (invoking their respective function) and returns all possible tiles neighbouring the given tile. |
Elm implementation
type Direction = W | NW | N | NE | E | SE | S | SW                                 (1)

onWEdge : Game -> Tile -> Bool                                                     (2)
onWEdge game tile =
  (tile.id % game.cols) == 0


onEEdge : Game -> Tile -> Bool
onEEdge game tile =
  (tile.id % game.cols) == game.cols - 1


neighbourByDir : Game -> Maybe Tile -> Direction -> Maybe Tile                     (3)
neighbourByDir game tile dir =
  let
    tIdx = tileByIdx game                                                          (4)
    isWOk t = not <| onWEdge game t                                                (5)
    isEOk t = not <| onEEdge game t
  in
    case (tile, dir) of                                                            (6)
      (Nothing, _) -> Nothing                                                      (7)
      (Just t, N)  -> tIdx <| t.id - game.cols
      (Just t, S)  -> tIdx <| t.id + game.cols
      (Just t, W)  -> if isWOk t then tIdx <| t.id - 1             else Nothing
      (Just t, NW) -> if isWOk t then tIdx <| t.id - game.cols - 1 else Nothing    (8)
      (Just t, SW) -> if isWOk t then tIdx <| t.id + game.cols - 1 else Nothing
      (Just t, E)  -> if isEOk t then tIdx <| t.id + 1             else Nothing
      (Just t, NE) -> if isEOk t then tIdx <| t.id - game.cols + 1 else Nothing
      (Just t, SE) -> if isEOk t then tIdx <| t.id + game.cols + 1 else Nothing


neighbours : Game -> Maybe Tile -> List Tile
neighbours game tile =
  let
    n = neighbourByDir game tile                                                   (9)
  in
List.filterMap identity <| List.map n [W, NW, N, NE, E, SE, S, SW] (10)| 1 | A type (actually a tagged union) describing/enumerating the possible directions |
| 2 | Pretty much the same as it’s JavaScript counterpart. I’ve been lazy and assumed the id of a tile is also the index in the tiles list of our game. |
| 3 | Find a neighbour by a given direction. The function takes 3 arguments; a game record, a tile (that may or may not have a value) and a direction. It returns a tile (that may or may not have a value) |
| 4 | tileByIdx is a functions that finds a tile by its index. (it returns a tile, … maybe). tIdx is a local function that just curries(/binds/partially applies) the first parameter - game |
| 5 | A local function that checks if it’s okay to retrieve a westward tile for a given tile |
| 6 | Pattern match on tile and direction. You might consider it a switch statement on steroids. |
| 7 | If the tile doesn’t have a value (then we don’t care about the direction hence _) we return Nothing (Maybe.Nothing) |
| 8 | Just t, NW matches on a tile that has value (assigned t) and a given direction of NW. The logic is for this case the same as for it’s JavaScript counterpart. Well except it returns Nothing if NW isn’t possible |
| 9 | A partially applied version of neightBourByDir to make the mapping function in 10. a bit less verbose |
| 10 | We map over all directions finding their neighbours, then List.filterMap identity filters out all List entries with Nothing.
Leaving us with a list of valid neighbours for the given tile. |
We covered quite a bit of ground here. I could have implemented all the direction functions as in the JavaScript implementation, but opted for a more generic function using pattern matching. It’s not that I dislike short functions, quite the contrary but in this case it felt like a good match (no pun intended). Once you get used to the syntax it gives a really nice overview as well.
| Think of <| as one way to avoid parenthesis. It’s actually a backwards function application |
|
When testing this function I got my first runtime error in Elm complaining that my case wasn’t exhaustive. Rumors has it that the next version of elm might handle this at compile time as well :-) 
|
Threat count
JavaScript
function getMineCount(game, tile) {                                             (1)
  var nbs = neighbours(game, tile);
  return nbs.filter(prop('isMine')).length;
}

function addThreatCount(game, tile) {                                           (2)
  return game.setIn(['tiles', tile, 'threatCount'], getMineCount(game, tile));
}| 1 | Gets the number of neighbouring tiles that are mines for a given tile. (prop is a helper function for retrieving a named property on a js object) |
| 2 | Set the threatCount property on a given tile in the game |
Elm
mineCount : Game -> Maybe Tile -> Int                                           (1)
mineCount game tile =
  List.length <| List.filter .isMine <| neighbours game tile

revealThreatCount : Game -> Tile -> Tile                                        (2)
revealThreatCount game tile =
  {tile | threatCount <- Just (mineCount game <| Just tile)
, isRevealed <- True}| 1 | Same as for it’s JavaScript counterpart, but using a . syntax for dynamic property access |
| 2 | Almoust the same as addThreatCount, but since once we add it the tile would also always be revealed I opted for a two in one function. |
|
For mine count, both implementations are potentially flawed.
|
Revealing safe adjacent tiles
JavaScript
function revealAdjacentSafeTiles(game, tile) {
  if (isMine(game, tile)) {
    return game;
  }
  game = addThreatCount(game, tile).setIn(['tiles', tile, 'isRevealed'], true);
  if (game.getIn(['tiles', tile, 'threatCount']) === 0) {
    return keep(directions, function (dir) {
      return dir(game, tile);
    }).reduce(function (game, pos) {
      return !game.getIn(['tiles', pos, 'isRevealed']) ?
        revealAdjacentSafeTiles(game, pos) : game;
    }, game);
  }
  return game;
}
Elm
revealAdjacentSafeTiles :  Game -> Int -> Game
revealAdjacentSafeTiles game tileId =
  case tileByIdx game tileId of
    Nothing -> game
    Just t ->
      if t.isMine then game else
        let
          updT   = revealThreatCount game t
          updG   = {game | tiles <- updateIn tileId (\_ -> updT) game.tiles}
          fn t g = if not t.isRevealed then revealAdjacentSafeTiles g t.id else g
        in
          if not (updT.threatCount == Just 0) then
            updG
          else
            List.foldl fn updG <| neighbours updG <| Just updT
A brief comparison
The most noteworthy difference is really the explicit handling of an illegal tile index in the Elm implementation. If I didn’t have the JavaScript code to look at, I’m guessing the difference would have been more noticable. Not necessarily for the better. We’ll never know.
Anyways, enough about the game logic. Let’s move on to the view part.
Comparing the view rendering
JavaScript
The React part for rendering the UI is found in ui.js Below I’ve picked out the most interesting parts
export function createUI(channel) {                                            (1)
  const Tile = createComponent((tile) => {                                     (2)
    if (tile.get('isRevealed')) {
      return div({className: 'tile' + (tile.get('isMine') ? ' mine' : '')},
                 tile.get('threatCount') > 0 ? tile.get('threatCount') : '');
    }
    return div({
      className: 'tile',
      onClick: function () {
        channel.emit('reveal', tile.get('id'));                                (3)
      }
    }, div({className: 'lid'}, ''));
  });

  const Row = createComponent((tiles) => {
    return div({className: 'row'}, tiles.map(Tile).toJS());
  });

  const Board = createComponent((game) => {
    return div({
      className: 'board'
    }, partition(game.get('cols'), game.get('tiles')).map(Row).toJS());
  });

  const UndoButton = createComponent(() => {                                  (4)
    return button({
      onClick: channel.emit.bind(channel, 'undo')
    }, 'Undo');
  });

  const Game = createComponent((game) => {
    return div({}, [Board(game), UndoButton()]);
  });

  return (data, container) => {                                               (5)
    render(Game(data), container);
  };
}| 1 | This function returns a function for creating the react component tree for the game. It takes a channel param, which is an event emitter. So when components need to notify the "controller" about user actions they can just emit messages to this channel A neat way to avoid using callbacks! |
| 2 | createComponent is a handy helper function that avoids some react boiler plate and provides an optimized shouldComponentUpdate function for each react component used. |
| 3 | When a user clicks on a tile a reveal message with the tile id is emitted |
| 4 | The game also supports undo previous move :) |
| 5 | Returns a function that when called starts the react rendering of the game in the given container element |
Elm
threatCount : Maybe Int -> List Html
threatCount count =
  case count of
    Nothing -> []
    Just t  -> [text (if t > 0 then toString t else "")]


tileView : Signal.Address Action -> Game.Tile -> Html                               (1)
tileView address tile =
  if tile.isRevealed then
    div [class ("tile" ++ (if tile.isMine then " mine" else ""))]
        <| threatCount tile.threatCount

  else
    div [class "tile", onClick address (RevealTile tile.id)]                        (2)
        [div [class "lid"] []]                                                      (3)


rowView : Signal.Address Action -> List Game.Tile -> Html
rowView address tiles =
  div [class "row"] (List.map (tileView address) tiles)


statusView: Game -> Html
statusView game =
  let
    (status, c) = case game.status of
                    SAFE          -> (" -  You won", "status-won")
                    DEAD          -> (" - You lost", "status-lost")
                    IN_PROGRESS   -> ("", "")
  in
    span [class c] [text status]


view : Signal.Address Action -> Game -> Html                                       (4)
view address game =
  let
    rows = Utils.partitionByN game.cols game.tiles
  in
    div [id "main"] [
      h1 [] [text "Minesweeper", statusView game],
      div [class "board"] (List.map (rowView address) rows),
      div [] [button [class "button", onClick address NewGame] [text "New game"]]
]| 1 | The function responsible for rendering a single tile. Very much comparable to the React tile component in the JavaScript implementation. Similar to React, we aren’t returning actual dom elments, Elm also has a virtual dom implementation |
| 2 | When a tile is clicked a message is sent to a given address (we’ll get back to that a little bit later). Well actually it doesn’t happen right away, rather think of it as creating an envelope with content and a known address. The Elm runtime receives a signal back that will take care of sending the message to it’s rendering function when appropriate. |
| 3 | div here is actually a function from the HTML module in Elm. It takes two lists as arguments, the first is a list of attributes and the second is a list of child elements |
| 4 | Our main entry function for creating our view. It takes an address and game as parameter and returns a virtual dom node (Html) |
Signal.Address Action : Address points to a particular type of Signal, in our case the Signal is an Action
we’ll come back to that shortly. But the short story is that this is what enables us to talk back to the main application.
|
Wiring it all together
JavaScript
const channel = new EventEmitter();
const renderMinesweeper = createUI(channel);
let game = createGame({cols: 16, rows: 16, mines: 48});
let history = List([game]);

function render() {                                                         (1)
  renderMinesweeper(game, document.getElementById('board'));
}

channel.on('undo', () => {                                                  (2)
  if (history.size > 1) {
    history = history.pop();
    game = history.last();
    render();
  }
});

channel.on('reveal', (tile) => {                                            (3)
  if (isGameOver(game)) { return; }

  const newGame = revealTile(game, tile);

  if (newGame !== game) {
    history = history.push(newGame);
    game = newGame;
  }

  render();

  if (isGameOver(game)) {
    // Wait for the final render to complete before alerting the user
    setTimeout(() => { alert('GAME OVER!'); }, 50);
  }
});| 1 | The react render entry point for the game. Called whenever the game state is changed |
| 2 | The JavaScript implementation keeps a history of all game states. I forgot to mention that immutable-js is for collections. Undo just gets the previous game state and rerenders. Nice and simple |
| 3 | Event listener for reveal messages. It invokes reveal tile, adds to history (and potentially ends the game). |
This is all very neat and tidy and works so great because the game state is managed in one place and is passed through the ui component tree as an immutable value. The fact that the state is immutable also makes the undo implementation a breeze. I really like this approach !
Elm
If you don’t know Elm at all, this part might be the most tricky to grasp. To simplify things I’ll split it into two parts.
Start-app approach
Start-app is a small elm package that makes it easy to get started with an elm Model-View-Update structure. This is a great place to start for your first elm app.
type Action = RevealTile Int                                             (1)


init : Game                                                              (2)
init =
  Game.createGame 15 15 5787345


update : Action -> Game -> Game                                          (3)
update Action game =
  case action of
    RevealTile id -> if not (game.status == IN_PROGRESS) then game else  (4)
                      Game.revealTile game id

main =                                                                   (5)
  StartApp.Simple.start                                                  (6)
    { model = init
    , update = update
    , view = view
}| 1 | Type describing the actions the game supports. Currently just revealing tiles, and you can see that we also specify that the RevealTile action expects an Int paramater. That would be the tile id. |
| 2 | The init function provides the initial state for our application. createGame is a helper function for creating
a game with x cols and y rows. The 3.rd param is a seed for randomizing tiles. We’ll return to that seed thing in the next chapter! |
| 3 | Update is the function that handles the actual update of state, or rather the transformation to the next state based on some action. It’s quite simple in this case, just reveal a given tile and return the updated game |
| 4 | No point in revealing more tiles when the game is already over :) |
| 5 | main is the entry point into our application. If you use elm-reactor this will be automatically invoked for you, which is handy for getting started quickly |
| 6 | StartApp.Simple.start takes care of wiring things up and start your application |
Trouble in paradise, we get the same board every time
Do you remember the 3rd param to createGame in the previous chapter? That is the initial seed to a random generator (Random) to randomize the occurence of mines. The problem is that using the same seed produces the same result. Calling an elm random generator will return a new seed, so of course I could/should have stored that and used that for the next game. But I still need an initial seed that’s different every time I start the app. Current time would be a good candidate for an initial seed. But there is no getCurrentTime function in Elm. Why ? It’s impure, and Elm doesn’t like impure functions. By "pure", we mean that if you call a function with the same arguments, you get the same result. There are several reasons why pure functions is a great thing (testing is one), but I won’t go into that, let’s just accept the fact that this is the case, so how can we deal with it ?
Well the elm-core package has a Time module with a timestamp function that looks useful. To use that we have to change a few things though, most notably we can’t use the simple start app approach any more.
type Action =
  NewGame                                                                 (1)
  | RevealTile Int


update : (Float, Action) -> Game -> Game                                  (2)
update (time, action) game =
  case action of
    NewGame -> Game.createGame 15 15  (truncate time)                     (3)
    RevealTile id -> if not (game.status == IN_PROGRESS) then game else
                       Game.revealTile game id


actions: Signal.Mailbox Action                                            (4)
actions =
  Signal.mailbox NewGame

model: Signal Game                                                        (5)
model =
  Signal.foldp update init (Time.timestamp actions.signal)

main : Signal Html                                                        (6)
main =
  Signal.map (view actions.address) model

port initGame : Task.Task x ()                                            (7)
port initGame =
Signal.send actions.address NewGame| 1 | We introduce a new action NewGame |
| 2 | Our update function now takes a tuple of time and action + game as input parameters |
| 3 | We use the elm core function truncate to convert the time(stamp) float into an integer and use that as our seed to createGame |
| 4 | We construct a mailbox for our Action messages manually, with an initial value of NewGame |
| 5 | Our model is a fold (reduce) of all state changes sent to our mailbox (from the app started to the current moment of time). This is where we introduce the Time.timestamp function, which wraps our action signal and produces a tuple of (timestamp, action) |
| 6 | main is just a map over our view function with our current model. Since view also expects an (mailbox) address we curry/partially apply that to our view function |
| 7 | Unfortunately I couldn’t figure out how to get the timestamp passed to the init function. The creation step (4) of the mailbox doesn’t actually cause the NewGame action to be executed either. So this is a little hack that fires off a task to execute the NewGame action. This is run after initialization so when you load the game you’ll not see state 0 for the game, but actually state 1. If any elm-ers out there reads this, feel free to comment on how this could be done in a more idiomatic fashion! |
| I found this blogpost very illuminating for deconstructing start-app. |
But what about undo ?
There is an elm-package I think would help us do that quite simply; elm-undo-redo. However if you are using elm-reactor you pretty much get undo-redo and more out of the box. Great for development, but maybe not so much for production!
Summary
Getting into Elm has been a really pleasurable experience so far. It’s quite easy to get up and running without knowing all that much about the language. I’ve found the elm compiler to be a really nice and friendly companion. The error messages I get are really impressive and I can truly say I’ve never experienced anything quite like it. Working with types (at least for this simple application) hasn’t felt like a burden at all. I still feel I should have had some tests, but I think I would feel more comfortable refactoring this app with a lot less tests than I would in say JavaScript.
If my intention for this post had been to bash JavaScript I chose a poor example to compare with. But then again that was never my intention. I wanted to show how a well written JavaScript app might compare to an Elm implementation written by an Elm noob. Hopefully I’ve also managed to demonstrate that it’s not all that difficult getting started with Elm and perhaps peeked your interest enough to give it a try !
Resources
These are some of the resources that have helped me getting up to speed:
-
Elm: Building Reactive Web Apps - A really nice step-by-step tutorial with videos and examples to get you up to speed. You get great value for $29 I think.
-
Elm: Signals, Mailboxes & Ports - Elm signals in depth. Really useful for getting into more detail on what Signals are, how they work and how to use them.
-
Elm Architecture Tutorial - Tutorial outlining "the Elm Architecture"
-
elm-lang.org - The official site for the elm language
-
elm-light - My elm plugin for Light Table, or if you use another editor it might be listed here
Addendum - Potential improvements
-
Initialize game with seed without adding an extra state
-
Perhaps I should/could have used extensible records to model the game
-
Maybe Array would be a better choice than List for holding tiles ?
Elm plugin for Light Table
30 October 2015
Tags: elm clojurescript lighttable
TweetBackground
I’ve just started playing around a little bit with elm. This weekend I’m going to codemesh where I’ll be attending an Elm workshop with the author of Elm, Evan Czaplicki.
To ensure I have an editor I’m familiar with and to get me started a little, I figured I’d create an Elm language plugin for Light Table. However lately I’ve been a little busy helping out getting https://github.com/LightTable/LightTable version 0.8 released. Last weekend we got an 0.8 alpha out. I needed some of the features from Electron. So now with Light Table using Electron under the hoods I could finally complete an intial plugin release. It’s rough, but it’s an ok start I suppose !
Demo
The plugin
| You can find the plugin repo on github https://github.com/rundis/elm-light |
ClojureScript - Performance tuning rewrite-cljs
04 August 2015
Tags: clojure clojurescript javascript performance
TweetHow would you go about performance tuning a ClojureScript Library or a ClojureScript application ? Before I started my summer holidays I started to investigate how I should go about doing that for one of my ClojureScript libraries: rewrite-cljs I didn’t find a whole lot of info from my trusted old friend Google, so I thought I’d share some bits and bobs I’ve learned so far.
Introduction
I’ve previously blogged about how I used rewrite-cljs for two of my Light Table plugins; clj-light-refactor and parembrace The library is a ClojureScript port of the awesome rewrite-clj library by Yannick Scherer. A lot of the porting was just plain sailing with a few adaptations here and there. It’s truly great that Clojure and ClojureScript are so much aligned. After the port I also made some changes and adaptations that I knew I needed in my plugins and that I though might be useful for other use cases as well.
However one limitation that seriously nagged me was that rewrite-cljs wasn’t performant enough to be able to handle rewriting of medium to large sized files (as strings currently mind you) from Light Table.
| One of my sample ClojureScript files (about 600 lines / 20K characters) took about 250 ms to parse and build a zip for before I started looking at performance tuning. At the time of writing this blog post it’s down to 50-60 ms. Pretty good, but still need shave it down a quite a bit further to do some of the things I have in mind ! |
Opposing forces
I guess I could have started blindly changing a lot of the implementation to be closer to native JavaScript. However for several reasons I’d like to keep it as Clojur’y as possible and ideally I don’t want to stray to far away from it origins (rewrite-clj). How to balance and where to begin ?
Tools
To get some idea of where to bottlenecks were and what/if any of my optimzations had any effect I really need some tools to help me out. Fortunately Light Table ships with the chrome developer tools. The profiler is quite helpful, in addition I used a small benchmark script to see how it perfomed over a slightly longer timespan.
Tuning
First quickwin - Moving away from multimethods
Before I profiled anything I came accross a google group discussion about multimethod performance vs protocols for dispatching. The core of the parser in rewrite-cljs was pretty much a 1-1 port of the one from rewrite-clj. I decided to try to just dispatch using a cond or case.
(defn- dispatch
  [c]
  (cond (nil? c)                        parse-eof
        (identical? c *delimiter*)      reader/ignore
        (reader/whitespace? c)          parse-whitespace
        (identical? c \^)               parse-meta
        (identical? c \#)               parse-sharp
        (identical? c \()               parse-list
        (identical? c \[)               parse-vector
        (identical? c \{)               parse-map
        (identical? c \})               parse-unmatched
        (identical? c \])               parse-unmatched
        (identical? c \))               parse-unmatched
        (identical? c \~)               parse-unquote
        (identical? c \')               parse-quote
        (identical? c \`)               parse-syntax-quote
        (identical? c \;)               parse-comment
        (identical? c \@)               parse-deref
        (identical? c \")               parse-string
        (identical? c \:)               parse-keyword
        :else                           parse-token))
The result was that I shaved of somewhere between 30-50 ms. I can’t remember the exact number, but it was substantial. So eventhough multimethods are nice, for this use case I don’t think they added that much value and the performance overhead (due to indirection?) just wasn’t justified. I did try using both a map and case for char tests, but found that a simple cond outperformed both (on my machine running on an old ClojureScript version in Light Table)
Some random pickings
When working with Light Table I’ve previously found that in some cases I could gain some nice performance improvements by changing from clojure datastructures to native js. I’ll show a couple of samples
Checking for token boundaries
(defn boundary?
  [c]
  "Check whether a given char is a token boundary."
  (contains?
    #{\" \: \; \' \@ \^ \` \~
      \( \) \[ \] \{ \} \\ nil}
    c))
was rewritten to:
(def js-boundaries                                     (1)
  #js [\" \: \; \' \@ \^ \` \~
      \( \) \[ \] \{ \} \\ nil])


(defn boundary?
  [c]
  "Check whether a given char is a token boundary."
(< -1 (.indexOf js-boundaries c))) (2)| 1 | Figured the list of boundaries only needs to be defined once |
| 2 | Using JavaScript Array.indexOf proved to be quite efficient. More so than a ClojureScript map lookup in this case. |
I used a similar approach for other kinds of boolean tests for characters (whitespace?, linebreak? etc).
Testing characters for equality
Tests like:
(when (= c "\")
  ... )
Performs better using identical? (same object):
(when (identical? c "(")
  ... )
Still far from satisfied - swanodette to the rescue
In the end of june/beginning of july I noticed that Davin Nolen was tweeting about promising performance improvments with regards to cljs-bootstrap. This made me curious and eventually I found some very inspiring commits on a cljs-bootstrap branch of a fork of tools.reader. Hey, surely this guy nows a thing or two about what really might help and still keep the code nice and clojury.
So I just started picking from relevant commits on this branch
A few highlights:
Avoiding protocol indirection
(defn peek
  "Peek next char."
  [^not-native reader]     (1)
(r/peek-char reader))| 1 | not-native is a type hint that inline calls directly to protocol implementations |
Type hinting
(defn ^boolean whitespace?   (1)
  [c]
(r/whitespace? c))| 1 | The boolean type hint allows the cljs compiler to avoid emitting a call to cljs.core/truth_. The type hint is really for true boolean values (true/false), but if we know for sure that the value
isn’t one of 0, "" (empty-string) and NaN we can coerce the compiler to do our bidding ! |
satisfies? ⇒ implements?
Changing:
(if (satisfies? IWithMeta o)
  ...)
To:
(if (implements? IWithMeta o)
  ...)
Helps quite a bit.
2X+ performance increase, what now ?
We’ve achieve quite a bit, but it’s still between 100-120 ms for my sample. I need more. More I tell you !
So back to the profiler to try and pick out some suspicious candidates.
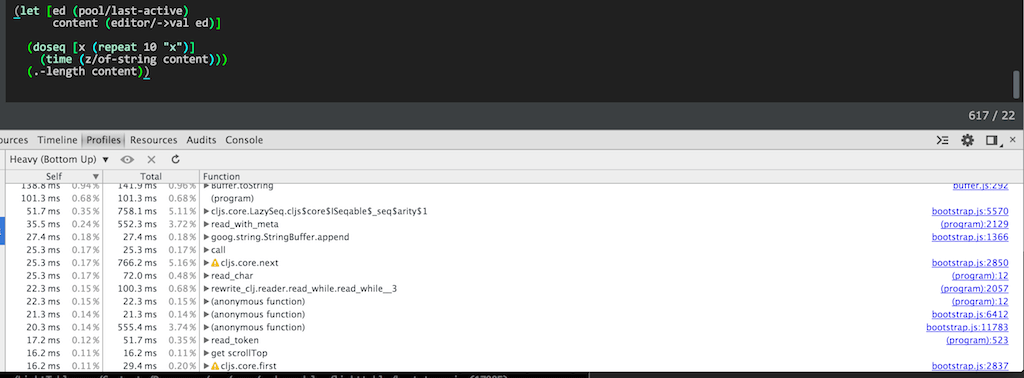
I made various micro-improvements like changing
-
str to goog.stringbuffer for concatinating strings
-
aget to .charAt for getting a character at a position in a string
-
Stringbuffer initialization to occur once and using clear inside functions (felt a bit like global variables (: )
-
count to .length for string length
-
etc
It all helped a bit, steadily shaving of a millisecond here and a millisecond there (even had some setbacks along the way !).
Do’s and Don’ts
A couple of function showed a lot of own-time in the profiler. I really couldn’t figure out why though. They didn’t seem to do much, but delegate to other functions. I tried a range of things until I stumbled accross this blogpost by Stuart Sierra. Both of the methods was using the following pattern for handling a single var-arg:
(defn token-node
  "Create node for an unspecified EDN token."
  [value & [string-value]]                       (1)
  (->TokenNode
    value
(or string-value (pr-str value))))| 1 | & [string-value] destructures the sequence of arguments |
This constructor method was called a lot. So not only was this perhaps not ideal stylewise, but it turns out it has some pretty bad performance characteristics as well. (Not knowing the details, I can only speculate on why…)
So I changed the above code to:
(defn token-node
  "Create node for an unspecified EDN token."
  ([value]
   (token-node value (pr-str value)))
  ([value string-value]
  (->TokenNode value string-value)))
Yay! Changing two frequently called functions to use method overloading had a huge impact on performance. Not only that, but I noticed that the garbage collector was using substantially less time as well.
Summary
Performance tuning is fun, but really hard. Not knowing anything about the inner wokings of ClojureScript and the closure compiler doesn’t help. There wasn’t much to be found in terms of help using my normal search foo, and the book "Performance tuning ClojureScript" hasn’t been seen quite yet. That beeing said, this is probably the first time in over a year and half playing/working with ClojureScript that I’ve even thought about performance issues with ClojureScript. Mostly it’s a non issue for my use cases.
Quite a few of the tweaks didn’t really make the code that much less idiomatic, however there were a couple of cases where the host language seeps out.
Feel free to share you experiences with performance tuning ClojureScript. I’d really like to learn more about it and hopefully make some additional shavings in rewrite-cljs !
| rewrite-cljs 0.3.1 was just released. Snappier than ever |
Showcasing rewrite-cljs - Parembrace for Light Table
12 June 2015
Tags: clojure clojurescript lighttable
TweetWow! Implementing my own paredit plugin for Light Table. How (and why) on earth did I end up doing that ?
Introduction
A few months back I set forth on a mission trying to bring some proper Clojure refactoring support to Light Table through the clj-light-refactor plugin. One of the first features I implemented was a threading refactoring using clojure.zip and cljs.reader. It quickly became evident that both clojure.zip and cljs.reader put severe limitations on what I would be able to implement. The reader is quite limited in terms of the syntaz it allows and using a plain zipper would make it incredibly tedious in terms of handling formatting (whitespace, newlines and comments etc).
The experience of using a zipper for refactoring was really appealing to me, but I needed something way better to be able to do anything really useful. I put the whole thing on the backburner for a while, until I stumbled upon rewrite-clj. It looked like just the thing I needed, however it had no ClojureScript support though. After weeks of deliberation I decided to write a ClojureScript port, aptly named rewrite-cljs.
The ParEdit support in Light Table is somewhat limited, a few plugins to remedy that has been implemented none of which are actively maintained or easily extendable. They all focus on the editor, text and moving braces around.
Could I make something a lot more structured for Light Table, where the focus is on navigating and moving proper clojure code nodes in a virtual AST ? If Light Table falls over and dies, will all my efforts have been in vain ?
| Well I present to you parembrace a slightly different take on implementing a paredit plugin for Light Table using rewrite-cljs for most of it’s heavy lifting |
Figure 1. Wrap forward slurping
Implementation challenges
A more powerful reader
My first challenge was that the default reader in ClojureScript, cljs.reader, only supports a subset of of valid clojure code. Things like anonymous functions and other reader macros are not supported. I had to address that before I could even consider trying to do a port of rewrite-clj.
Luckily I found most of what I needed in the clojurescript-in-clojurescript project. It even supported a IndexingPUshBackReader which was essential for retaining source positional information about the nodes in a zipper. I had to hack around it a little bit, but nearly everything I needed was in place. Yay !
| I ended up bundling the modded reader in rewrite-cljs btw. |
Porting rewrite-clj
I won’t bore you with the details here, but it was mostly pretty straight forward. While I was at it, I opted for extending its' features somewhat:
-
I added bounds meta information for all nodes (start - end coordinates)
-
Finder functions to locate nodes by a given position in the underlying source
-
A paredit namespace
| The paredit namespace should probably be factored out to a separate lib. I really shouldn’t bloat rewrite-cljs unnecessarily. |
Whan creating(/aka porting) rewrite-cljs my intention was always to ensure that it was reusable from many other contexts than my own client libs/apps. Whether I’ve succeeded with that I guess is yet to be proven !
It’s used from parembrace and clj-light-refactor, but I see no reason why you wouldn’t be able to reuse it from say the Atom editor or your somewhat overly ambitious fully structural ClojureScript SPA editor project.
Performance
It quickly became evident that parsing all code in an editor to a rewrite-cljs zipper structure for every paredit editor action wouldn’t be usable for files beyond 100-200 lines of code. For now I have to settle for the inconvenience of working within the context of top level forms. Having used the plugin during it’s development for a couple of weeks now, that’s not really a problem 99 % if the time (at least for me that is).
A smattering of code
Let me run you through an example. Paredit raise-sexpr
(dynamic-wind in (lambda () |body) out) ; ->
(dynamic-wind in |body out) ; ->
body
rewrite-cljs
(defn raise [zloc]                               (1)
  (if-let [containing (z/up zloc)]
    (z/replace containing (z/node zloc))         (2)
zloc)) (3)| 1 | zloc is a the zipper node we wish to raise. From the example above the body token node |
| 2 | If zloc has a parent node (seq), then we replace the parent node with the node at zloc |
| 3 | If zloc has no parent, we can’t raise we just return zloc |
Trying it out
(ns foo-bar
  (:require [rewrite-clj.zip :as z]
            [rewrite-clj.paredit :as pe])

(-> (z/of-string "(dynamic-wind in (lambda () body) out)")    (1)
    (pe/find-by-pos {:row 1 :col 29})                         (2)
    pe/raise                                                  (3)
    pe/raise
z/root-string) (4)| 1 | Create a clojure zipper with rewrite nodes for the initial code |
| 2 | Locate zloc, a pointer to the body node in our instance |
| 3 | Raise (twice to produce the end result) |
| 4 | Wrap up the zipper and return it’s stringified representation |
Light Table
The generic function for invoking paredit commands in parembrace looks something like the this:
(defn paredit-cmd [ed f]
  (let [pos (editor/->cursor ed)
        form (u/get-top-level-form ed)                                         (1)
        zloc (positioned-zip pos form)]                                        (2)
    (when zloc
      (editor/replace ed (:start form) (:end form) (-> zloc f z/root-string))  (3)
      (editor/move-cursor ed pos)                                              (4)
(format-keep-pos ed)))) (5)| 1 | Get the top-level form at given position |
| 2 | Given form an position in LT terms, create a zipper and position it at node with given position |
| 3 | Replace the form in editor with the rewritten form after applying paredit/zipper function f |
| 4 | The positioning isn’t quite as trivial as this with depth changing commands |
| 5 | Format the form nicely |
|
For raise, f would in our example be a reference to which would given you: Let me know if that is something you would find useful |
Behaviors and commands
(behavior ::raise!                                                   (1)
          :triggers #{:parembrace.raise!}
          :reaction (fn [ed]
                      (paredit-cmd ed pe/raise)))


(cmd/command {:command :parembrace.raise                             (2)
              :desc "Parembrace: Raise"
              :exec (fn []
                      (when-let [ed (pool/last-active)]
(object/raise ed :parembrace.raise!)))})| 1 | The behavior here strictly speaking isn’t needed, but it provides a means to scope the feature to only be available for editors tagged as clojure editors |
| 2 | The commands are there for you to be able to either execute from the command bar, or for mapping a keyboard shortcut |
Current state and future plans for Parembrace ?
A large percentage of the features in the paredit reference card has been implemented. Some features behave slightly different, and there are a couple of novel nuggets there as well. All is not well though. Cursor positioning needs improving and performance needs to be tweaked.
What does the future hold ? Well I’m planning on implementing the missing features and I’m sure I’ll add a few more useful nuggets too. The most important thing I aim to provide is a clear pluggable way of extending and modifying features to allow you to customize parembrace to your liking.
Conclusion
I believe rewrite-cljs already has paid off multiple times. I can’t thank xsc enough for writing rewrite-clj. It’s really awesome and without it I’d still be fumbling around with parsers and what-not. I can reuse rewrite-cljs from both parembrace and clj-light-refactor. In the latter not only can I start implementing cool code refactoring features, but I can do things like structurally traverse and rewrite the project.clj file. I can’t wait to get started… well I have to wait because I’m moving to a new house, but after that…
| If you are a Light Table user, do take Parembrace for a spin and let me know what you think ! |
Implementing a Clojure ns-browser in Light Table with React
22 April 2015
Tags: clojure clojurescript lighttable react
TweetI’ve long been looking for better ways to navigate between code in Clojure projects in Light Table. The workspace navigator isn’t particularily keyboard friendly. For navigating files claire is a better option. Coming from IntelliJ I have been used to navigating to classes/resources in java projects in a breeze.
I needed something more clojure project aware, so I decided to implement a namespace browser.
Introduction
Lately I’ve been working on the clj-light-refactor plugin, providing better Clojure support in Light Table. It made sense to me to add a namespace browser feature to the plugin at some point. Through experience with integrating the cider-nrepl middleware I found that I had most of the tools necessary to implement a simple namespace browser.
A namespace browser obviously needs a bit of UI, and this is where the power of having an editor framework based on node-webkit/atom-shell opens up for a range of opportunities. I could use the std dom lib that ships with Light Table, but I decided I’d rather have a go at implementing the UI part using React. Just for fun.
There are a range of ClojureScript wrappers for React, but I decided to opt for one of the least opinionated ones : quiescent. Let’s have a look at how I did it !
Figure 1. Namespace list
Figure 2. Public vars for selected namespace
Setting up React and quiescent
As you’ll see, this part is pretty easy.
Quiescent dependency - project.clj
(defproject clj-light-refactor "0.1.5"
  :dependencies [[org.clojure/clojure "1.5.1"]
[quiescent "0.1.4"]]) (1)| 1 | To include quiescent, just add it as a dependency. I opted for an older version because the ClojureScript version currently supported by LT is fairly old. |
React dependency - plugin behaviours file
[:app :lt.objs.plugins/load-js ["react.min.js"                       (1)
"clj-light-refactor_compiled.js"]]| 1 | Just add the react js using the load-js behavior for plugins. It needs to load before quiescent, so it’s added before the transpiled js for the plugin project. |
State, BOT and such
My namespace browser will need to have state. The namespace browser will retrieve it’s data from a cider-nrepl middleware op. Continuously invoking this backend for the data would kill the performance. State in Light Table is typically stored in objects. Objects are basically a map of data stored in an ClojureScript atom.
| To learn more about BOT (Behaviors, Objects and Tags), check out The IDE as a value by Chris Granger. |
Quiescent has no opinions with regards to state, you just feed quiescent components with data, so using LT objects shouldn’t be of any concern.
(defui wrapper [this]                                             (1)
  [:div.outer
   [:div {:id "nsbrowser-wrapper"} "Retrieving namespaces..."]])

(object/object* ::nsbrowser
                :tags #{:clojure.nsbrowser}                       (2)
                :label "Clojure ns browser"
                :order 2
                :init (fn [this]                                  (3)
                        (wrapper this)))

(def ns-bar (object/create ::nsbrowser)) (4)| 1 | React needs a container element to mount in. We just create a wrapper (nsbrowser-wrapper), using the LT defui macro. |
| 2 | We add a custom tag to our object. Using this tag we can attach behaviors, i.e reaction to events, to our object. |
| 3 | Objects have an init function that can return a UI representation. Initially thats just our wrapper div. The actual content we will provide through behaviors. |
| 4 | Instantiate the object |
Rendering the nsbrowser UI using quiescent and react
(declare render)

(defn handle-keypress [props ev]                                           (6)
  (let [kk (.-which ev)]
    (case kk
      38 (do (.preventDefault ev) ((:on-up props)))
      40 (do (.preventDefault ev) ((:on-down props)))
      13 (do (.preventDefault ev) ((:on-select props)))
      27 (do (.preventDefault ev) ((:on-escape props)))
      :default)))

(q/defcomponent SearchInput [props]                                        (5)
  (d/input {:placeholder "search"
            :value (:search-for props)
            :onKeyDown (partial handle-keypress props)
            :onChange  #((:on-change props) (aget % "target" "value"))
            :autoFocus (:focus props)}))

(q/defcomponent ResultItem [item]                                          (4)
  (d/li {:className (when (:selected item) "selected")} (:name item)))

(q/defcomponent ResultList [props]                                         (3)
  (apply d/ul {:className (when (:selected-ns props) " nsselection")}
               (map ResultItem (:items props))))

(q/defcomponent Searcher [props]                                           (2)
  (d/div {:className "filter-list"}
         (SearchInput props)
         (when-let [sel-ns (:selected-ns props)]
           (d/div {:className "nstitle"} sel-ns))
         (ResultList (select-keys props [:items :selected-ns]))))


(defn render [props]                                                       (1)
  (q/render (Searcher (merge {:on-down #(object/raise ns-bar :move-down!)
                              :on-up #(object/raise ns-bar :move-up!)
                              :on-select #(object/raise ns-bar :select!)
                              :on-escape #(object/raise ns-bar :escape!)
                              :on-change (fn [search-for]
                                           (object/raise ns-bar :search! search-for))}
                             props))
(.getElementById js/document "nsbrowser-wrapper")))| 1 | The render function is where we initially mount our react components and subsequently rerender our UI upon any change in our data. The function takes a map (containing the data to render) and we merge in some properties for handling events we wish to handle in our ui. More on that later. |
| 2 | This is the root component for our UI. It basically contains a search input and a result list (with a optional heading, when a namespace has been selected) |
| 3 | Subcomponent for the result list |
| 4 | Subcomponent for a result list item, applies a .selected class if this item is selected |
| 5 | Subcomponent for the search input. This is used for filtering and navigating our result list. |
| 6 | Handler for keyboard events in the search input |
| If you are not familiar with react, it might seem inefficient to render the entire UI everytime. But react is quite clever with its DOM operations, using a virtual dom it only performs the DOM operations necessary to represent the diff since the last render. Further optimization is provided by quiescent as any quiescent component will check whether the first param have changed using a clojure equality test (fast). If no props have changed, it will tell React that the component doesn’t need to rerender. Short story, you don’t need to worry about render speed. It’s more than fast enough. |
The benefits of this approach might not be immediatly visible, but believe me it makes it very simple to reason about the UI. When some state changes, rerender the entire UI. You don’t need to worry about making the individual dom updates needed to represent the change. This part is handled by react.
Working with data
When implementing the logic for changing which items is selected it made sense to extract the core of that to immutable helper functions. Nothing new here, but it’s a whole lot easier when no state is represented in the dom, but rather in data structures somewhere else (like in an atom).
(defn move-down [items]
  (let [curr-idx (selected-idx items)]
    (if-not (< curr-idx (dec (count items)))
      items
      (-> items
          (assoc-in  [curr-idx :selected] false)
          (assoc-in  [(inc curr-idx) :selected] true)))))
Implementing then move up/down logic are just simple functions. Testing them interactivly in Light Table is dead easy using the inbuild repl with inline results.
Behaviors for filter, navigation and selection
(behavior ::move-up!                                                     (1)
          :triggers #{:move-up!}
          :reaction (fn [this]
                      (let [moved (move-up (:filtered-items @this))]
                        (object/merge! this {:filtered-items moved})
                        (render {:items moved
                                 :selected-ns (:selected-ns @this)
                                 :search-for (:search-for @this)})
                        (sidebar-cmd/ensure-visible this))))            (2)

(behavior ::select!                                                     (3)
          :triggers #{:select!}
          :reaction (fn [this]
                      (when-let [sel-idx (selected-idx (:filtered-items @this))]
                        (when-let [ed (pool/last-active)]
                          (let [item-name (:name (nth (:filtered-items @this) sel-idx))]
                            (if-not (:selected-ns @this)
                              (do
                                (object/merge! this {:search-for ""
                                                     :selected-ns item-name})
                                (object/raise ed :list-ns-vars item-name))
                              (let [sym (str (:selected-ns @this) "/" item-name)]
                                (object/raise ed :editor.jump-to-definition! sym)
                                (object/raise this :clear!))))))))


(behavior ::search!                                                    (4)
          :triggers #{:search!}
          :reaction (fn [this search-for]
                      (let [items (if (:selected-ns @this) (:vars @this) (:items @this))
                            filtered
                            (->> items
                                 (filter-items search-for)
                                 maybe-select-first
                                 vec)]
                        (object/merge! this {:filtered-items filtered
                                             :search-for search-for})
                        (render {:items filtered
                                 :selected-ns (:selected-ns @this)
:search-for search-for}))))| 1 | All the move up behavior basically does is updating the state holding which item (in our filtered list of items) is selected and then rerenders the UI with the updated item list |
| 2 | When scrolling down the list (an UL element), we need to make sure the item is visible so we need to scroll. I couldn’t figure out a react-way to do this, so I reused a function from LT’s command browser to achieve this. |
| 3 | The select behavior does one of two things. If the item selected is an namespace item it triggers a behavior for retrieving (and subsequently later render) a list of public vars for that namespace. If the item is a var it triggers a behavior for jumping to the definition of that var. The latter is a behavior already present in the Light Table Clojure plugin. |
| 4 | The search behavior filters the list of items to show based on what the user has entered in the search input. It stores that filtered list in our object and rerenders the ui. |
| The this argument for our behavior reaction function is the ns-bar object instance we defined earlier. |
 [:clojure.nsbrowser :lt.plugins.cljrefactor.nsbrowser/move-up!]
 [:clojure.nsbrowser :lt.plugins.cljrefactor.nsbrowser/select!]
 [:clojure.nsbrowser :lt.plugins.cljrefactor.nsbrowser/search!]
Hooking up our behaviors to our object can be done inline using code, or declaratively using a behaviors definition file. I’ve opted for the latter and hooked them up in the plugin behaviors file. What we say here is that objects with the given tag :clojure.nsbrowser responds to the behavior defined in the second arg for the vectors. Should you find that you’d like to override one or more of the behaviors (or disable them alltogether) you can easily do that.
A silly example - overriding the move behavior
Let’s say you have a better idea for how the move behavior should work. You override that in your Light Table user plugin (everyone has one !).
Providing your own behavior
(ns lt.plugins.user                                                    (1)
  (:require [lt.object :as object]
            [lt.plugins.nsrefactor.nsbrowser :as nsbrowser])           (2)
  (:require-macros [lt.macros :refer [behavior]]))

(behavior ::user-move-up!
          :triggers #{:move-up!}                                       (3)
          :reaction (fn [this]
(println "Add my custom version here..."))) (4)| 1 | You’ll find the user plugin in $LT_HOME/User. It ships with a default $LT_HOME/User/src/plugins/user.cljs file for your convenience |
| 2 | Require any namespace you need, for the purpose of this override you might need to have access to functions in the namespace where the nsbrowser is implemented |
| 3 | This is the really important bit. Triggers (together with tags) tells LT which behavior reaction functions to invoke when an event is triggered (through object/raise) |
| 4 | Implementation for the overriding behavior |
Replacing the default behavior with our own
 [:clojure.nsbrowser :-lt.plugins.cljrefactor.nsbrowser/move-up!]   (1)
[:clojure.nsbrowser :lt.plugins.user/user-move-up!] (2)| 1 | First we turn off the default behavior from the plugin :- disable a given behavior) |
| 2 | The we hook up our new custom made override behavior |
I think you now can start to the see the power of the BOT model in Light Table. It’s very flexible, but the price you pay is that it can be difficult to grasp at first sight. Once you do grock it, you’ll realize that you have an incredibly customizable editor at your disposal.
Getting the namespace data
So how do we go about getting the list of namespaces and vars for each namespace ? This is where cider-nrepl comes into play. The ops we wish to call are in the ns middleware for cider-nrepl.
Interacting with cider-nrepl
A precondition for this to work is that the cider-nrepl is added as a plugin dependency for your project. You could do this on a project level, or you could do it globally for all your projects in profiles.clj.
:user {:plugins [[cider/cider-nrepl "0.9.0-SNAPSHOT"]]}}(behavior ::list-ns
:triggers #{:list-ns}
:reaction (fn [ed]
(object/raise ed
:eval.custom (1)
(mw/create-op {:op "ns-list"}) (2)
{:result-type :refactor.list-ns-res (3)
:verbatim true})))
(behavior ::list-ns-res
:triggers #{:editor.eval.clj.result.refactor.list-ns-res} (4)
:reaction (fn [ed res]
(let [[ok? ret] (mw/extract-result res (5)
:singles
[:ns-list :results])]
(if-not ok?
(object/raise ed
:editor.exception
(:err ret)
{:line (-> ret :meta :line)})
(do
(object/raise sidebar/rightbar :toggle ns-bar) (6)
(object/raise ns-bar
:update-ns-list! (7)
(->> (:ns-list ret)
(maybe-exclude (:exclusions @ns-bar))
(map #(hash-map :name %)))))))))| 1 | To evaluate arbitrary clojure code in LT you can use the eval.custom behavior |
| 2 | This is a helper method that creates the code to invoke the cider-nrepl middleware |
| 3 | We can tell LT that the trigger for the response should end with refactor.list-ns-res. So when the operation completes in will trigger a behavior named as defined in 4 |
| 4 | The trigger for our behavior to handle the response |
| 5 | Helper function to extract the result from cider-nrepl op |
| 6 | Our nsbrowser is displayed in a predefined UI component which is a sidebar. We tell it to display |
| 7 | We raise a behavior for displaying the list of namespaces found (see the full source for how this behavior is defined) |
| The code eval behavior is triggered on an ed object. This is an LT editor object. This means that we need to have a clojure editor open for our namespace browser to work (hoping to remedy that in the near future). The editor object contains information about which project we are connected to (and if not connected, prompts you to do so). |
Providing a command to show the namespace browser
The final piece of the puzzle is to provide a command to allow us to trigger when the namespace browser should be displayed. Commands in Light Table are typically the user actions. Commands are actions that can be tied to keyboard shortcuts. They are also displayed in the Light Table command browser (open by pressing ctrl + space).
(cmd/command {:command :show-nsbrowser                          (1)
              :desc "Clojure refactor: Show ns-browser"         (2)
              :exec (fn []
                      (when-let [ed (pool/last-active)]         (3)
(object/raise ed :list-ns)))}) (4)| 1 | The name of the command |
| 2 | The description for our command, this text is shown in the command browser |
| 3 | Get the currently active editor object (if one is open) |
| 4 | Trigger the behavior for retrieving the initial namespace list and ultimately display the namespace browser |
Defining a keyboard shortcut
In your user keymap (ctrl + space, find "Setting: User keymap" and select it)
[:editor.clj "ctrl-alt-n" :show-nsbrowser]Here we’ve scoped the shortcut to only trigger when we invoke it having an active clojure editor open
Some final sugaring - Custom filtering
To provide some customization for our nsbrowser we’ve defined a user configurable behavior for that purpose. Currently you can define a list of regex’s for namespaces you wish to exclude from the listing.
(behavior ::set-nsbrowser-filters
          :triggers #{:object.instant}                                   (1)
          :desc "Clojure Refactor: Configure filter for nsbrowser"
          :type :user
          :params [{:label "exclusions" :type :list}]                    (2)
          :exclusive true
          :reaction (fn [this exclusions]
(object/merge! this {:exclusions exclusions}))) (3)| 1 | This particular behavior is triggered when the ns-bar object is instatiated |
| 2 | You can provide param descriptions which show up in .behaviors files to assist user configuration |
| 3 | We store the user provided setting in our object |

The default behavior adds a few exclusions by default. You can easily override those by configuring the behavior in your own user.behaviors. (ctrl + space, find "Settings: User behavior" and select)
Summary
Having an editor that is basically a web browser with node-js integration provides the foundation to do an incredible amount of cool stuff. In this post I have shown you how to use React (with quiescent on top) for rendering view items in Light Table. I have walked you through how that may fit in with the BOT architecture Light Table is based on. I hope I have managed to give you a glimpse of the power of the BOT architecture and the facilities it provides for extending and customizing your editor. I haven’t gone into great detail on how I’ve interacted with cider-nrepl to provide the namespace data, that belongs in a separate blogpost.
Some of you might have noticed that the Light Table project and it’s progress has stalled somewhat (ref this post from Chris Granger on the LT discussion forum. I’m still hoping that this situation can be remedied. I firmly believe it’s possible and with just a wee bit more community effort Light Table can still have a future as a great Open Source IDE alternative.
| For improved Clojure support in Light Table, you really should try out the clj-light-refactor plugin ! |
A pinch of Clojure love to Light Table
14 April 2015
Tags: clojure clojurescript lighttable
TweetThe Clojure Refactoring plugin for Light Table has finally been released ! You’ll find the plugin in the LIght Table plugin manager. Alternatively you can clone the repo to the plugin folder of LIght Table if you know what you are doing :)
| You will need to check out the readme https://github.com/rundis/clj-light-refactor |
To celebrate the launch of the plugin I’ve made a small demo of some of the features in the plugin. You might also be interrested in the pre-release demo
Demo
Feature highlights
-
Simple form refactoring (cycle if, cycle col, introduce threading etc)
-
Extract function
-
Dependency completion and hotloading of dependencies
-
Find usages and rename
-
Namespace cleanup
-
Resolve mising requires/imports
-
Some cider features like: test support, smarter autocompletion and better formatting
Most of the features are currently Clojure only, but some of the simpler ones also works in ClojureScript.
Resources
-
Pre release demo: http://rundis.github.io/blog/2015/clj_light_refactor.html
-
Plugin repo: https://github.com/rundis/clj-light-refactor
Credits
-
refactor-nrepl - nREPL middleware to support refactorings in an editor agnostic way. This awesome middleware has enable most of the advanced refactoring features in the plugin
-
cider-nrepl - A collection of nREPL middleware designed to enhance CIDER. Additional cool features have been enabled by this middleware, and there are more to come !
-
clj-refactor.el - Emacs Clojure Refactor plugin. The source of inspiration for my Light Table plugin. It provides a long list of really cool refactoring features for emacs users.
Taming those pesky datetimes in a clojure stack
27 March 2015
Tags: clojure clojurescript date
TweetHave you ever faced frustrating issues when using dates in your clojure stack ? If I mention java.util.Date, java.sql.Date/java.sql.Timestamp clj-time, json/ISO-8601 and UTC/Timezones, does your bloodpressure rise slightly ?
This is the blog post I wished I had several weeks back to save me from some of the date pains my current project has been through.
Introduction
A little while back date handling started to become a nightmare in my current project. We have a stack with a ClojureScript frontend, a clojure WebApp and a couple of clojure microservices apps using Oracle as a data store.
We decided pretty early on to use clj-time. It’s a really quite nice wrapper on top of joda-time. But we didn’t pay much attention to how dates should be read/written to Oracle or how we should transmit dates across process boundaries. Timezones is another issue we didn’t worry to much about either.
| You will probably not regret using an UTC timezone for your Servers and Database. This post puts it succinctly. Your webclient(s) though is out of your control ! |
I’m sure some of the measures we have taken can be solved more elegantly, but hopefully you might find some of them useful.
Reading from/writing to the database
We use clojure/java.jdbc for our database integration. Here’s how we managed to simplify reading and writing dates/datetimes.
(ns acme.helpers.db
  (:import [java.sql PreparedStatement])
  (:require [acme.util.date :as du]
            [clj-time.coerce :as c]
            [clojure.java.jdbc :as jdbc]))


(extend-protocol jdbc/IResultSetReadColumn                                (1)
  java.sql.Date
  (result-set-read-column [v _ _] (c/from-sql-date v))                    (2)

  java.sql.Timestamp
  (result-set-read-column [v _ _] (c/from-sql-time v)))

(extend-type org.joda.time.DateTime                                       (3)
  jdbc/ISQLParameter
  (set-parameter [v ^PreparedStatement stmt idx]
(.setTimestamp stmt idx (c/to-sql-time v)))) (4)| 1 | We extend the protocol for reading objects from the java.sql.ResultSet. In our case we chose to treat java.sql.Date and java.sql.Timestamp in the same manner |
| 2 | clj-time provides some nifty coercion functions including the facility to coerce from sql dates/times to DateTime |
| 3 | We extend the DateTime class (which is final btw!) with the ISQLParameter protocol. This is a protocol for setting SQL parameters in statement objects. |
| 4 | We explicitly call setTimestamp on the prepared statement with a DateTime coerced to a java.sqlTimestamp as our value |
Now we can interact with oracle without being bothered with java.sql.Date and java.sql.Timestamp malarkey.
| It’s vital that you require the namespace you have the above incantations, before doing any db interactions. Might be evident, but it’s worth emphasizing. |
| Clojure protocols are pretty powerful stuff. It’s deffo on my list of clojure things I need to dig deeper into. |
Dates across process boundaries
Our services unsurpringly uses JSON as the data exchange format. I suppose the defacto standard date format is ISO-8601, it makes sence to use that. It so happens this is the standard format for DateTime when you stringify it.
| You might want to look into transit. It would probably have been very useful for us :) |
Outbound dates
(ns acme.core
  (:require [clojure.data.json :as json]
            [clj-time.coerce :as c]))


(extend-type org.joda.time.DateTime           (1)
  json/JSONWriter
  (-write [date out]
(json/-write (c/to-string date) out))) (2)| 1 | Another extend of DateTime, this time with the JSONWriter protocol. |
| 2 | When serializing DateTime to json we coerce it to string. clj-time.coerce luckily uses the ISO-8601 format as default |
Inbound dates
(ns acme.util.date
  (:require [clj-time.core :as t]
            [clj-time.format :as f]
            [clj-time.coerce :as c]))


(def iso-date-pattern (re-pattern "^\\d{4}-\\d{2}-\\d{2}.*"))


(defn date? [date-str]                                                         (1)
  (when (and date-str (string? date-str))
    (re-matches iso-date-pattern date-str)))


(defn json->datetime [json-str]
  (when (date? json-str)
    (if-let [res (c/from-string json-str)]                                     (2)
      res
      nil))) ;; you should probably throw an exception or something here !

(defn datetimeify [m]
  (let [f (fn [[k v]]
            (if (date? v)
              [k (json->datetime v)]                                           (3)
              [k v]))]
(clojure.walk/postwalk (fn [x] (if (map? x) (into {} (map f x)) x)) m)))| 1 | A crude helper function to check if a given value is a date. There is a lot that passes through as valid ISO-8601 we settled for atleast a minimum of YYYY-MM-DD |
| 2 | Coerces a string to a DateTime, the coercion will return nil if it can’t be coerced, that’s probably worth an exception |
| 3 | Traverse a arbitrary nested map and coerce values that (most likely) are dates |
Hook up middleware
(defn wrap-date [handler]                                     (1)
  (fn [req]
    (handler (update-in req [:params] (datetimeify %)))))


def app (-> routes
            auth/wrap-auth
            wrap-date                                         (2)
            wrap-keyword-params
            wrap-json-params
            wrap-datasource
            wrap-params
wrap-config))| 1 | Middleware that calls our helper function to coerce dates with the request map as input |
| 2 | Hook up the middleware |
Handling dates in the webclient
We have a ClojureScript based client so it made sense for us to use cljs-time. It’s very much inspired by clj-time, but there are some differences. The most obvious one is that there is no jodatime, so Google Closure goog.date is used behind the scenes.
So how do we convert to and from the iSO-8601 string based format in our client ?
Surprisingly similar to how we do it on the server side as it happens !
;; require similar to the ones on the server side. cljs-time. rather than clj-time.


(defn datetimes->json [m]                                                       (1)
  (let [f (fn [[k v]]
            (if (instance? goog.date.Date v)                                    (2)
              [k (c/to-string v)]
              [k v]))]
    (clojure.walk/postwalk (fn [x] (if (map? x) (into {} (map f x)) x)) m)))


;; AJAX/HTTP Utils

(defn resp->view [resp]                                                         (3)
  (-> resp
      (update-in [:headers] #(keywordize-keys %))
      (assoc-in [:body] (-> resp datetimeify :body))))                          (4)

(defn view->req [params]                                                        (5)
  (-> params
datetimes->json)) (6)| 1 | Function that traverses a nested map and converts from DateTime to ISO-8601 |
| 2 | Almost an instanceOf check to decide if the value is eligible for coercion |
| 3 | Handy function to transform an ajax response to something appropriate for use in our client side logic |
| 4 | datetimeify is identical to our server side impl |
| 5 | Handy function to take a map, typically request params, and transform to something appropriate for communication with a backend server. If you are using something like cljs-http it might be appropriate to hook it in as a middleware. |
| 6 | Coerce any DateTime values to ISO-8601 date strings |
| What about timezones on the client ? The default for the datetime constructor in cljs-time is to use UTC. So when displaying time and/or accepting date with time input from the client you need to convert to/from the appropriate timezone. |
(ns acme.client
  (:require [cljs-time.format :as f]
            [cljs-time.core :as t]))


(def sample (t/now)) ;; lets say 2015-03-27T00:53:38.950Z


(->> sample
     t/to-default-time-zone                          ; UTC+1 for me
     (f/unparse (f/formatter "dd.MM.yyyy hh:mm")))   ; => 27.03.2015 01:53
Summary
Using clojure protocols we managed to simplify reading and writing date(times) to the database. Protocols also helped us serialize date(times) to json. For reading json we had to hack it a little bit. By using fairly similar libs for dates on both the client and our server apps we managed to reuse quite a bit. In addition We have reasonable control of where we need to compensate for timezones. Most importantly though, our server-side and client-side logic can work consistently with a sensible and powerful date implementation.
Securing Clojure Microservices using buddy - Part 4: Secure and liberate a service app
25 March 2015
TweetPart 4 in my blog series about securing clojure web services using buddy. The time has finally come to demonstrate how you may secure a REST based microservice application.
Introduction
Previous episodes in this series:
| Sample code (tagged for each blog post) can be found on github |
Before I discovered buddy my first attempt at prototyping a clojure web app with security tried to combine the use of Friend and Liberator. To complicate matters I tried to make an app that both served user content (html) and provided a REST api. I had a hard time figuring out how to make the two play nicely together. If it hadn’t been for the brilliant article: API Authentication with Liberator and Friend by Sam Ritchie, I wouldn’t have gotten very far.
In this episode I will try to demonstrate how you may use buddy in combination with Liberator to secure a REST-oriented microservice application. We are going to build upon the token based authentication and authorization from the previous episodes and create the acme-catalog service app.
A small contribution to buddy
The primary buddy lib to help you secure ring based web apps is buddy-auth. Unfortunately when I first wanted to use buddy-auth for authentication and authorization, it didn’t provide out of the box support for jws tokens. What to do ? Well I decided to do what any good open citizen should do. I submitted a pull request. My first clojure lib contribution got accepted. Yay !
Relevant code snippets for acme-catalog
Wrap authentication middleware
(ns acme-catalog.core
  (:require [compojure.core :refer [defroutes ANY]]
            [ring.middleware.params :refer [wrap-params]]
            [ring.middleware.keyword-params :refer [wrap-keyword-params]]
            [ring.middleware.json :refer [wrap-json-params]]
            [clojure.java.io :as io]
            [buddy.auth.backends.token :refer [jws-backend]]
            [buddy.auth.middleware :refer [wrap-authentication]]
            [buddy.core.keys :as ks]
            [acme-catalog.resources :as r]))

(defroutes app-routes
  (ANY "/products" [] r/products)
  (ANY "/products/:id" [id] (r/product id)))


(def auth-backend (jws-backend {:secret (ks/public-key (io/resource "auth_pubkey.pem"))  (1)
                                :token-name "Acme-Token"}))

(def app
  (-> app-routes
      (wrap-authentication auth-backend)                                                 (2)
      wrap-keyword-params
wrap-json-params))| 1 | Buddy auth backend that supports jws tokens. We provide the public key for the certifacate used by acme-auth to create our tokens. In addition we can optionally provide a custom name for our token |
| 2 | Apply middleware that uses backend to read the token, unsign it and populate request map with the token info |
|
What does the wrap-authentication middleware do ?
|
Sample request map
{:identity
  {:user
    {:user-roles [{:role-id 10, :application-id 10}
                  {:role-id 41, :application-id 40}],
     :username test, :id 1},
 :exp 1427285979},
 ;; etc...
 }
Authorizing liberator resources
| Liberator routes your request through a graph of decisions and actions. This graph provides a useful context in case you are not familiar with what decisions kicks in when ! |
I initially tripped on the difference between HTTP status 401 and 403. Stackoverflow provides a pretty clear explanation.
Helper functions for role access
(def acme-catalog-roles
  {:customer 41 :catalog-admin 40})                                       (1)

(defn any-granted? [ctx roles]                                            (2)
  (seq
   (clojure.set/intersection
    (set (map :role-id (-> ctx :request :identity :user :user-roles)))
(set (vals (select-keys acme-catalog-roles roles))))))| 1 | Hardcoded definition of roles applicable for the acme-catalog app |
| 2 | Helper function to check if the user has been granted one or more of the applicable roles |
Liberator resource commons
Liberator resources are composable, so to avoid too much repetion across resources we’ve created a small helper function to define behavior for the two key decision points with regards to authentication and authorization checks.
(defn secured-resource [m]
  {:authorized?    #(authenticated? (:request %))                                       (1)
   :allowed?       (fn [ctx]
                     (let [default-auth? (any-granted? ctx (keys acme-catalog-roles))]  (2)
                       (if-let [auth-fn (:allowed? m)]
                         (and default-auth? (auth-fn ctx))                              (3)
default-auth?)))})| 1 | :authorized? corresponds to 401. Here we check if the user is authenticated. We use a buddy function: authenticated? to do the check. If the user isn’t authentication this function will return false |
| 2 | :allowed? corresponds to 403. We provide a default impl here that says that the user must atleast have one of the acme-catalog roles to be authorized to access a secured resource |
| 3 | In addition we provide an optional facility to specify a custom function for more fine grained authorization checks. See below for example. |
Securing products resources
(defresource product-categories
  (secured-resource {})                                                                   (1)
  :available-media-types ["application/json"]
  :allowed-methods       [:get]
  :handle-ok             (fn [ctx] "List of categories"))

(defresource products
  (secured-resource {:allowed? (by-method {:get true                                      (2)
                                           :post #(any-granted? % [:catalog-admin])})})
  :available-media-types ["application/json"]
  :allowed-methods       [:get :post]
  :handle-ok             (fn [ctx] "List of products coming your way honey"))


(defresource product [id]
  (secured-resource {:allowed? (by-method {:get true
                                           :delete #(any-granted? % [:catalog-admin])
                                           :put #(any-granted? % [:catalog-admin])})})
  :available-media-types ["application/json"]
  :allowed-methods       [:get :put :delete]
  :handle-ok             (fn [ctx]                                                        (3)
                           (if (and (= "99" id)
                                    (not (any-granted? ctx [:catalog-admin])))
                             (ring-response {:status 403
                                             :headers {}
                                             :body "Only admins can access product 99"})
"A single product returned")))| 1 | For the product-categories service anybody with a acme-catalog role may access |
| 2 | For products we restrict access by request method. Only catalog admins may add new products, while anyone can list products. |
| 3 | Silly example, but demonstrates that you can always bypass the defaults and do custom authorization further down in the liberator decision chain. |
Trying it all out - commando style
Get a valid token
acme-auth: lein ring server-headless

# In another terminal
curl -i -X POST -d '{"username": "test", "password":"secret"}' -H "Content-type: application/json" http://localhost:6001/create-auth-token

# Responds with something like:
HTTP/1.1 201 Created
Date: Wed, 25 Mar 2015 11:49:39 GMT
Content-Type: application/json; charset=utf-8
Content-Length: 1057
Server: Jetty(7.6.13.v20130916)

{"token-pair":{"auth-token":"eyJ0eXAiOiJKV1MiLCJhbGciOiJSUzI1NiJ9.eyJ1c2VyIjp7InVzZXItcm9sZXMiOlt7InJvbGUtaWQiOjEwLCJhcHBsaWNhdGlvbi1pZCI6MTB9LHsicm9sZS1pZCI6NDEsImFwcGxpY2F0aW9uLWlkIjo0MH1dLCJ1c2VybmFtZSI6InRlc3QiLCJpZCI6MX0sImV4cCI6MTQyNzI4NTk3OX0.eNTNG8Hu8a4OD9xWSoEZgwGUd15Oytj-GQZY4RgmTEdx9OjkLDRBefU89GNlEEq19Bsd3ciuWzTXKg3B0qvAk4F4-najY_erPGypSlBvRUI0Fa1_wA2PRYxT-zCTiSIxD-oM0oq_3Z61QlN0k-Sf7shel42-x9z7r8RQeNMr-iMk-hOI_v7moQogN08FiZnctcQdE8qKg_DEhwO3l780eBta_vr3tGSd174IRthz59G61P-XqV8wC4HZymbe8TCMc-3uniIvQeoG_rC3oRqNfjkxZlTB_h6mOjs1p3h_cUmrsOhSk0mQe5mrwSzuCiunMcKQ1jsb88daWkvjMrwRUg","refresh-token":"eyJ0eXAiOiJKV1MiLCJhbGciOiJSUzI1NiJ9.eyJ1c2VyLWlkIjoxLCJleHAiOjE0Mjk4NzYxODAsImlhdCI6MTQyNzI4NDE4MH0.FH2xooPoGnrSEbcU17Tr8ls9A-Noc3n9ZzLWGrblrI0bbIIFz25eJLcJbVGT3dLs7syc0KG3v4O0LAwQ6URvgl0aV2IT366KpmOiMUpsYmgqDCuE45FlSB2IBQKOLBTb6j18jpIsy0Kev6iHUCpvgKyNPcglElnVLFFahVwk_DDyrWusPcX-Di3AqSJdyz6ruBuPGzbzS6DMNkasTFNI1TLwjuokzVCdIYSNiQmgc1IozBFjHdeqQ_5kUdinv_tiW7yho0CwqiGSa9i56b328aZR5lADXR6gom5Oy4XTDDR6eMoDcvZKBncLV3YO29HC58EmZLghbX6832i0J7jfGw"}}
Calling acme-catalog
acme-catalog: lein ring server-headless

#in another terminal
curl -i -H "Authorization: Acme-Token eyJ0eXAiOiJKV1MiLCJhbGciOiJSUzI1NiJ9.eyJ1c2VyIjp7InVzZXItcm9sZXMiOlt7InJvbGUtaWQiOjEwLCJhcHBsaWNhdGlvbi1pZCI6MTB9LHsicm9sZS1pZCI6NDEsImFwcGxpY2F0aW9uLWlkIjo0MH1dLCJ1c2VybmFtZSI6InRlc3QiLCJpZCI6MX0sImV4cCI6MTQyNzI4NTk3OX0.eNTNG8Hu8a4OD9xWSoEZgwGUd15Oytj-GQZY4RgmTEdx9OjkLDRBefU89GNlEEq19Bsd3ciuWzTXKg3B0qvAk4F4-najY_erPGypSlBvRUI0Fa1_wA2PRYxT-zCTiSIxD-oM0oq_3Z61QlN0k-Sf7shel42-x9z7r8RQeNMr-iMk-hOI_v7moQogN08FiZnctcQdE8qKg_DEhwO3l780eBta_vr3tGSd174IRthz59G61P-XqV8wC4HZymbe8TCMc-3uniIvQeoG_rC3oRqNfjkxZlTB_h6mOjs1p3h_cUmrsOhSk0mQe5mrwSzuCiunMcKQ1jsb88daWkvjMrwRUg" http//localhost:6003/products/1

# reponds with something like
HTTP/1.1 200 OK
Date: Wed, 25 Mar 2015 13:47:50 GMT
Vary: Accept
Content-Type: application/json;charset=UTF-8
Content-Length: 25
Server: Jetty(7.6.13.v20130916)

A single product returned
Integration with acme-webstore
Calling acme-catalog from acme-webstore should now be a pretty simple matter. We just need to make sure we pass on the token.
Calling acme-catalog
(ns acme-webstore.catalog
  (:require [clj-http.client :as http]))


(defn get-from-catalog [path token]
  (http/get path {:headers {"Authorization" (str "Acme-Token " token)}}))       (1)

(defn get-products [req]
  (let [auth-token (-> req :session :token-pair :auth-token)                    (2)
        resp (get-from-catalog "http://localhost:6003/products" auth-token)]
(:body resp)))| 1 | We make sure we pass the token in the Authorization header with the given token name |
| 2 | The auth-token for the logged in user is found under the session key for the request |
The rest is just a matter of hooking up the appropriate route and view. I’ll leave that part up to you !
Summary
Most of the hard work was already done in the previous episodes. Providing authentication and authorization for our REST services was pretty simple. We also demonstrated that integrating with Liberator was mostly a matter of hooking into the appropriate decision points for our resource definitions. We didn’t utilize all that much of buddy-auth here, but your app might find use for some of its more advanced features.
I think this episode demonstrates some of the benefits of using a library like buddy. It’s not very opnionated which leaves you with a lot of decisions to make. But it does have the building blocks you need and it provides you with great flexibility when it comes to integrating with other libraries.
At the moment I’m not sure if there is going to be any further episodes in the near future. But the again it might. Feel free to leave suggestions in the commenting section though.
Implementing a Clojure threading refactoring in ClojureScript using Light Table
16 March 2015
Tags: clojure clojurescript lighttable
TweetIntroduction
About a week ago I blogged and did a ScreenCast about Clojure refactoring in Light Table. I introduced some clojure refactorings enabled by the not yet released plugin I’m currently working on. In this post I thought I’d walk you through a feature I’ve added since then in a little more detail.
| Clj-Light-Refactor plugin on github https://github.com/rundis/clj-light-refactor |
Again clj-refactor.el provided me with a great list of potential refactoring candidates. I decided I’d start with the threading refactoring, mostly because I’ve missed something like that for Light Table on a daily basis.
Goal
; Turn something like this;
(map #(+ % 1) (filter even? [1 2 3 4 5]))

;into
(->> [1 2 3 4 5]
     (filter even?)
(map #(+ % 1)))-
I’d like the refactorings to work for both Clojure and ClojureScript
-
I think it would be the best option if I could implement it in the lt plugin client code (using clojurescript)
-
Use third party lib if that saves me time and provides a great platform for future refactorings
Analysis paralysis
..the state of over-analyzing (or over-thinking) a situation so that a decision or action is never taken, in effect paralyzing the outcome..
— WIKIPEDIA
Before I could get started on the implementation I had to do a bit of research. I tried to find a clojurescript compatible lib that would make it easy to read/"parse" clojure and clojurescript code and make it easy to navigate and manipulate it. I looked at parser libs like Instaparse-cljs and https://github.com/cgrand/parsley [parsley] but both seemed like a little bit to much effort to get me started. rewrite-clj seemed very promising, but unfortunately no ClojureScript port (feel free to vote for or contribute to this issue)
What to do ?
After much deliberation it dawned on my that maybe I should have a go at it without using any libs. ClojureScript ships with cljs.reader. That should get me started right ? Next step is to get the code into something easily navigable and modifiable (immutably of course). Another look at xlj-rewrite provided the necessary neuron kickstart: zipper of course. Good job there is a ClojreScript version already at hand !
| There are many resources out there on zippers in clojure. This article is pretty thorough |
Thread last step by step overview
To really get to grips with what I had to achieve I sat down and sketched up something like the illustration below. Quite helpful when your in-brain tree visualizer has gotten somewhat rusty.
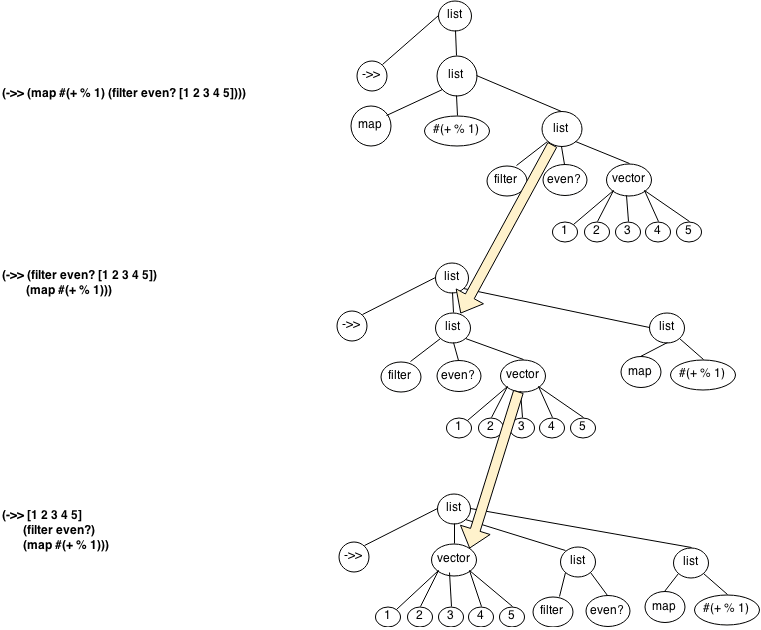
Steps
-
First we wrap our form in a thread-last if we haven’t done so already
-
We take the last argument of the list node right of the threading operator and promote that node to become the first argument to the threading ("function/"macro)
-
Same as above, now the node we promote is a vector
-
When the first node next to the threading operator node isn’t a list (or a list of just one arg), we are done.
Thread first isn’t much different, so I’ll leave that excersize up to you !
|
Some of you might raise your finger at the way I skipped breaking down the #(+ % 1) node. We’ll get back to that later, but I’ll give you a hint : |
Code essential
Reading code from a string
(defn str->seq-zip [form-str]
  (when (seq form-str)
    (-> form-str
        rdr/read-string        (1)
z/seq-zip))) (2)| 1 | Using cljs.reader to read(/parse) code. |
| 2 | Create a sequence zipper from the parsed form |
| Please note that cljs.reader only a subset (edn) of clojure. That means that several reader macros like #(), '() etc will croak |
Thread one / promote one pass
(defn do-thread-one [cand cand-fn]
  (if-not (further-threadable? cand)                         (1)
    cand
    (let [promote (-> cand cand-fn z/node)                   (2)
          therest (-> cand cand-fn z/remove)]                (3)
      (-> therest
          z/up
          (z/insert-left promote)                            (4)
          (#(z/replace % (unwrap-list-if-one (z/node %))))   (5)
z/up)))) (6)| 1 | First we need to check if the form is further threadable, if it isn’t then just return the zipper (cand) with it’s current position |
| 2 | Get the node that should be promoted using cand-fn. cand-fn basically handles navigating the zipper to find the last argument to the function call (thread-last) or the first argument (thread-first) |
| 3 | Gently rip out the node to be promoted, so you are left with the rest sans this node |
| 4 | Insert the node to be promoted as the first sibling to the threading operator node |
| 5 | If the node at the position of the rest node is a list with just one item, it should be the function and we can leave out the parens |
| 6 | Move the zipper "cursor" up to the first arg of the thread operator function (for potentially further threading) |
Thread fully
(defn- do-thread [orig cand-fn t]
  (when (seq orig)
    (let [root (if (threaded? orig) orig (wrap-in-thread orig t))]  (1)
      (loop [cand root]
        (if-not (further-threadable? cand)                          (2)
          cand
(recur (do-thread-one cand cand-fn)))))))| 1 | If not already wrapped in a form with a threading operator, do so (just for convenience) |
| 2 | Keep promoting until isn’t possible to promote further |
Zip it up
(defn zip->str [zipnode]
  (-> zipnode
      z/root
      pr-str))
Orchestration
(defn thread [form-str]
  (let [node (str->seq-zip form-str)
        threading (when node (threaded? node))]
    (when (and node threading)
      (-> node
          (do-thread (threading-locator threading) threading)
          zip->str))))
Entry point function to read form string, do threading and return result as string again
Hooking it into Light Table
Replace helper function
defn replace-cmd [ed replace-fn]
  (cmd/exec! :paredit.select.parent)                                       (1)
  (when-let [candidate  (editor/selection ed)]
    (let [bounds (editor/selection-bounds ed)]
      (when-let [res (replace-fn candidate)]                               (2)
        (editor/replace-selection ed res))                                 (3)
(editor/move-cursor ed (-> bounds :from (update-in [:ch] inc))))))| 1 | Using paredit command to select parent expression |
| 2 | Execute threading function on selected expression |
| 3 | Replace selection with given the refactored result |
Behavior and commands
(behavior ::thread-fully!                                           (1)
          :triggers #{:refactor.thread-fully!}
          :reaction (fn [ed]
                      (replace-cmd ed thread)))

(cmd/command {:command ::thread-fully                               (2)
              :desc "Clojure refactor: Thread fully"
              :exec (fn []
                      (when-let [ed (pool/last-active)]
(object/raise ed :refactor.thread-fully!)))})| 1 | We create behaviors for each refactor feature so that we can target the feature to a given set of editor tags |
| 2 | Commands are what the user sees in the LIght Table command pane, and which can be assigned to keyboard shortcuts |
Configuring behaviors
  [:editor.clj :lt.plugins.cljrefactor.threading/thread-fully!]
  [:editor.cljs :lt.plugins.cljrefactor.threading/thread-fully!]
We enable the behaviors for both Clojure and ClojureScript tagged editor objects.
Problems ?
Well the limitations of cljs.reader is a problem. The anonymous function literal is something I use all the time. I did quickly look at cljs.reader/register-tag-parser! but couldn’t really come up with a workable strategy here. So if anyone have suggestions for a more complete parsing of clojure code in ClojureScript please give me a ping ! I ended up escaping it as a string for now. Not exactly great if you’d like to apply the refactoring inside an anonymous function literal block.
| Actually I also had some issues using clojure.zip from Light Table, but a restart seemed to solve it |
Summary
Once I managed to make a decision on which route to pursue, the rest was mainly just a blast. it´s really awesome how much of Clojure it’s possible to use in ClojureScript and digging into zippers was a real eyeopener for me. I believe I now have a foundation to provide a range of useful client side refactoring features and I’ve already started pondering on what to address next.
Some thorny issues remain, and some icing like customizable formatting etc still remains. The complete list of threading refactorings are listed here
The main takeaway for me is that I keep learning more and more about Clojure, and as a bonus I get new nifty features for my current editor of choice !
Clojure refactoring in Light Table
08 March 2015
Tags: clojure lighttable
TweetBackground
A colleague of mine, the emacs wizard Magnar has on multiple occations demonstrated some of the cool refactoring features for Clojure he has at his disposal in emacs.
I’m currently a Light Table user and plugin author. Surely it should be possible to add some refactoring support to Light Table ? I started looking at clj-refactor.el and I couldn’t initially figure out where to start. But I found that some of the cool features were actually enabled by an nrepl middleware refactor-nrepl.
nREPL middleware to support refactorings in an editor agnostic way.
— refactor-nrepl
Yay, now that’s what I call a great initiative. I decided to give it a go, and here’s a taste of what I managed to come up with so far.
Demo
The plugin
| You can find the plugin repo on github https://github.com/rundis/clj-light-refactor |
A taste of implementation
I won’t go into to much details in this blogpost, but I thought I’d give you a little teaser on how I’ve gone about interacting with the middleware. Light Table supports calling arbitrary clojure code through it’s custom nrepl middleware. So getting started wasn’t really that difficult.
Middleware invocation
(defn artifact-list-op []
(str "(do (require 'refactor-nrepl.client) (require 'clojure.tools.nrepl)"
"(def tr (refactor-nrepl.client/connect))"
"(clojure.tools.nrepl/message (clojure.tools.nrepl/client tr 10000) {:op \"artifact-list\"}))"))The above code is an example of the code necessary to connect to and invoke an operation on then refactor-nrepl middleware for listing clojare artifacts.
Behaviour in Light Table
(behavior ::trigger-artifact-hints
:triggers #{:artifact.hints.update!}
:debounce 500
:reaction (fn [editor res]
(when-let [default-client (-> @editor :client :default)] (1)
(notifos/set-msg! (str "Retrieving clojars artifacts"))
(object/raise editor (2)
:eval.custom (3)
(artifact-list)
{:result-type :refactor.artifacts :verbatim true})))) (4)| 1 | For this particular operation (autocompletion of deps) we require that the user has already got a connection to a lein project |
| 2 | We raise an event on the editor instance (in this case it’s an editor with a project.clj file) |
| 3 | :eval.custom is a behavior for evaluate arbitrary clojure code |
| 4 | We set the result type to something custom so that we can define a corresponding custom behavior to handle the results |
(behavior ::finish-artifact-hints
:triggers #{:editor.eval.clj.result.refactor.artifacts} (1)
:reaction (fn [editor res]
(let [artifacts (-> res :results first :result first :value (s/split #" "))
hints (create-artifact-hints editor artifacts)] (2)
(object/merge! editor {::dep-hints hints}) (3)
(object/raise auto-complete/hinter :refresh!)))) (4)| 1 | The important part here is that the editor.eval.clj.result is assumed by the Light Table client whilst refactor.artifacts is appended, given the corresponding param we supplied above. So by naming our trigger like this, our behaviour will be triggered |
| 2 | We pick out the results from the refactor-nrepl operation and transform it into a datastructure that’s suitable for whatever we need to do (in this case providing autocompletion hints) |
| 3 | We store the list of artifacts in the editor (atom) so that our autocomplete hinter doesn’t go bananas invoking the middleware like crazy |
| 4 | Finally we tell the autocomplete hinter to refresh itself to include the list of artifacts |
| The autocomplete part is skimpily explained here, but the important bit I’m trying to get across is how to invoke the middleware and how to pick up the results. Autocompletion in Light Table deserves a blog post of it’s own at some point in the future |
Middleware preconditions
For any of the features in the plugin to work we have to set up the middleware. So you need to add something like this to your ~/.lein/profiles.clj
:plugins [[refactor-nrepl "X.Y.Z"] (1)
[cider/cider-nrepl "A.B.C"]] (2)| 1 | This is the core dependency that does all the heavy lifting for the features currently implemented |
| 2 | The Cider nrepl middleware is used by refactor-nrepl. However the cider middleware on it’s own provides several cool features that might come handy to the clj-light-refactor plugin in the near future :) |
| The version indentifiers are intentionally left out, because it’s currently a little in flux. This plugin won’t be released until the refactor-nrepl comes with it’s next official release. |
The road ahead
This is just the beginning, but it feels like I’m on to something. The clj-refactor.el project provides an huge list of potential features to implement, the refactor-nrepl middleware will surely continue to evolve and last but not least the cider middleware has plenty of useful stuff to harvest from.
I’ll keep plugin(g) along and hopefully others might get inspired to contribute as well. At some point in the future maybe parts of this plugin will be ported to the official Light Table Clojure plugin. Who knows !?
Securing Clojure Microservices using buddy - Part 3: Token revocation
19 February 2015
TweetPart 3 in my blog series about securing clojure web services using buddy. In this episode we’ll be looking at how we might handle revocation of previously issued auth tokens.
Introduction
Previous episodes in this series:
| Sample code (tagged for each blog post) can be found on github |
In part 2 I said that my next post would be about authorization using tokens in a service application. Well my conscience got the better of me and I decided I had to address the slightly thorny issue of how to handle token revocation first. In part 2 I left you in a state where you’d have a really hard time locking a user out or changing access rights. You would have to trust that the user re-authenticated (or change the key-pair for token signing/unsigning).
Opposing forces
Some of the things we are trying to achieve with our auth design are:
-
Avoiding session state for authentication and authorization. Hence the introduction of self contained auth tokens
-
The auth service shouldn’t become a huge dependency magnet, ideally only client facing apps should have to call the auth-service, whilst the service apps would only use the auth-token for authenticating and authorizing requests
-
The user shouldn’t be prompted for his/her credentials more than necessary
The reality though is that:
-
We have to be able to lock down a user (malicious or whatever reason)
-
We should be able to change a users rights without forcing a re-authentication
-
Checking whether a token has been revoked would be impossible without storing state about that fact somewhere
-
Continuously checking with the auth-service whether a token has been revoked and/or rights have changed with the auth service would negate the use of tokens in the first place
Refresh tokens
I briefly started reading up on Oath2 Refresh tokens. It have to admin I didn’t quite get it until I read a farily explanatory post on stackoverflow.
The gist of it that we issue two tokens upon authentication. An authentication token (or access token if you like) and a refresh token. This allows us to set a shorter expiry for the auth token, and we can use the refresh-token to request a new auth token when a previous one has expired. The sole purpose of refresh tokens is to be able to request new auth tokens.
Solution outline
The diagram below (UML with liberties) illustrates how refresh-tokens might work for us.
Steps
-
User logs in with username/password
-
The web app invokes the create-auth-token service in acme-auth. This in turn
-
authenticates the user
-
creates an auth-token
-
creates a refresh token
-
-
The refresh token is stored in a refresh_tokens table
-
Both the auth-token and refresh-token is returned to the web-app
-
The web app stores the tokens in a cookie which is returned to the browser
-
User makes a request (with a valid auth token)
-
The web app might make a call to a resource server/service app (providing the auth-token as a auth-header in the request)
-
At some point later after the auth-token has expired (say 30 minutes) the user makes another request
-
The web app finds that the auth-token has expired and request a new auth-token using the refresh-token (from the cookie)
-
We retrieve the stored refresh-token to check if it still valid (ie not revoked)
-
We invalidate the existing refresh token in the db (will explain this bit when we look at the implementation)
-
We create a new auth token and a new refresh token. The new refresh token is stored in db
-
A new token-pair is returned to the web-app
-
The web app can now make a request to a resource server/service with a valid auth-token
-
Finally the cookie is updated with the new token-pair
Where is the code man ?
Well that was a long intro, so if you are still following along it’s time to have a look at what changes and additions are needed from part 1 and 2.
Changing token creation in acme-auth
(defn- unsign-token [auth-conf token]
(jws/unsign token (pub-key auth-conf)))
(defn- make-auth-token [auth-conf user] (1)
(let [exp (-> (t/plus (t/now) (t/minutes 30)) (jws/to-timestamp))]
(jws/sign {:user (dissoc user :password)}
(priv-key auth-conf)
{:alg :rs256 :exp exp})))
(defn- make-refresh-token! [conn auth-conf user] (2)
(let [iat (jws/to-timestamp (t/now))
token (jws/sign {:user-id (:id user)}
(priv-key auth-conf)
{:alg :rs256 :iat iat :exp (-> (t/plus (t/now) (t/days 30)) (jws/to-timestamp))})]
(store/add-refresh-token! conn {:user_id (:id user) (3)
:issued iat
:token token})
token))
(defn make-token-pair! [conn auth-conf user] (4)
{:token-pair {:auth-token (make-auth-token auth-conf user)
:refresh-token (make-refresh-token! conn auth-conf user)}})
(defn create-auth-token [ds auth-conf credentials] (5)
(jdbc/with-db-transaction [conn ds]
(let [[ok? res] (auth-user conn credentials)]
(if ok?
[true (make-token-pair! conn auth-conf (:user res))]
[false res]))))| 1 | The auth token store user and role info as in part 1, but we now have the option of shortening the expiry |
| 2 | For simplicity we have created the refresh token using the same key-pair as for the auth token. The refresh token contains only user-id and issued at time (iat). This allows us retrieval of the db stored token info later on. The expiry for this token can be as long as you are comfortable with (30 days in this instance) |
| 3 | We store the token in the refresh_token table with some fields extracted for ease of querying |
| 4 | We now return a map with both the auth-token and our shiny new refresh-token |
| 5 | The entry point service for token creation |
Refreshing tokens
(defn refresh-auth-token [ds auth-conf refresh-token]
(if-let [unsigned (unsign-token auth-conf refresh-token)] (1)
(jdbc/with-db-transaction [conn ds]
(let [db-token-rec (store/find-token-by-unq-key conn (:user-id unsigned) (:iat unsigned)) (2)
user (store/find-user-by-id conn (:user_id db-token-rec))]
(if (:valid db-token-rec) (3)
(do
(store/invalidate-token! conn (:id db-token-rec)) (4)
[true (make-token-pair! conn auth-conf user)]) (5)
[false {:message "Refresh token revoked/deleted or new refresh token already created"}])))
[false {:message "Invalid or expired refresh token provided"}]))| 1 | We unsign the refresh-token to ensure it is valid (not tampered with or expired) |
| 2 | We use information from the refresh token to retrieve it’s db stored representation. |
| 3 | This test could return false for 3 cases; token deleted, token has been revoked or the token has been invalidated because a new refresh token has been created |
| 4 | The existing refresh token is invalidated in the database |
| 5 | We create a new token pair (where the newly created refresh token is stored in a new db row in the refrest_token table) |
|
Why creating a new refresh token every time ?
Imagine that someone gets hold of a users refresh token. Lets say the user requests a token refresh first, now if the hijacker is making a refresh-request with the hijacked request token we detect that a refresh is attempted on a token that is already invalid. We can’t tell if the user or the hijacker is first, but either way we could take action (trigger warning/lock user account etc) In the code above we can’t tell the diffence between why a refresh token is invalid, so you might wish to have a separate flag for this particular check. |
Middleware changes in the acme-webstore
(defn wrap-auth-cookie [handler cookie-secret] (1)
(-> handler
(wrap-session
{:store (cookie-store {:key cookie-secret})
:cookie-name "acme"
:cookie-attrs {:max-age (* 60 60 24 30)}}))) ;; you should probably add :secure true to enforce https
(defn unsign-token [token]
(jws/unsign token (ks/public-key (io/resource "auth_pubkey.pem"))))
(defn wrap-auth-token [handler] (2)
(fn [req]
(let [auth-token (-> req :session :token-pair :auth-token)
unsigned-auth (when auth-token (unsign-token auth-token))]
(if unsigned-auth
(handler (assoc req :auth-user (:user unsigned-auth)))
(handler req)))))
(defn- handle-token-refresh [handler req refresh-token]
(let [[ok? res] (refresh-auth-token refresh-token) (4)
user (:user (when ok? (unsign-token (-> res :token-pair :auth-token))))]
(if user
(-> (handler (assoc req :auth-user user)) (5)
(assoc :session {:token-pair (:token-pair res)}))
{:status 302
:headers {"Location " (str "/login?m=" (:uri req))}}))) (6)
(defn wrap-authentication [handler]
(fn [req]
(if (:auth-user req)
(handler req)
(if-let [refresh-token (-> req :session :token-pair :refresh-token)]
(handle-token-refresh handler req refresh-token) (3)
{:status 302
:headers {"Location " (str "/login?m=" (:uri req))}}))))| 1 | The only change we made to the cookie middleware is increase the ttl. |
| 2 | The wrap-auth-token middleware just needed to change to handle that auth-token is found as part of a token pair (not shown: the login handler adds the token pair to the session upon successful authentication) |
| 3 | If the auth token has expired and refresh token exists we initiate an attempt to refresh the token pair |
| 4 | Invokes the acme-auth service for requesting token refresh |
| 5 | If a refreshing the token pair was successful we invoke the next handler in the chain and assoc the new token pair with the session key in the response (which in turn ends up in the cookie) |
| 6 | We give up, you have to log in again |
| It might not be a great ideat to store the auth token and the refresh token in the same cookie. Haven’t really thought that bit through tbh. |
Summary
A lot of thinking and not a lot of code this time. But I feel we have come up with a solution that might provide a suitable balance between risk and statelessless with regards to revoking tokens/user access. Refresh tokens allows us to stay clear of sessions and avoid asking the usere for their credentials. CSRF is obviously still an issue, but we have taken some small steps to detect when the users cookie might have been hijacked.
The next episode will definately be about authentication and authorization in a service app.
Scratching my AsciiDoc itch
15 February 2015
Tags: clojurescript node javascript
TweetBackground
So I have been writing my previous blog posts in AsciiDoc using Light Table. AsciiDoc is really great and I haven’t regretted using it for my blog at any point in time. To create my blog site I’m using Jbake and its all published to github (gh-pages). To preview my blog posts while writing I either had to start a separate browser window (with a AsciiDoc browser plugin) or I had to set up a gradle watch task and use something like SimpleHttpServer to serve my "baked" site locally.
I’m probably still going to test my site locally, but I really felt a need for something similar to the https://github.com/MarcoPolo/lt-markdown plugin.
I wish I had an editor where I could easily program my own extensions.
— Magnus Rundberget
A few years back
A few years back
I guess I’m just lucky, but whacking something together wasn’t really that hard. I thought I’d share my experience.
Technology
AsciiDoctor comes with JavaScript support through asciidoctor.js. It even comes with support for node. Light Table runs on Node (node webkit, soon Atom Shell ?). Light Table plugins are written in ClojureScript, I much prefer ClojureScript to JavaScript or CoffeeScript for that matter. Anyways I’m digressing, calling node modules from a Light Table is no big deal.
Solution
The end result became a new plugin for Light Table. AsciiLight
| I pretty much nicked most of the ClojureScript code from https://github.com/MarcoPolo/lt-markdown. Cheers Marco Polo ! |
Calling asciidoctor.js
For reasons unknown to me I had some troubles calling the Objects/functions needed from asciidoctor.js directly from ClojureScript so I had to make a thing JavaScript wrapper my self. No big deal, but I’d be interested to find out why it croaked.
var asciidoctor = require('asciidoctor.js')();
var processor = asciidoctor.Asciidoctor(true); (1)
var opal = asciidoctor.Opal;
var doConvert = function(content, baseDir) {
var opts = opal.hash2(
['base-dir', 'safe', 'attributes'],
{'base-dir': baseDir,
'safe': 'secure',
attributes: ['icons=font@', 'showtitle']});
return processor.$convert(content, opts); (2)
};
module.exports = {
convert: function(content, baseDir) {
return doConvert(content, baseDir);
}
}| 1 | Load Node module and configure AsciiDoctor to support extensions |
| 2 | The function where we actually call asciidoctor |
There was a lot of trial and error to figure out what to call the options and how to pass these options to asciidoctor. Some seemed to work others seemed to have no effect. To be improved in a future release for sure. The most painful part here was that I couldn’t figure out how to reload my custom node module … hence a lot of Light Table restarts. Surely there must be a better way.
Plugin code
defn setAdocHTML! [ed obj]
(let [html (->
(adoc->html (.getValue (editor/->cm-ed ed))
(files/parent (-> @ed :info :path))) (1)
(s/replace #"class=\"content\"" "class=\"adoc-content\""))]
(set! (.-innerHTML (object/->content obj)) html))) (2)
(defn get-filename [ed]
(-> @ed :info :name))
(defui adoc-skeleton [this]
[:div {:class "adoc"}
[:h1 "Asciidoc content coming here"]])
(object/object* ::asciilight (3)
:tags [:asciilight]
:name "markdown"
:behaviors [::on-close-destroy]
:init (fn [this filename]
(object/update! this [:name] (constantly (str filename " - Live")))
(adoc-skeleton this)))
(behavior ::on-close-destroy (4)
:triggers #{:close}
:reaction (fn [this]
(when-let [ts (:lt.objs.tabs/tabset @this)]
(when (= (count (:objs @ts)) 1)
(tabs/rem-tabset ts)))
(object/raise this :destroy)))
(behavior ::read-editor (5)
:triggers [:change ::read-editor]
:desc "AsciiLight: Read the content inside an editor"
:reaction (fn [this]
(let [adoc-obj (:adoc @this)]
(setAdocHTML! this adoc-obj))))
(cmd/command {:command ::watch-editor (6)
:desc "AsciiLight: Watch this editor for changes"
:exec (fn []
(let [ed (pool/last-active)
filename (get-filename ed)
adoc-obj (object/create ::asciilight filename)]
(tabs/add-or-focus! adoc-obj)
(object/update! ed [:adoc] (fn [] adoc-obj))
(object/add-behavior! ed ::read-editor)
(object/raise ed ::read-editor)))})| 1 | Retrieve whatever is in the given editor ed and request ascidoctor.js to make nice html from it. |
| 2 | Insert the generated html into the preview viewer |
| 3 | An atom that holds the markup used for the preview. Destroyed when its owning tab is closed. |
| 4 | Behavior that is triggered when the tab (or LightTable) is closed. Performs cleanup as one should ! |
| 5 | Behavior that is triggered whenever the user changes the content of the editor being watched. For large documents we might want to introduce a throttle on this behaviour. |
| 6 | This i the command you see in the command bar in Light Table. It’s the entry point for the plugin currently and is responsible for adding a new tab and setting up the link between the editor to be watched and the preview tab. |
That’s pretty manageable for something quite usable.
Behaviors and a note on CSS
[[:app :lt.objs.plugins/load-js "asciilight_compiled.js"]
[:app :lt.objs.plugins/load-css "css/font-awesome.css"]
[:app :lt.objs.plugins/load-css "css/adoc.css"]]Here we load the transpiled javascript for our plugin, css icon support throught font-awesome and a slightly customized css for our asciidoc preview.
CSS, the cascading part you know.
AsciiDoc ships with a default CSS you may use (it even has a stylesheet factory) That’s cool. Light Table also has styles, hey it even has lots of skins. So I had to spend some time ensuring that the css I added through the plugin didn’t mess up the user selected styles from Light Table. For instance both LIght Table and AsciiDoc found good use for a css class called content.
Lost a few hairs (not many left tbh)
Summary
It’s very early days for this plugin, and it has many snags. But its a decent start considering I used maybe 6-8 hours in total, most of which was time struggling with css. It just feels great writing this blogpost with a preview of what I’m writing using a plugin of my own creation.
One itch scratched !
Securing Clojure Microservices using buddy - Part 2: WebApp authentication and authorization
02 February 2015
TweetIntroduction
In Part 1 of this blog series we learned how to create tokens that could be used for authentication and authorization. In this episode we will create a sample web app called acme-webstore. The acme-webstore will make use of the tokens generated from the acme-auth service. The app will implement a simple login and logout flow and demonstrate how you may employ role based authorization.
Disclaimer
|
There are many concerns to be addressed with regards to securing a web app. Be sure to do proper research for what your needs and potential risks are. A good starting point might be to check out OWASP |
Buddy support
Buddy provides support for authentication and authorization of web applications through buddy-auth. I believe that version 0.3.0 of this lib doesn’t provide support for key-pair signed jws tokens out of the box. Buddy auth does provide a flexible mechanism for creating your own backends and it also provides what looks to be a fairly flexible scheme for authorization.
For this episode I chose not to go down that route though. Actually the app won’t be using buddy-auth at all. We are going to plunge into the abyss and see how far we get on our own. The end result might be that me or someone else makes a contribution to buddy-auth to save us from some of the steps here !
Login
The first thing to implement is a login flow to authenticate our users against the acme-auth service.
Figure 1. Sample login screen
Calling acme-auth
To perform the REST calls to acme-auth our app will use the excellent clj-http library
(defn create-token [req] (1)
(http/post "http://localhost:6001/create-auth-token"
{:content-type :json
:accept :json
:throw-exceptions false
:as :json
:form-params (select-keys (:params req) [:username :password])}))
(defn do-login [req]
(let [resp (create-token req)]
(condp = (:status resp)
201 (-> (response/redirect (if-let [m (get-in req [:query-params "m"])] m "/dashboard")) (2)
(assoc :session {:token (-> resp :body :token)})) (3)
401 (show-login req ["Invalid username or password"]) (4)
{:status 500 :body "Something went pearshape when trying to authenticate"}))) (5)| 1 | Helper function that invokes acme-auth using clj-http |
| 2 | The default behaviour is redirecting the user to a dashboard page after successful login, however if a query param "m" is set it will redirect to the url provided in m. Redirection will be covered explicitly later on. |
| 3 | Upon successful authentication we add the token to the users session. Sessions will also be discussed explicitly later on. |
| 4 | If authentication failed, display the login screen again with an error message |
| 5 | Lazy error handling… |
Logging out
(defn logout [req]
(assoc (response/redirect "/") :session nil))Logging out is just a matter of clearing the user session.
Rewind: Middleware overview
web.clj
Before plunging deeper into the details its useful to get a highlevel view of the various middlewares applied to the routes in the sample application.
(defroutes public-routes
(route/resources "/")
(GET "/" [] show-index)
(GET "/login" [] sec/show-login)
(POST "/login" [] sec/do-login)
(GET "/logout" [] sec/logout))
(defroutes secured-routes
(GET "/accounts/:id" [] show-account)
(GET "/accounts" [] (sec/wrap-restrict-by-roles show-accounts [:store-admin])) (1)
(GET "/dashboard" [] show-dashboard))
(defroutes app-routes
(-> public-routes
sec/wrap-auth-token) (2)
(-> secured-routes
sec/wrap-authentication (3)
sec/wrap-auth-token)) (4)
(def app (-> app-routes
wrap-keyword-params
wrap-params
wrap-absolute-redirects (5)
sec/wrap-authorized-redirects (6)
(sec/wrap-auth-cookie "SoSecret12345678"))) (7)| 1 | Custom middleware for restricting access based on role(s) |
| 2 | Custom middleware for picking out user info from a users token (if logged in) |
| 3 | Custom middleware to verify that user is authenticated for given route(s) |
| 4 | Duplication, cop out to ensure we have user info both for secured and unsecured routes |
| 5 | Redirects should really should use absolute urls (most browsers support relative though) |
| 6 | Custom middleware to prevent redirect attacks |
| 7 | Custom middleware wrapping a ring session using a cookie store. Obviously you wouldn’t define the cookie secret here ! |
Sessions and cookies
For a single-page web app or a REST client I would probably have been completely feasible using our auth token directly. However if we have a web app with a nice mix of server side generated html and chunks of client side scripting with ajax, we need to consider whether/how to use sessions.
Out of the box ring comes with session support in two flavours. Sessions based on a memory store or a cookie based store. In both cases a cookie will be used, but for the in memory store the cookie is only used to uniquely identify the server side cached data for that user session. When using the cookie store, the users session data is stored in the cookie (encrypted and MAC’ed) which is passed back and forth between the server and the client.
The article clojure web security by Eric Normand provides some very valuable insights into session handling (amoung other things) in Clojure.
Regardless of the article just mentioned the Security Architect of Acme corp instructed me to pursue the cookie based session store. To make matters worse, the Architect insisted on using a long-lived cookie. He went on about the benefits of avoiding clustered sessions stores, that the usability of the web store would be hopeless with short lived sessions and that surely there had to be measures to mitigate some of the additional risks involved.
Who am I to argue (I’m no expert by any means) let us see where the cookie store option takes us.
|
I suppose one of the biggest risk with the cookie approach is "man in the middle attacks". First mitigating step is to use SSL (and not just partially). Secondly there is the obvious risk of someone having taken control over the device you used for your logged in session. Maybe you should implement two factor authentication and require reauthentication for any critical operations ? Setting a long expiry for both the token and cookie might be far to risky for your scenario, maybe you need to implement something akin to oauth refresh tokens. Also revocation of a token is definitely an interesting scenario we will need to handle in a later blog post ! |
Enough analysis/paralysis for now, I guess the bottom line is you’ll need to figure out what is secure enough for you.
Cookie store
(defn wrap-auth-cookie [handler cookie-secret]
(-> handler
(wrap-session
{:store (cookie-store {:key cookie-secret}) (1)
:cookie-name "acme"
:cookie-attrs {:max-age (* 60 60 24)}}))) (2)| 1 | The cookie content (session data ) is encrypted and a MAC signature added. For storing our token this may or may not be overkill. Our token is already MAC’ed, however it’s content is possible to extract quite easily as it is. |
| 2 | Only shown setting the max age here, but you definitely should set the :secure attribute to true (and put up something like nginx infront of your app to terminate ssl). |
| A big win with the cookie approach is that a server restart is no big deal. The user stays logged in. If you are using staged deploys, no session synchronization is needed. |
Unsigning the token
(defn unsign-token [token]
(jws/unsign token (ks/public-key (io/resource "auth_pubkey.pem")) {:alg :rs256})) (1)
(defn wrap-auth-token [handler]
(fn [req]
(let [user (:user (when-let [token (-> req :session :token)] (2)
(unsign-token token)))]
(handler (assoc req :auth-user user))))) (3)| 1 | Unsign the jws token using the public key from acme-auth |
| 2 | If the user has logged in, the token should be stored in session. Unsign if it exists. |
| 3 | Add the user info from the token to an explicit key in the request-map |
Ensuring that the user is logged in for a given route
(defn wrap-authentication [handler]
(fn [req]
(if (:auth-user req)
(handler req)
{:status 302
:headers {"Location " (str "/login?m=" (:uri req))}})))If the user hasn’t logged in, we redirect to the login page. To allow the user to return to the url he/she originally tried to access, we provide the url as a query param to the login handler.
Authorization
We have implemented login, now lets see how we can implement a simple mechanism for authorizing what a user may or may not do once authenticated. We’ll cover role based authorization for now. Your app might require more fine-grained control and various other mechanisms for authorization.
(def acme-store-roles (1)
{:customer 10 :store-admin 11})
(defn any-granted? [req roles] (2)
(seq
(clojure.set/intersection
(set (map :role-id (-> req :auth-user :user-roles)))
(set (vals (select-keys acme-store-roles roles))))))
(defn wrap-restrict-by-roles [handler roles] (3)
(fn [req]
(if (any-granted? req roles)
(handler req)
{:status 401 :body "You are not authorized for this feature"})))| 1 | A hardcoded set of roles we care about in this app |
| 2 | Function to verify if authed user has any of the roles given |
| 3 | Middleware for declaratively restricting routes based on role privileges |
Showing elements based on role privileges
(defn- render-menu [req]
(let [user (:auth-user req)]
[:nav.menu
[:div {:class "collapse navbar-collapse bs-navbar-collapse navbar-inverse"}
[:ul.nav.navbar-nav
[:li [:a {:href (if user "/dashboard" "/")} "Home"]]
(when user
[:li [:a {:href (str "/accounts/" (:id user))} "My account"]])
(when (any-granted? req [:store-admin])
[:li [:a {:href "/accounts"} "Account listing"]])]
[:ul.nav.navbar-nav.navbar-right
(if user
[:li [:a {:href "/logout"} "Logout"]]
[:li [:a {:href "/login"} "Login"]])]]]))
Figure 2. Sample Dashboard screen with the Account listing menu option for admins
As you can see, you can easily use the any-granted? function for providing granular restrictions on UI elements.
Preventing redirect attacks
In the login handler we added a feature for redirecting the user to the url he/she tried to access before redirected to the login page. We don’t want to open up for redirect attacks so we added a simple middleware to help us prevent that from happening.
| Lets say someone sends you a link like this http://localhost:6002/login?m=http%3A%2F%2Fwww.robyouonline.bot You probably don’t want your users to end up there upon successfully login. |
(def redirect-whitelist
[#"http://localhost:6002/.*"])
(defn wrap-authorized-redirects [handler]
(fn [req]
(let [resp (handler req)
loc (get-in resp [:headers "Location"])]
(if (and loc (not (some #(re-matches % loc) redirect-whitelist)))
(do
;; (log/warning "Possible redirect attack: " loc)
(assoc-in resp [:headers "Location"] "/"))
resp))))Obviously you’d need to use the proper host and scheme etc once you put a proxy with a proper domain name in front etc. You get the general idea though.
Summary
In part 1 we were creating a backend service for creating auth tokens. In this post you have seen how you could use that token service to implement authentication and role based authorization in a public facing web app. Long lived tokens are not without issues, and we have glossed over some big ones. Token revocation is a candidate for a near future blog post, but before that I’d like to cover usage of the token in a service application.
The next blog post will be about acme-orders and/or acme-catalog.
Securing Clojure Microservices using buddy - Part 1: Creating Auth Tokens
27 January 2015
TweetDisclaimer
|
There is much more to securing web apps and microservices than just authentication and authorization. This blog series will almost exclusively focus on those two aspects. |
Introduction
Let’s say you have decided to go down the microservices path with Clojure. How would you go about implementing authentication and authorization for your various apps and services ?
In this blog series I’ll take you through my stumblings through how you might address some of the concerns. At this point I have no idea how it might turn out, but I’m pretty sure I’ll learn quite a bit along the way.
Sample architecture
To illustrate various aspects I’ll be using the following sample high-level architecture as a starting point. It’s just a sketch, so don’t get too hung up on the dependency arrows, that might change.
You’ll find the evolving code examples at https://github.com/rundis/acme-buddy. A tag will be created for each blog posting.
Initial selection of technologies
The most known and used library in clojure for securing your ring webapps is friend. To my knowledge it’s a great library, and you should seriously consider using it for your apps as well.
A little while back I did a small spike on using friend and liberator. Liberator is a super library for rest enabling your applications/services. I came across the blog post API Authentication with Liberator and Friend. I tried to implement something similar but couldn’t quite get it working and I have to admit I had problems groking what was actually going on.
So for this blog series I decided to start off with something less opinionated. Hopefully that will enable me to understand more about the concerns involved. In buddy I found an a la carte menu of building blocks that looked very promising as a starting point.
Token based authentication
The goal for this first post is to create a service that allows a caller to authenticate a user by credentials and receive an authentication token upon successful authentication. That token can then be used by services and apps to authenticate and authorize requests for the duration of defined lifespan for the token. The service will be implemented in the acme-auth service app.
Database
For this sample app we’ll use a plain old boring rdbms. The schema will be as follows.
Password hashing
We need to store our passwords securely hashed in the user table. Buddy provides buddy-hashers.
Adding a user
(ns acme-auth.service
(:require [buddy.hashers :as hs]
[acme-auth.store :as store]))
(defn add-user! [ds user]
(store/add-user! ds (update-in user [:password] #(hs/encrypt %))))hs/encrypt - Hashes the password using bcrypt+sha512 (default, others available). Buddy generates a random salt if you don’t provide one as an option param.
Sample hash
1bcrypt+sha512$232da7e602406d818c6768194$312$4243261243132246c32674a576d514c75585255434f64444f4c59414b653843357a4e645547397279616c304a696f525656393166434862347a2e564b
The password hash we store to the database consists of 4 parts concatinated with $.
-
Algorithm
-
Salt - In our case the randomly generated by buddy
-
Iterations - Number of iterations used for hashing the pwd
-
Encrypted password hash
Authenticating a user
(defn auth-user [ds credentials]
(let [user (store/find-user ds (:username credentials))
unauthed [false {:message "Invalid username or password"}]]
(if user
(if (hs/check (:password credentials) (:password user)) (1)
[true {:user (dissoc user :password)}] (2)
unauthed)
unauthed)))| 1 | Verify provided plain text password credential against the hashed password in the db |
| 2 | You probably don’t want to ship the password in the token ! |
| Bcrypt is intentionally relatively slow. It’s a measure to help prevent brute force attacks. |
Creating a signed token
With the user store in place we can turn our attention to creating our (signed) token. Buddy provides us with buddy-sign. We could have opted for a HMAC based algorithm, but we’ll take it up one notch and use an algorithm that requires a public/private key-pair. Not only that, but we’ll serialize our token content in a json format following the jws draft spec.
acme-auth will own the private key and use that for signing whilst the other apps will have the public key for unsigning the token.
Creating a key-pair
You’ll be asked to enter a passphrase in both steps below. Keep it safe !
openssl genrsa -aes128 -out auth_privkey.pem 2048|
You should probably use something stronger than -aes128. You’ll need to fiddle with your JVM, but might be worth it unless it’s important for you that your government agencies have access to decrypting your token signatures. |
openssl rsa -pubout -in auth_privkey.pem -out auth_pubkey.pemSigning
(ns acme-auth.service
(:require [buddy.sign.generic :as sign]
[buddy.sign.jws :as jws]
[buddy.core.keys :as ks]
[clj-time.core :as t]
[clojure.java.io :as io]))
(defn- pkey [auth-conf] (1)
(ks/private-key
(io/resource (:privkey auth-conf))
(:passphrase auth-conf)))
(defn create-auth-token [ds auth-conf credentials]
(let [[ok? res] (auth-user ds credentials)
exp (-> (t/plus (t/now) (t/days 1)) (jws/to-timestamp))] (2)
(if ok?
[true {:token (jws/sign res (3)
(pkey auth-conf)
{:alg :rs256 :exp exp})}]
[false res])))| 1 | Helper function to read the private key we generated above |
| 2 | Sets a timestamp for when the token expires |
| 3 | Creates a signed token |
The token consists of 3 parts concatenated using "."
-
Base64 encoded string with header data (algorithm and other optional headers you might have set)
-
Base64 encoded json string with your message (claims in jws speak). Expiry ie. :exp is also a claim btw.
-
Base64 encoded MAC (Message Authentication Code) signature for our message (header + claims)
With that knowledge in mind, you see why it might be a good idea to leave the password out of the token (even though it would have been the hashed pwd we’re talking about).
Exposing our service
handler
(defn create-auth-token [req]
(let [[ok? res] (service/create-auth-token (:datasource req)
(:auth-conf req)
(:params req))]
(if ok?
{:status 201 :body res}
{:status 401 :body res})))Ring / Compojure wrap-up
(defroutes app-routes
(POST "/create-auth-token" [] handlers/create-auth-token))
(defn wrap-datasource [handler]
(fn [req]
(handler (assoc req :datasource (get-ds)))))
(defn wrap-config [handler]
(fn [req]
(handler (assoc req :auth-conf {:privkey "auth_privkey.pem"
:passphrase "secret-key"}))))
(def app
(-> app-routes
wrap-datasource
wrap-config
wrap-keyword-params
wrap-json-params
wrap-json-response))Invoking
curl -i -X POST -d '{"username": "test", "password":"secret"}' -H "Content-type: application/json" http://localhost:6001/create-auth-tokenWould yield something like:
{"token":"eyJ0eXAiOiJKV1MiLCJhbGciOiJSUzI1NiJ9.eyJ1c2VyIjp7InVzZXItcm9sZXMiOlt7InJvbGUtaWQiOjEwLCJhcHBsaWNhdGlvbi1pZCI6MTB9LHsicm9sZS1pZCI6MTEsImFwcGxpY2F0aW9uLWlkIjoxMH1dLCJ1c2VybmFtZSI6InRlc3QiLCJpZCI6MX0sImV4cCI6MTQyMjMxNDk3MH0.bKB3fh2CcPWqP85CK18U_IITxkRce8Xuj8fZGvhqjAaq1dWeiDMKOAGfSlg6GGJi-CrRepMaLOEfAVN23R7yoYb543wgm1Tv_pOYuNQ02tYRQMRJXSxVKS1m9zMEWlszLVet8Q3kfrLBaOxjdvjSp8exjsPeOcfCaqdcXPn9mwWSz0X8k1iaLbnY2fRL0mWbbG8rz4bSUSE0KX0xnKH3LqrtJcZE3BDHSr7tVqaxcHaFt4ivRpk3EYBzMtwRSCQ4jwAMibsh1XhvJMo4QeDwil-et70qJMV5XCJOsAr3SF4FVlNeUsNx2Aj1lORGIN7c8xKq-MDaTaGYV2O7L_0mGA"}Unsigning the token is quite similar to the signing. However when unsigning you must have the public key we generated earlier.
For the token above, the claims part of the message would look like this:
{"user":{"user-roles":[{"role-id":10,"application-id":10},
{"role-id":11,"application-id":10}],
"username":"test",
"id":1},
"exp":1422314970}Summary
We have created a small clojure app with a user database and a rest service that authenticates a user and returns a signed token with information about the user and his/her role+app/service authorizations. We’ve briefly covered password hashing and message signing using buddy.
The auth-token service will serve as a building block for the next step. How do we make use of token for authentication and authorization purposes in the acme-webstore ? That’s the topic of my next blog post in this series. Stay tuned !
A Groovy Light Table client - Not dead (yet)
25 January 2015
Tags: lighttable groovy gradle clojurescript
TweetBackground
In 2014 I blogged about the process of evolving a groovy(/gradle) plugin for Light Table from scratch.
Posts so far:
I even did a screen cast showing off some of the features so far.
So what happened ?
After the summer holidays my Open Source mojo was drained, I needed a break and I went into uphill cycling mode.
Light Table doubts
First of all. I haven’t given up on Light Table I somehow even feel strongly obliged to hang in there longer than most people given that I’ve contributed. I still use Light Table, actually more than ever because I’m currently hacking on a clojure/clojurescript project.
In October the founder of Light Table annouced Eve and released this blog post Obviously there was initial fears that this would be the end of Light Table. However 3 of the most active contributors to Light Table stepped up. There was a lot of visible activity initially (proper spring cleaning of the issues log). However visible activity from Light Table has been in steady decline and the last release was 21. november of last year.
I believe they are working on moving from node-webkit to atom shell, the layout system is being revised. There is also a hack night planned in a few days time.
I guess I just wished someone stepped up and outlined a clear road-map for Light Table and that a steady stream of releases towards a version 1.0 started coming out :)
Possibilites for further developments
Great things are happening with gradle I believe in terms of performance and also in terms of whats possible to achieve with the Tooling API. This opens up a whole range of oportunities to provide IDE support for languages that gradle supports.
The groovy and gradle parts of the currenty groovy plugin should probably be split with a generic gradle plugin and specific language plugins (scala, java…) depending on that.
How about things like ?:
-
Continuous unit testing - utilizing gradle builds incremental nature and the coming watcher tasks. Couple that with showing results inline in Light Table
-
Compilation - Same story here, show compilation errors inline
-
run webapp - Run apropriate gradle task to start your webapp and fire up a browser window inline in lighttable , maybe even hook it up with a browser debug/repl connection
Help needed
I’d love to hear if anyone has actually used the plugin and if so which parts of it.
I’m currently fully engaged in a clojure/clojurescript project, which takes all of my day time and quite a few evenings. It puts me in a better shape to contribute to Light Table, but currently leaves me little time to do so.
That might change though, but I guess I need 2 things to happen before I pick up work on this plugin:
-
Some visible progress from Light Table to show that it’s intending to survive
-
Hopefully someone feels inspired to help contribute progressing the plugin (pull requests are welcome)
Bootifying my ring app
19 January 2015
TweetA little background
A few weeks back I noticed a tweet about boot-clj. This weekend I finally had some time to look into whether it could be a viable alternative to Leiningen for our apps or not. We have a couple of ring based apps running as uberjars, so I decided to try to make a boot build for one of the projects. For the purpose of this blogpost however I’ve created a sample app. Source available on github
Why bother with an alternative when there is Leiningen ?
I haven’t been in the clojuresphere all that long. I do have a history as java and groovy developer and have been through a history of using ant, maven and lately gradle for my builds. In terms of development experience Leiningen is definately a step up from all of them. However I feel Leiningen has left me longing as soon as my builds have become a bit more elaborate (testing javascript, transpiling, create artifacts, upload to repo, run migrations deploy to different environments etc). I’m sure all of this is achievable with Lein, but is it really architected to excel for that purpose ? TBH I’d love to see gradle get some serious clojure love, but it doesn’t seem to be coming anytime soon. Maybe boot will be my next build tooling love :)
Reading up a bit on boot checked a few boxes for some of my longings though:
-
Your build doesn’t have to be all declarative
-
Sensible abstractions and libraries to allow you to compose and extend your build using the full power of clojure
-
Compose build pipelines somewhat similar to how you would compose middlewares in ring
-
Task is the fundamental building block
-
Tasks typically works on immutable filesets (files treated as values, you never touch the filesystem directly yourself !)
-
Possibility of complete classpath isolation at task level
-
Great repl and commandline support.
-
… and surely a lots more
Lein → Boot
Leningen project
project.clj
(defproject boot-sample "0.1.0"
:description "Boot sample application"
:url "https://github.com/rundis/boot-sample"
:min-lein-version "2.0.0"
:dependencies [[org.clojure/clojure "1.6.0"]
[compojure "1.2.1"]
[liberator "0.12.2"]
[ring/ring-jetty-adapter "1.3.1"]
[ring/ring-json "0.3.1"]
[bouncer "0.3.1"]
[io.aviso/pretty "0.1.14"]]
:ring {:handler boot-sample.core/app (1)
:port 3360}
:profiles {:dev {:plugins [[lein-ring "0.8.13"]]
:test-paths ^:replace []}
:test {:dependencies [[midje "1.6.3"]]
:plugins [[lein-midje "3.1.3"]]
:test-paths ["test"]
:resource-paths ["test/resources"]}})-
The entry point for my ring app
The above project is a really simple project definition. To run my app I just have to execute:
lein ring uberjar
java -jar target/boot-sample-0.1.0-standalone.jarcore.clj
(ns boot-sample.core
(:require [ring.middleware.params :refer [wrap-params]]
[ring.middleware.keyword-params :refer [wrap-keyword-params]]
[ring.middleware.json :refer [wrap-json-params]]
[compojure.core :refer [defroutes ANY GET]]
[liberator.core :refer [defresource resource]]))
(defn index-handler [req]
"Hello Boot sample (or maybe Lein still)")
(defresource booters
:available-media-types ["application/json"]
:allowed-methods [:get]
:handle-ok (fn [ctx] [{:id "Pod1"} {:id "Pod 2"}]))
(defroutes app-routes
(ANY "/" [] index-handler)
(ANY "/booters" [] booters))
(def app (-> app-routes
wrap-keyword-params
wrap-json-params
wrap-params))Hey. Hang on. There is no main method here, how can the java -jar command work without one ? Well, because the ring plugin creates one for us.
cat target classes/boot_sample/core/main.cljgives us
(do
(clojure.core/ns boot-sample.core.main
(:require ring.server.leiningen)
(:gen-class))
(clojure.core/defn -main []
(ring.server.leiningen/serve
(quote {:ring {:auto-reload? false,
:stacktraces? false,
:open-browser? false,
:port 3360,
:handler boot-sample.core/app}}))))That’s useful to know in case boot-clj doesn’t happen to have a ring task that does something similar.
Boot me up
Boot comes with a range of predefined tasks that I can compose to get quite close to the Leiningen build above. I’ll focus on getting that uberjar up and running.
I could have done it all on the command line or in the boot repl, but lets just be a little declarative (still functions don’t worry!).
build.boot
(set-env!
:resource-paths #{"src"} (1)
:dependencies '[[org.clojure/clojure "1.6.0"]
[compojure "1.2.1"]
[liberator "0.12.2"]
[ring/ring-jetty-adapter "1.3.1"]
[ring/ring-json "0.3.1"]
[bouncer "0.3.1"]
[io.aviso/pretty "0.1.14"]])
(task-options!
pom {:project 'boot-Sample
:version "0.1.0"}
aot {:namespace '#{boot-sample.core}} (2)
jar {:main 'boot_sample.core (3)
:manifest {"Description" "Sample boot app"
"Url" "https://github.com/rundis/boot-sample"}})
(deftask build
"Build uberjar"
[]
(comp (aot) (pom) (uber) (jar)))-
To bundle your sources in the output jar, you have to specify src as a resource-path. A small gotcha there.
-
We need to aot our core.clj namespace so that java -jar can invoke it’s main method
-
We need to help java -jar with the location of our main class in the jar
However you might remember from above that there is no main method in core.clj. So the last piece of the puzzle is to add one. It’t not that hard.
(ns boot-sample.core
(:require [ring.middleware.params :refer [wrap-params]]
[ring.middleware.keyword-params :refer [wrap-keyword-params]]
[ring.middleware.json :refer [wrap-json-params]]
[compojure.core :refer [defroutes ANY GET]]
[liberator.core :refer [defresource resource]]
[ring.adapter.jetty :as jetty]) (1)
(:gen-class)) (2)
;; ... the other stuff
(defn -main []
(jetty/run-jetty app {:port 3360})) (3)-
Using the jetty ring adapter
-
The :gen-class directive generates the necessary stuff for our main method to be invokable from java during aot compilation
-
Fire away
|
Note
|
At the time of writing there was a regression in boot that caused aot to fail. I needed to build boot from source, should be fixed in the next release though. |
Now all is set to try it out:
boot build
java -jar target/boot-sample-0.1.0.jarAll is well then ?
Unfortunately not quite. For uberjar projects it seems boot-clj at the time of writing has some serious performance challenges.
On my machine generating the uberjar takes:
-
Leiningen : 12 seconds
-
boot-clj : 46 seconds !
It’s not like Leiningen is lightning fast in the first place. But for this scenario boot just doesn’t cut it. I reported an issue and got prompt responses from the developers which can only be a good sign.
Concluding remarks
My initial question of whether or not I feel we could use boot for our current projects gets a thumbs down for now.
I think boot-clj carries a lot of promise and have some really great ideas. It’s going to be interesting to see if boot-clj becomes a viable alternative to leiningen. I suppose a porting and/or interop story with lein and lein plugins might be needed in addition to maturing both the model and obviously its performance characteristics.
I’m certainly keen on trying it out more. I might try out the clojurescript support next and maybe churn out some custom tasks just for fun.
A Groovy Light Table client - Step 5: Gradle dependencies in Light Table with dagre-D3
18 June 2014
Tags: lighttable groovy clojurescript gradle
TweetBackground
This is the fifth post in my series "A Groovy Light Table client". A blog series about steps I take when trying to build a Groovy plugin for Light Table.
Tapping more into the Potential of Light Table
So far the Groovy Light Table plugin hasn’t really showcased the real power of the Light Table Editor. What feature could showcase more of Light Table and at the same time prove useful in many scenarios ? For most projects I have worked on, the number of dependencies and their relationships have usually been non trivial. A couple of years back I wrote a post about showing gradle dependencies as a graphwiz png. Wouldn’t it be cool if I could show my gradle dependencies inline in Light Table ? It would be even cooler if the graph was interactive and provided more/different value than the default dependency reporting you got from Gradle itself
dagre-D3
So what library should I choose for laying out my planned dependency diagram ? My first instinct was something related to D3. However laying out a dot-graph sensibly on my own didn’t seem like a challenge I was quite up to. Luckily I found dagre-D3 and it looked to be just the thing I needed. Of course I would have loved to have found something more clojurish and ideally something that supported an immediate mode ui (akin to Facebook React, but for graphing). Maybe I didn’t look long or well enough but I couldn’t find anything obvious so I settled for dagre-D3.
Gradle dependencies
The second challenge I faced before even getting started was: How would I go about retrieving rich dependency information for my gradle projects using the tooling-api ? The information about dependencies default provided through the tooling api is fairly limited and wouldn’t have produced a very informative graph at all. Luckily I found through dialog with the Gradle guys that it should be possible to achieve what I wanted through a custom gradle model.
It’s all about the data
When I initially started developing the custom gradle model for retrieving dependency information I designed a data structure that resembled the dependency modelling in Gradle. However after prototyping with dagre and later trying to display multi project dependency graphs I decided to change the design. I ended up with a data structure more similar to that of a graph with nodes and edges.
Custom Gradle Model
To create a Custom Gradle Model you need to create a Gradle Plugin. My plugin got the very informative name "Generic Gradle Model" (naming is hard!).
class GenericGradleModelPlugin implements Plugin {
final ToolingModelBuilderRegistry registry;
@Inject
public GenericGradleModelPlugin(ToolingModelBuilderRegistry registry) {
this.registry = registry;
}
@Override
void apply(Project project) {
registry.register(new CustomToolingModelBuilder())
}
}The important bit above is registering my custom tooling builder to make it available to the tooling api !
private static class CustomToolingModelBuilder implements ToolingModelBuilder {
// .. other private methods left out for brevity
Map confDiGraph(Configuration conf) {
def nodeTree = conf.allDependencies
.findAll {it instanceof ProjectDependency}
.collect {getProjectDepInfo(it as ProjectDependency)} +
conf.resolvedConfiguration
.firstLevelModuleDependencies
.collect { getDependencyInfo(it) }
def nodes = nodeTree.collect {collectNodeEntry(it)}.flatten().unique {nodeId(it)}
def edges = nodeTree.collect {
collectEdge(conf.name, it)
}.flatten().unique()
[nodes: nodes, edges: edges]
}
Map projectDeps(Project project) {
[
name: project.name,
group: project.group,
version: project.version,
configurations: project.configurations.collectEntries{Configuration conf ->
[conf.name, confDiGraph(conf)]
}
]
}
public boolean canBuild(String modelName) {
modelName.equals(GenericModel.class.getName())
}
public Object buildAll(String modelName, Project project) {
new DefaultGenericModel(
rootDependencies: projectDeps(project),
subprojectDependencies: project.subprojects.collect {projectDeps(it)}
}
}The custom tooling model builder harvests information about all dependencies for all defined configurations in the project. If the project is a multi-project It will collect the same information for each subproject in addition to collect information about interdependencies between the sub projects.
Applying the plugin to gradle projects we connect to
Before we can retrieve our custom gradle model, we need to apply the plugin to the project in question. I could ask the users to do it themselves, but that wouldn’t be particularly user friendly. Luckily Gradle provides init scripts that you can apply to projects and the tooling api supports doing so. Init scripts allows you to do… well … init stuff for your projects. Applying a plugin from the outside falls into that category.
initscript {
repositories {
maven { url 'http://dl.bintray.com/rundis/maven' }
}
dependencies { classpath "no.rundis.gradle:generic-gradle-model:0.0.2" }
}
allprojects {
apply plugin: org.gradle.tooling.model.generic.GenericGradleModelPlugin
}Retrieving the model
def genericModel = con.action(new GetGenericModelAction())
.withArguments("--init-script", new File("lib/lt-project-init.gradle").absolutePath)
.addProgressListener(listener)
.run()
private static class GetGenericModelAction implements Serializable, BuildAction {
@Override
GenericModel execute(BuildController controller) {
controller.getModel(GenericModel)
}
}To retrieve the model we use a custom build action and applies the plugin implementing the custom model using the --init-script command line argument for gradle.
Voila we have the data we need and we return the dependency info (async) after you have connected to a gradle project.
Show me a graph
The dependency graph and associated logic was separated out to a separate namespace (graph.cljs). We’ll quickly run through some of the highlights of the LightTable clojurescript parts for displaying the dependency graph.
Graph object
(defui dependency-graph-ui [this]
[:div.graph
[:div.dependency-graph
[:svg:svg {:width "650" :height "680"}
[:svg:g {:transform "translate(20,20)"}]]]])
(object/object* ::dependency-graph
:tags [:graph.dependency]
:name "Dependency graph"
:init (fn [this]
(load/js (files/join plugin-dir "js/d3.v3.min.js") :sync)
(load/js (files/join plugin-dir "js/dagre-d3.js") :sync)
(let [content (dependency-graph-ui this)]
content)))The first step was to create and object that represents the view (and is able to hold the dependency data). The init method is responsible for loading the required graphing libs and then it creates the initial placeholder markup for the graph.
Some behaviours
(behavior ::on-dependencies-loaded
:desc "Gradle dependencies loaded for selected project"
:triggers #{:graph.set.dependencies}
:reaction (fn [this rootDeps subDeps]
(object/merge! this {:rootDeps rootDeps
:subDeps subDeps})))
(behavior ::on-show-dependencies
:desc "Show dependency graph"
:triggers #{:graph.show.dependencies}
:reaction (fn [this root-deps]
(tabs/add-or-focus! dependency-graph)
(default-display this)))The first behavior is triggered when the groovy backend has finished retrieving the project info, and more specifically the dependencies. If the project is a single project only the rootDeps will contain data.
The second behavior is triggered (by a command) when the user wishes to view the dependency graph for a connected gradle project.
Render Multiproject graph Hightlighs
For multi projects the plugin renders an overview graph where you can see the interdependencies between you sub projects.
(defn create-multiproject-graph [this]
(let [g (new dagreD3/Digraph)]
(doseq [x (:nodes (multi-proj-deps this))]
(.addNode g (dep-id x) #js {:label (str "<div class='graph-label clickable' data-proj-name='"
(:name x) "' title='"
(dep-id x) "'>"
(:name x) "<br/>"
(:version x)
"</div>")}))
(doseq [x (:edges (multi-proj-deps this))]
(.addEdge g nil (:a x) (:b x) #js {:label ""}))
g))
(defn render-multi-deps [this]
(let [renderer (new dagreD3/Renderer)
g (dom/$ :g (:content @this))
svg (dom/$ :svg (:content @this))
layout (.run renderer (create-multiproject-graph this) (d3-sel g))
dim (dimensions this)]
(unbind-select-project this)
(bind-select-project this)
(.attr (d3-sel svg) "width" (+ (:w dim) 20))
(.attr (d3-sel svg) "height" (+ (:h dim) 20))))The first function shows how we use dagre-D3 to create a logical dot graph representation. We basically add nodes and edges (dep→dep). Most of the code is related to what’s rendered inside each node.
The second function shows how we actually layout and display the graph. In addition we bind click handlers to our custom divs inside the nodes. The click handlers allows for drill down into a detailed graph about each dependency configuration.
End results
Figure 1. Multiproject sample : Ratpack
Figure 2. Project configuration dependencies
Conclusion
I think we achieved some pretty cool things. Maybe not a feature that you need everyday, but its certainly useful to get an overview of your project dependencies. For troubleshooting transitive dependency issues and resolution conflicts etc you might need more details though.
We have certainly showcased that you can do some really cool things with Light Table that you probably wouldn’t typically do (easily) with a lot of other editors and IDE’s. We have also dug deeper into the gradle tooling api. The gradle tooling api when maturing even more will provide some really cool new options for JVM IDE integrations. A smart move by gradleware that opens up for integrations from a range of editors, IDE’s and specialised tools and applications.
The end result of the dependency graph integration became the largest chunk of the 0.0.6 release.
A Groovy Light Table client - Step 4: Exploring new avenues with Gradle
26 May 2014
Tags: lighttable groovy gradle clojurescript
TweetBackground
This is the fourth post in my series "A Groovy Light Table client". A blog series about steps I take when trying to build a Groovy plugin for Light Table.
Initial ponderings
Gradle ships with a Tooling API that makes it fairly easily to integrate with your Gradle projects. Initially I thought that Gradle integration should be a separate plugin that other jvm language plugins could depend on, starting with the Groovy plugin. However after much deliberation I decided to start out with bundling the gradle integration with the Groovy plugin. There is certainly a degree of selecting the easy option to that decision. However I still consider the integration exploratory and I’m not sure how it will pan out. I’ve settled for a strategy of keeping it logically fairly separate, with a mind to separating gradle specifics out to its own plugin when things become clearer.
Classpath Integration for Groovy "REPL"
In part 3 I talked about some REPL like features where variables that result in bindings are stored in a editor session and used as input to the next evaluation. Since then I’ve also added the feature of caching method definitions (albeit as closures so I’m sure there are gotchas to that approach as well).
Anyways wouldn’t it be nice If I could also explore my project classes and my projects third party library dependencies in a REPL like fashion ? Hence the idea of providing a Gradle integration. With the Tooling API I should be able to retrieve a class path. So this is where i started. Before anyone potentially asking; I will not bother with maven or ant at any point in time, I’ll leave that to someone else.
Retrieving the class path as a list from a Gradle project
// Step 1: Connecting to project
def con = GradleConnector.newConnector()
.forProjectDirectory(projectDir)
.connect()
// Step 2: Get hold of a project model, for now a IdeaModel provides what we need
def ideaProject = con.model(IdeaProject)
.addProgressListener(listener)
.get()
// Step 3: Get list of dependencies
def deps = ideaProject.children
.dependencies
.flatten()
.findAll { it.scope.scope == "COMPILE" }
.collect {
[
name : it.gradleModuleVersion?.name,
group : it.gradleModuleVersion?.group,
version: it.gradleModuleVersion?.version,
file : it.file?.path,
source : it.source?.path,
javadoc: it.javadoc?.path
]
}
def classpathList = deps.file + [new File(projectDir, "build/classes/main").path]The above code is actually wrapped in a class. Connection and model instances are cached for performance reasons. We connect to our gradle project. If the project ships with a gradle wrapper (which it should IMO), the gradle connector will use that version (download the distribution even if need be). Otherwise it will use the gradle version of the tooling-api. At the time of writing that’s 1.12 The tooling api doesn’t really expose as much information by default as you might wish. However it ships with an IdeaModel and an EclipseModel that provides what we need for the purposes of creating a class path. As an Idea user the IdeaModel seemed the right choice ! There is also added a progress listener, which is a callback from the api reporting progress. The progress listener returns each progress event as a string to Light Table so that we can display progress information We basically navigate the model and extract information about dependencies and put it in a list of maps for ease of jsonifying (useful later !). The location of our projects custom compiled classes are added manually to the class path list (ideally should have been retrieved from the model as well…) Adding the class path list to our groovy shell before code invocation
private GroovyShell createShell(Map params) {
def transform = new ScriptTransform()
def conf = new CompilerConfiguration()
conf.addCompilationCustomizers(new ASTTransformationCustomizer(transform))
conf.addCompilationCustomizers(ic)
if(params.classPathList) {
conf.setClasspathList(params.classPathList)
}
new GroovyShell(conf)
}Its basically just a matter of adding the class path list to the CompilerConfiguration we initialise our GroovyShell with. Sweet ! Voila your groovy scripts can invoke any class in your project´s class path.
This addition basically resulted in version 0.0.4
Reporting progress
Groovy
class ProgressReporter implements LTProgressReporter {
final LTConnection ltCon
ProgressReporter(LTConnection ltCon) { this.ltCon = ltCon }
@Override
void statusChanged(ProgressEvent event) {
if (event.description?.trim()) {
reportProgress(event.description)
}
}
void reportProgress(String message) {
ltCon.sendData([null, "gradle.progress",[msg: message]])
}
}Notes
-
statusChanges is called by gradle (LTProgressReporter extends the Gradle ProgressListener interface)
-
reportProgress sends the progress information to Light Table
Light Table
(behavior ::on-gradle-progress
:desc "Reporting of progress from gradle related tasks"
:triggers #{:gradle.progress}
:reaction (fn [this info]
(notifos/msg* (str "Gradle progress: " (:msg info)) {:timeout 5000})))The progress behaviour just prints a message to the Light Table status bar.
Executing Gradle Tasks
There are two parts to this puzzle. One is to retrieve information about what tasks are actually available for the given project. The other is to actually invoke the task (tasks in the future). Listing tasks Groovy/Server
// Step 1: Retrieve generic Gradle model
def gradleProject = con.model(GradleProject)
.addProgressListener(listener)
.get()
// Step 2: Get list of available tasks
gradleProject.tasks.collect{
[
name: it.name,
displayName: it.displayName,
description: it.description,
path: it.path
]
}
// Step 3: Send task list to client (omitted, you get the general idea by now !)Listing tasks in Light Table
The list of tasks is actually retrieved by the Light Table plugin once you select to connect to a gradle project. Furthermore the list is cached in an atom.
(behavior ::on-gradle-projectinfo
:desc "Gradle project model information"
:triggers #{:gradle.projectinfo}
:reaction (fn [this info]
(object/merge! groovy {::gradle-project-info info})
(object/assoc-in! cmd/manager [:commands :gradle.task.select :options] (add-selector))))When the groovy server has finished retrieving the tasks (and other project info) the above behaviour is triggered in Light Table:
We store the project info in our Groovy object (an atom) We also update the command for selecting tasks with the new list of tasks. See the section below for details.
(behavior ::set-selected
:triggers #{:select}
:reaction (fn [this v]
(scmd/exec-active! v)))
(defn selector [opts]
(doto (scmd/filter-list opts)
(object/add-behavior! ::set-selected)))
(defn get-tasks []
(->@groovy ::gradle-project-info :tasks))
(defn add-selector []
(selector {:items (get-tasks)
:key :name
:transform #(str "<p>" (:name %4) "</p>"
"<p class='binding'>" (:description %4) "</p>")}))
(cmd/command {:command :gradle.task.select
:desc "Groovy: Select Gradle task"
:options (add-selector)
:exec (fn [item]
(object/raise groovy :gradle.execute item))})The above code adds a sub panel to the default sidebar command panel. When you select the command :gradle.task.select it will show a child panel listing the tasks from the get-tasks function.

;; Behavior to actually trigger execution of a selected task from the list above
(behavior ::on-gradle-execute
:desc "Gradle execute task(s)"
:triggers #{:gradle.execute}
:reaction (fn [this task]
(clients/send
(clients/by-name "Groovy")
:gradle.execute
{:tasks [(:name task)]})))Once you have selected a task the above behaviour is triggered. We get hold of an editor agnostic groovy client and send an execute task message with a list of task (currently always just one). The data we send will be extended in the future to support multiple tasks and build arguments.
Server side Task execution
// Generic execute task function
def execute(Map params, Closure onComplete) {
def resultHandler = [
onComplete: {Object result ->
onComplete status: "OK"
},
onFailure: {GradleConnectionException failure ->
onComplete status: "ERROR", error: failure
}
] as ResultHandler
con.newBuild()
.addProgressListener(listener)
.forTasks(params.tasks as String[])
.run(resultHandler)
}Here we use the asynch features of the Gradle Tooling API. Executing a task may actually take a while so it certainly makes sense. Callers of the execute method will receive a callback (onComplete) once task execution is completed successfully (of failed).
projectConnection.execute(params) {Map result ->
ltConnection.sendData([
null,
result.status == "ERROR" ? "gradle.execute.err" : "gradle.execute.success",
result
])
}We invoke the execute method with a closure argument and return the results (success/failure) back to Light Table.
This brings us pretty much up to version 0.0.5
Summary
Well we covered a lot of ground here. We can now call any class that’s in your Gradle project’s class path from a groovy editor in Light Table. We’ve also started on providing Gradle features that are language agnostic. Starting with support for listing and executing tasks in your gradle project. We’ve added decent progress reporting and performance seems to be pretty good too. Looks like we have something we can build further upon !
I have lots of ideas; Infinitesting, single test with inline results, compile single file, grails integration ? etc etc. I also really want to show project dependencies in a graph. However before I can do any of those things I need to extend the tooling api with custom models … and/or maybe I should see if I can contribute to the gradle project in extending the tooling-api with a richer generic project model.
We’ll have to wait and see. Next week I’m off to gr8conf.eu in Copenhagen. Really looking forward to meeting up with all the great Groovy dudes/dudettes. And who knows maybe the hackergarten evening will result in something new and exciting !
Groovy Light Table Plugin
19 May 2014
Tags: lighttable clojurescript groovy screencast
TweetA short demonstration of the repl like capabilities of my Light Table Groovy plugin (https://github.com/rundis/LightTable-Groovy)
A Groovy Light Table client - Step 3: Running out of quick wins
12 May 2014
Tags: lighttable groovy clojurescript
TweetBackground
This is the third post in my series "A Groovy Light Table client". A blog series about steps I take when trying to build a Groovy plugin for Light Table.
Running out of quick wins
After 0.0.2 of the plugin was released I was pretty happy. I had something that I could actually use as an alternative Groovy Console. However I was keen to keep up the flow so I figured I would try to implement an autocomplete feature. The task proved rather daunting. Not so much from the Light Table side of things, but rather from the Groovy side. First I tried to see if I could reuse anything from GroovySh, but that didn’t look to promising. After that I tried to get my head around whether I could somehow reuse something from IntelliJ or Eclipse. I failed to see the light so I gave up that endeavour. Secondly I tried to see if there was an easy way to provide an inline documentation feature. Sadly I couldn’t find much reusable and something with a small foot print here either. Someone should make a REST based doc search feature for Groovy Docs one day !
I turned my attention to a couple of other plugins that I thought would be useful for Light Table. I created a Buster.JS plugin InstaBuster for easily running JavaScript tests. I also created a snippets/code templates plugin lt-snippets and some snippet collections, among them a small collection of groovy snippets.
There is just no way I could ever compete with the mainstream IDE’s, but then again that was never really the original intention. But even with limited capacity it should still be possible to provide useful groovy support and maybe even something fairly unique within the super hackable framework of Light Table.
A (small) step towards a Groovy REPL
After working with Light Table and the Clojure/ClojureScript REPL I have grown very fond of that exploratory nature of working. Is there anything I could do with the plugin to give a more REPL like feel ? Well a small but helpful step would be to be able to remember what I previously have evaluated …
Groovy Bindings
A simple but still useful mechanism would be to cache bindings from script execution between evals.
// from the evalGroovy method
def evalResult = scriptExecutor.execute(data.code, clientSessions.get(currentClientId))
clientSessions.put(currentClientId, evalResult.bindings)Each editor in Light Table gets it’s own unique Id. So I just created a simple cache "ClientSessions" that hold a map of binding variables, mapped my that Id. When executing a script the current binding variables are applied to the script and after the script has executed the resulting binding variables are added/replaced in the cache. Dead simple really.
Clearing bindings - Light Table
I figured it would be handy to be able to clear any stored bindings. So a new command and behaviour was created in Light Table
;; Behavior for clearing bindings
(behavior ::on-clear-bindings
:desc "Clear cached bindings for this editor"
:triggers #{:on.clear.bindings}
:reaction (fn [editor]
(let [info (:info @editor)
cl (eval/get-client! {:command :editor.clear.groovy
:origin editor
:info info
:create try-connect})]
(clients/send cl
:editor.clear.groovy info
:only editor))))
;; Command that allows a new keyboard bindable action for invoking the behaviour above
(cmd/command {:command :clear-bindings
:desc "Groovy: Clear bindings for current editor"
:exec (fn []
(when-let [ed (pool/last-active)]
(object/raise ed :on.clear.bindings)))})The command retrieves the currently active editor and triggers the behaviour. The behaviour retrieves a client connection (or creates one if one shouldn’t exist) and calls the server (groovy).
// Wiring up the behaviour in groovy.behaviors
:editor.groovy [:lt.plugins.groovy/on-eval
:lt.plugins.groovy/on-eval.one
:lt.plugins.groovy/on-clear-bindings
:lt.plugins.groovy/groovy-res
:lt.plugins.groovy/groovy-err
[:lt.object/add-tag :watchable]]The final piece of the puzzle from the Light Table side is to attach the behavior to the :editor.groovy tag. This enables the behavior to be available from any editor that is tagged with this tag.
Clearing bindings - Groovy
// The command dispatch got a new command
case "editor.clear.groovy":
clientSessions.clear(currentClientId)
break;The code above will just nuke any stored binding variables.
Conclusions
A tiny step that allows you to eval groovy expressions step by step. Anything that results in a binding is stored between evals. Obviously it’s a bit limited in that you’ll run into the familiar trap of trying to use def and be surprised(/annoyed) that it won’t remember that or if you define a class it won’t remember that either. It’s probably possible to cater for some of these traps, but maybe not within the realms of a quick win.
Anyways the end result is Version 0.0.3 !
Next steps
Firstly there is a Screencast brewing. After that I think a Light Table Gradle plugin is coming before the Groovy plugin gets any further updates. A pluggable Gradle plugin would enable the Groovy plugin to quite easily get the class path for you project. This would allow you to explore your projects code in a REPL (-like) way. Exploratory testing FTW !
Creating and using snippets in Light Table
06 May 2014
Tags: lighttable plugin clojure clojurescript screencast
TweetA short introduction to my Light Table Snippets plugin (https://github.com/rundis/lt-snippets).
JavaScript testing with Light Table and Buster.JS
21 April 2014
Tags: lighttable clojurescript javascript screencast
TweetSecond part of the intro to the Light Table Buster plugin (https://github.com/busterjs/lt-instabuster) This time demonstrating some of the more advanced features.
JavaScript testing with Light Table and Buster.JS
17 March 2014
Tags: lighttable clojurescript javascript screencast
TweetIntro to the Light Table Buster plugin (https://github.com/busterjs/lt-instabuster)
A Groovy Light Table client - Step 2: Evaluating Code
23 February 2014
Tags: lighttable groovy clojurescript
TweetBackground
This is the second post in my series "A Groovy Light Table client". A blog series about steps I take when trying to build a Groovy plugin for Light Table.
In this post I will take you through some of the steps I went through to get Light Table to evaluate groovy (script) code and show results inline in the editor.
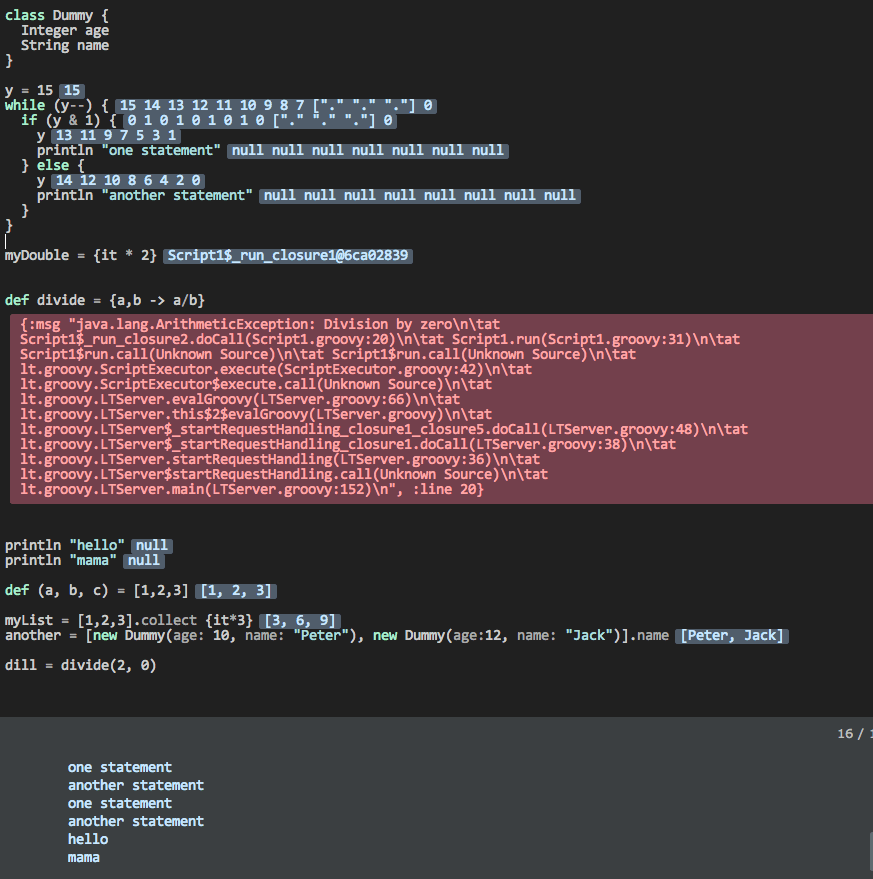
How did we get here ?
Evaluate contents of editor (cmd/ctrl + shift + enter)
(behavior ::on-eval
:desc "Groovy: Eval current editor"
:triggers #{:eval}
:reaction (fn [editor]
(object/raise groovy :eval! {:origin editor
:info (assoc (@editor :info)
:code (ed/->val editor)
:meta {:start 0, :end (ed/last-line editor)})})))This behavior triggers on ":eval", which is triggered to any editor (on cmd/ctrl + shift + enter in default key mapping). We just get hold of the text from the editor and gather some meta info and trigger a ":eval!" behavior on the groovy "mother" object defined in the previous blog post.
Evaluate current line/selection
(behavior ::on-eval.one
:desc "Groovy: Eval current selection"
:triggers #{:eval.one}
:reaction (fn [editor]
(let [pos (ed/->cursor editor)
info (conj (:info @editor)
(if (ed/selection? editor)
{:code (ed/selection editor) :meta {:start (-> (ed/->cursor editor "start") :line)
:end (-> (ed/->cursor editor "end") :line)}}
{:pos pos :code (ed/line editor (:line pos)) :meta {:start (:line pos) :end (:line pos)}}))]
(object/raise groovy :eval! {:origin editor :info info}))))The only difference here is that we gather the code for the current line or current selection. Then we trigger the same behavior as for evaluating the whole editor.
Our groovy Eval!
(behavior ::eval!
:triggers #{:eval!}
:reaction (fn [this event]
(let [{:keys [info origin]} event
client (-> @origin :client :default)]
(notifos/working "Evaluating groovy...")
(clients/send (eval/get-client! {:command :editor.eval.groovy
:origin origin
:info info
:create try-connect})
:editor.eval.groovy info
:only origin))))This behavior is what actually sends off a eval request to the groovy client. Quite a lot happens under the hood (by help of inbuilt LightTable behaviors):
It tries to find a client (connection) for the editor If no connection exists it will try to create a new one. On create it will invoke the try-connect function that we defined for the gui connect/connect bar behavior in the previous blog post Once connected it will jsonify our parameters and send them off to our groovy client
The JSON might look something like:
[89,
"editor.eval.groovy",
{"line-ending":"\n",
"name":"sample.groovy",
"type-name":"Groovy",
"path":"/Users/mrundberget/Library/Application Support/LightTable/plugins/Groovy/sample.groovy",
"mime":"text/x-groovy",
"tags":["editor.groovy"],
"code":"println \"hello\"",
"meta":{"start":22,"end":22}}]Notes
-
The first param is the client id for the editor that triggered the behavior. This client Id doesn’t represent the same as a connection id (ref previous blog post). Many editors may share the same connection !
-
The second param is the command (our groovy client will of course support many different commands, this is one of them)
-
The third and last parameter is our info. The code is the essential bit, but some of the meta information, like line info comes in handy when handling the response later on
The actual groovy evaluation
Command dispatch
ltClient.withStreams { input, output ->
try {
input.eachLine { line ->
def (currentClientId, command, data) = new JsonSlurper().parseText(line)
switch (command) {
case "client.close":
stop()
break
case "editor.eval.groovy":
evalGroovy(data, currentClientId)
break
default:
log "Invalid command: $command"
}
// ...We parse any lines received from Light Table and based on the command received invokes the appropriate handler. In this case evalGroovy.
Eval groovy
private void evalGroovy(data, currentClientId) {
def evalResult = scriptExecutor.execute(data.code)
def resultParams = [meta: data.meta]
if (evalResult.out) {
resultParams << [out: evalResult.out]
}
if(evalResult.exprValues) {
resultParams << [result: convertToClientVals(evalResult.exprValues)]
}
if (!evalResult.err) {
data = [currentClientId?.toInteger(), "groovy.res", resultParams]
} else {
data = [currentClientId?.toInteger(), "groovy.err", [ex: evalResult.err] + resultParams]
}
sendData data
}The first and most significant line is where we evaluate the groovy code received. This post would be too long if we went into all the details of what it does, but here’s a high-level summary:
We basically create a GroovyShell and compile our code to a script. Normally that would just compile a Script class. However we wish to collect a lot more information than you typically would get from default groovy script execution. So we do an AST transformation on the script class and add a custom abstract script class as a base class for the compiled script class. This allows us to inject behavior and wrap statement execution (all compiled into the script for optimal performance). That way we are able to collect information about values for most types of statements. We collect line number and value (each line could end up having many values :-) ) We run the script (capturing system.out and system.err).
The function returns:
-
Anything written to standard out (println etc)
-
Errors if any and line number for error where possible
-
A list for of maps with line number and value(s)
Most of the AST stuff is not something I’ve written. It’s been contributed by Jim White after I posted a question on the groovy-user mailing list. I asked for advice on which way to proceed and the response from the groovy community was awesome. Jim in particular was more than eager to contribute to the plugin. OpenSource rocks ! So when I say we, I sometimes mean we literally.
Anyways, based on the results of the script execution we notify Light Table to trigger either a ":groovy.res" behavior or a "groovy.err" behavior.
The json response for sendData for a successful execution might look something like:
[89,
"groovy.res",
{"meta":{"start":22,"end":23},"out":"hello\nmama\n","result":[{"line":1,"values":["null"]},{"line":2,"values":["null"]}]}]Handling the evaluation results in Light Table
(defn notify-of-results [editor res]
(doseq [ln (:result res)]
(let [lineNo (+ (:line ln) (-> res :meta :start) -1)]
(object/raise editor :editor.result (clojure.string/join " " (:values ln)) {:line lineNo :start-line lineNo}))))
(behavior ::groovy-res
:triggers #{:groovy.res}
:reaction (fn [editor res]
(notifos/done-working)
(when-let [o (:out res)] (.log js/console o))
(notify-of-results editor res)))
(defn notify-of-error [editor res]
(let [lineNo (+ (-> res :ex :line) (-> res :meta :start) -1)]
(object/raise editor :editor.exception (:ex res) {:line lineNo :start-line lineNo'})))
(behavior ::groovy-err
:triggers #{:groovy.err}
:reaction (fn [editor res]
(object/raise editor :groovy.res res)
(notify-of-error editor res)))These are the behavior definitions that handles either successful or evaluation of scripts with errors. Basically we: Print to the Light Table Console anything that was captured to system.out/system.err by our groovy evaluation Show inline results for each line, multiple results for a line are space separated. For showing inline results we are using a predefined Light Table behavior (:editor.result) If the behavior is to handle an error, we show evaluation results up until the script exception. In addition we display details (stack trace) for the exception at the line in the script it occurred
Wiring it all up
groovy.behaviors
{:+ {:app [(:lt.objs.plugins/load-js ["codemirror/groovy.js", "groovy_compiled.js"])]
:clients []
:editor.groovy [:lt.plugins.groovy/on-eval
:lt.plugins.groovy/on-eval.one
:lt.plugins.groovy/groovy-res
:lt.plugins.groovy/groovy-err
[:lt.object/add-tag :watchable]]
:files [(:lt.objs.files/file-types
[{:name "Groovy" :exts [:groovy] :mime "text/x-groovy" :tags [:editor.groovy]}])]
:groovy.lang [:lt.plugins.groovy/eval!
:lt.plugins.groovy/connect]}}The eval and results/err behaviors are defined for the editor tag. So they are only applicable for editors marked as groovy editors. Any editor open with a file name ending in .groovy will automatically be attached to a editor.groovy tag. (You can also set it manually cmd+space → "Editor: Set current editor syntax"). The ":eval!" behavior is defined for the :groovy.lang tag. Its tied to our groovy mother object just like the connect behavior. These behaviors are totally groovy client specific, whilst the other behaviors are less so (although not exactly generic as they are now…)
Wrap up
A little bit of plumbing was needed to get this set up. But the hard parts was really coming up with the groovy AST transformation stuff. I guess by now you might have started getting an inkling that Light Table is fairly composable ? It really is super flexible. You don’t like the behavior for handling inline results for the groovy plugin ? You could easily write your own and wire it up in your user.behaviors file in Light Table. It’s wicked cool, actually it really is your editor !
Yesterday I released version 0.0.2 of the Groovy LightTable plugin. Its available through the Light Table plugin manager, or if you wish to play with the code or maybe feel like contributing feel free to fork the repo at : https://github.com/rundis/LightTable-Groovy. Pull requests are welcome.
So where to next ? I’d really like to try and create an InstaRepl editor for the plugin. A groovy script editor that evaluates code as you type. There’s gotta be one or two challenges related to that. A quick win might be to provide groovy api documentation from inside Light Table. I’ll let you know what happens in the next post.
|
Note
|
Disclaimer: I might have misunderstood some nuances of Light Table, but hopefully I’m roughly on track. If you see anything glaringly wrong, do let me know. |
A Groovy Light Table client - Step 1: Connecting the client
16 February 2014
Tags: lighttable groovy clojurescript
TweetBuilding a plugin in Light Table
This is the first post in (hopefully) a series of blog posts about the various steps I go through when trying to create a plugin for Light Table. I have decided to try to create a Groovy plugin. I chose Groovy to ensure there was at least one technology fairly familiar to me. I have just started using Light Table, I have no previous experience with ClojureScript and I have just recently started writing some Clojure beyond the basic tutorials.
The short term goal is for the plugin to provide inline results and maybe an instarepl of some sort for groovy scripts.
LightTable-Groovy is the name of my plugin project and you can find the latest source there. It might be a couple of steps ahead of the blog posts though !
Documentation
Light Table was made open source in january and documentation for plugin developers is a little sparse.
So to have something to go by I decided to use some of the other language plugins as inspiration:
-
Python plugin (comes bundled/under the light table umbrella)
I haven’t worked with any of the above mentioned languages, but they did provide enough inspiration to deduce how a Light Table client might interact.
BTW. A quick starter just to get you up an running with a hello world plugin could be this screen cast by Mike Haney.
Connecting a client - Process overview
Before we dwelve into the code It’s a good idea to have a high level understanding of what we are trying to achieve !
A couple of use cases that needs to be supported:
-
Evaluate current selection or current line of groovy code and present results (preferably inline)
-
Evaluate contents of current editor and present results
-
Provide as much info about the results of each statement as possible
-
(Maybe need to evaluate line/statement by statement)
For a future instarepl, any change in the editor will trigger an evaluation It becomes evident that our plugin needs to provide some kind of process that reacts to events from light table.
A default pattern for achieving this has been devised for Light Table and roughly equates to the following steps:
-
A connect event is triggered from Light Table (you need to set up your plugin to trigger that event…). Typically the connect event can be invoked manually from the connect bar in light table, or it can be triggered implicetly when evaluating code.
-
You fire of a process - Using inbuilt support from Light Table you start a process either a shell script or whatever really. I created a shell script that sets some environment stuff and then basically kicks off a groovy script. Light table provides a tcp/ip port and a unique client id which you need to forward to the process.
-
Create a tcp client: In your process you create a tcp client using the given port
-
Send ack message: Send a json message with client id and an event name (behavior) to Light Table (through the tcp connection!)
-
Confirm handshake for process: In your process (i.e. not the tcp connection!) write "Connected" to standard out. ("Connected" is just what the other plugins use, you could use anything you like as long as it matches the connect behaviors(handlers) you provide inside light table.)
-
Listen for events: Now you are connected and given you have set up your behaviors in Light Table correctly, your new connection should be reported as connected and shown in the Light Table connect bar. Now you listen for events on your tcp client and provides appropriate responses back to Light Table accordingly. (Handling this is the subject of a future blog post)
Behaviors for connecting (from groovy.cljs):
(defn run-groovy[{:keys [path name client] :as info}]
(let [obj (object/create ::connecting-notifier info)
client-id (clients/->id client)
project-dir (files/parent path)]
(object/merge! client {:port tcp/port
:proc obj})
(notifos/working "Connecting..")
(proc/exec {:command binary-path
:args [tcp/port client-id project-dir]
:cwd plugin-dir
:env {"GROOVY_PATH" (files/join (files/parent path))}
:obj obj})))
(defn check-groovy[obj]
(assoc obj :groovy (or (::groovy-exe @groovy)
(.which shell "groovy"))))
(defn check-server[obj]
(assoc obj :groovy-server (files/exists? server-path)))
(defn handle-no-groovy [client]
(clients/rem! client)
(notifos/done-working)
(popup/popup! {:header "We couldn't find Groovy."
:body "In order to evaluate in Groovy files, Groovy must be installed and on your system PATH."
:buttons [{:label "Download Groovy"
:action (fn []
(platform/open "http://gvmtool.net/"))}
{:label "ok"}]}))
(defn notify [obj]
(let [{:keys [groovy path groovy-server client]} obj]
(cond
(or (not groovy) (empty? groovy)) (do (handle-no-groovy client))
:else (run-groovy obj))
obj))
(defn check-all [obj]
(-> obj
(check-groovy)
(check-server)
(notify)))
(defn try-connect [{:keys [info]}]
(.log js/console (str "try connect" info))
(let [path (:path info)
client (clients/client! :groovy.client)]
(check-all {:path path
:client client})
client))
(object/object* ::groovy-lang
:tags #{:groovy.lang})
(def groovy (object/create ::groovy-lang))
(scl/add-connector {:name "Groovy"
:desc "Select a directory to serve as the root of your groovy project... then again it might not be relevant..."
:connect (fn []
(dialogs/dir groovy :connect))})
(behavior ::connect
:triggers #{:connect}
:reaction (fn [this path]
(try-connect {:info {:path path}})))Notes:
-
scl/add-connector: This statement adds a connect dialog to our groovy plugin. You select a root directory and upon selection the ::connect behavior is triggered
-
::connect basically responds with invoking a method for connecting. This does some sanity checks and if all goes well ends up invoking run-groovy.
-
run-groovy : Fires up our groovy (server) process
-
def groovy is basically the "mother" object of our plugin. It helps us scope behaviors and commands
The server part (LTServer.groovy)
import groovy.json.*
params = [
ltPort: args[0].toInteger(),
clientId: args[1].toInteger() // light table generated id for the client (connection)
]
logFile = new File("server.log")
def log(msg) {
logFile << "${new Date().format('dd.MM.yyyy mm:hh:sss')} - $msg\n"
}
client = null
try {
client = new Socket("127.0.0.1", params.ltPort)
} catch (Exception e) {
log "Could not connect to port: ${params.ltPort}"
throw e
}
def sendData(data) {
client << new JsonBuilder(data).toString() + "\n"
}
// ack to Light Table
sendData (
[
name: "Groovy",
"client-id": params.clientId,
dir: new File("").absolutePath,
commands: ["editor.eval.groovy"],
type: "groovy"
]
)
println "Connected" // tells lighttable we're good
client.withStreams {input, output ->
while(true) {
// insert code to listen for events from light table and respond to those (eval code etc)
}
}Notification of successful connection
(behavior ::on-out
:triggers #{:proc.out}
:reaction (fn [this data]
(let [out (.toString data)]
(object/update! this [:buffer] str out)
(if (> (.indexOf out "Connected") -1)
(do
(notifos/done-working)
(object/merge! this {:connected true}))
(object/update! this [:buffer] str data)))))
(behavior ::on-error
:triggers #{:proc.error}
:reaction (fn [this data]
(let [out (.toString data)]
(when-not (> (.indexOf (:buffer @this) "Connected") -1)
(object/update! this [:buffer] str data)
))
))
(behavior ::on-exit
:triggers #{:proc.exit}
:reaction (fn [this data]
;(object/update! this [:buffer] str data)
(when-not (:connected @this)
(notifos/done-working)
(popup/popup! {:header "We couldn't connect."
:body [:span "Looks like there was an issue trying to connect
to the project. Here's what we got:" [:pre (:buffer @this)]]
:buttons [{:label "close"}]})
(clients/rem! (:client @this)))
(proc/kill-all (:procs @this))
(object/destroy! this)
))
(object/object* ::connecting-notifier
:triggers []
:behaviors [::on-exit ::on-error ::on-out]
:init (fn [this client]
(object/merge! this {:client client :buffer ""})
nil))The above behaviors basically handles signaling success, error or connection exits for our groovy client. As you can see in ::on-out this is where we check standard out from the process for the string "Connected", to signal success.
Wiring up behaviors (behaviors.groovy)
{:+ {:app [(:lt.objs.plugins/load-js ["codemirror/groovy.js", "groovy_compiled.js"])]
:clients []
:editor.groovy []
:files [(:lt.objs.files/file-types
[{:name "Groovy" :exts [:groovy] :mime "text/x-groovy" :tags [:editor.groovy]}])]
:groovy.lang [:lt.plugins.groovy/connect]}}The important part in terms on the connection is the wiring of the connect behavior to ":groovy.lang". This is needed for groovy to appear as a connection item in the light table connect bar.
"codemirror/groovy.js" deserves a special mention. This is what provides syntax highlighting for our groovy files (defined in the :files vector). The syntax highlighting is provided by the groovy mode module from CodeMirror.
Wrapping up
So what have we achieved. Well we now have a connection to Light Table from an external process that can listen and respond to events from Light Table. For the purposes of this blog post series, its a Groovy client that hopefully pretty soon will be able to evaluate groovy scripts and respond with evaluation results. We didn’t pay much attention to it, but we also got syntax highlighting of our Groovy files complements of CodeMirror.
It took a while to grok how the connection part worked. Once I did understand roughly what was needed I was a bit annoyed with myself for messing about so much. I’m hoping this post might help others to avoid some of the mistakes I stumbled into.
Javascript testing in your JVM projects using Gradle and BusterJS
19 August 2013
Tags: gradle groovy javascript buster screencast
TweetIntroduction
When I first started looking at testing in javascript land a while back I quickly felt lost in space.
Filled with questions like;
-
which framework(s) to choose ?
-
how do I get framework x to work from my IDE ?
-
more importantly how to I manage to include the javascript tests in my CI builds ?
-
how can I avoid repetitive setup pain across projects ?
-
why is it such a hassle getting started ?
I can’t say I have answered any of the questions above fully, but I have taken some strides in the right direction.
Buster.JS
Buster is a flexible and modularized framework for writing and running your JavaScript tests. There are others out there, but from what I could gather and based on advice from my frontend wizard colleagues I decided to give it a good go. It’s still in beta, but from my experiences so far its more than mature enough for proper use in projects.
A few important aspects about Buster.JS:
Tests are run in real browsers (phantomjs for headless). No emulation bull You can run tests in multiple browsers in parallell Its really really fast Write tests in the fashion that suits you (xUnit or spec) Nice assertion library and integrated with Sinon.JS (powerful stubbing and spying) … and lots more
Gradle buster plugin
For my jvm project builds I use Gradle. Maven and Ant projects that spend time with me a few weeks tend to find themselves converted. So I set out to create a buster plugin for gradle, aptly named gradle-buster-plugin. Still early days, but already it has started to prove quite valuable.
The plugin has two high-level goals;
-
Allow you to easily run javascripts as part of your CI builds
-
Provide you with a smooth development experience by adding value on top of whats already present in Buster.JS.
The homepage for the pluging is here: https://github.com/rundis/gradle-buster-plugin
What do I have to do ? (aka getting started)
Installing preconditions
-
Install node.js/npm - Mac: $ brew install node
-
Install Buster.JS - $ npm install buster -g
-
Install Phantom.JS - Mac: $ brew install phantomjs
Set up the buster plugin in your gradle config
buildscript {
repositories { jcenter() }
dependencies {
classpath 'org.gradle.buster:gradle-buster-plugin:0.2.4.1'
}
}
apply plugin: 'war' // just assuming you have a war project
apply plugin: 'buster'
build.dependsOn busterTest // hook up javascript task in the buildSet up a buster.js configuration file
var config = module.exports;
config["Sample JSTests"] = {
environment: "browser",
libs: ["src/main/webaapp/js/libs/jquery-1.10.2.js"],
sources: ["src/main/web-app/js/app/**/*.js"],
tests: ["src/test/js/**/*-test.js"]
};Sample unit
So you could create a file like src/main/webapp/js/app/dummy-service.js
var myapp = this.myapp || {};
myapp.services = app.services || {};
(function () {
myapp.services.DummyService = function (my) {
my.listTodos = function(success, error) {
$.get('/todos/list')
.done(function(data) {
success(data);
})
.fail(function(jqXHR, textStatus, errorThrown) {
error("Error getting todos")
});
};
return my;
}(myapp.services.DummyService || {});
}());Sample unit test
Create a corresponding unit test in src/test/js/app/dummy-service-test.js
(function () {
buster.testCase("DummyService", {
setUp: function() {
this.service = myapp.services.DummyService;
this.server = sinon.fakeServer.create();
this.success = this.spy();
this.error = this.spy();
},
tearDown: function () {
this.server.restore();
},
"should successfully list todos": function () {
this.service.listTodos(this.success, this.error);
this.server.requests[0].respond(
200,
{ "Content-Type": "application/json" },
JSON.stringify([{ id: 1, text: "Provide examples", done: true }])
);
assert.calledOnce(this.success);
},
"should invoke error callback on errors": function () {
this.service.listTodos(this.success, this.error);
this.server.requests[0].respond(
500,
{ "Content-Type": "application/json" },
JSON.stringify([{ id: 1, text: "dummy", done: true }])
);
assert.calledOnce(this.error);
}
});
}());Running the tests locally
$ gradle busterTestTest results are found in : build/busterTest-results/bustertests.xml
Autotesting When doing your tdd cycles its quite useful to use the autotest feature (kinda like infinitest).
$ gradle busterAutoTestWill leave the server running and listen for file changes in the patterns specified by the buster.js file above. So if I change the test or unit above a test run will automatically be fired off and results reported to the console. Its pretty fast so you should be able to keep a good flow going ! Just do Ctrl + C to kill the autotesting.
Multiple browsers Its quite easy to set up just see the readme for the plugin
CI Server Obviously you will need to set up the preconditions. If you’re server isn’t headless you have the option of testing with a few proper browsers(firefox and chrome on linux, safari if your server is mac… which I doubt).
Conclusion
Its certainly not perfect, but with the above you have a pretty good start. Once you get over the hurdle of setting up the preconditions it really is quite pleasant to work with. You should be amazed by the performance of the tests runs if you are from a jvm background. What about IDE integration ? With the autotest feature I can’t say I have missed it much. I have my IDE and a visible console available and get instant feedback on saves in my IDE.
Smooth !
Older posts are available in the archive.